How to Wire a 24LC256 EEPROM
Welcome to our guide on how to wire a 24LC256 EEPROM! EEPROM, which stands for Electrically Erasable Programmable Read-Only Memory, is a type of non-volatile memory that can store data even when the power is turned off. The 24LC256 is a popular EEPROM chip manufactured by Microchip Technology that has a capacity of 256 kilobits, or 32 kilobytes, of memory.
Wiring a 24LC256 EEPROM is a straightforward process that involves connecting the chip to a microcontroller or other device using standard communication protocols. In this guide, we will walk you through the steps to wire a 24LC256 EEPROM to an Arduino microcontroller.
Materials Needed:
- 24LC256 EEPROM chip
- Arduino Uno microcontroller
- Breadboard
- Jumper wires
- USB cable
Step 1: Gather Your Materials
Before you begin wiring your 24LC256 EEPROM, make sure you have all the necessary materials listed above. Having everything ready will make the process much smoother.
Step 2: Connect the 24LC256 EEPROM to the Arduino
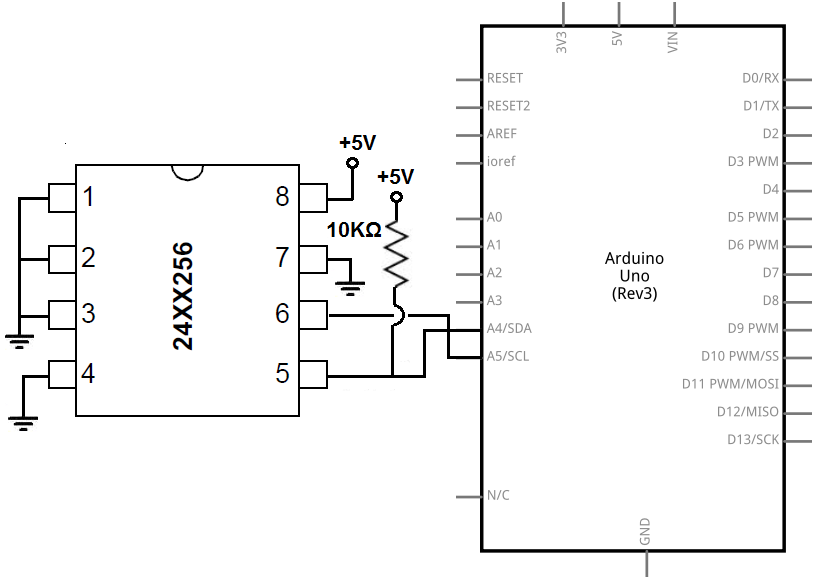
First, connect the 24LC256 EEPROM chip to the Arduino Uno microcontroller. You will need to connect the following pins:
VCC – Connect this pin to the 5V pin on the Arduino.
GND – Connect this pin to any GND pin on the Arduino.
SDA – Connect this pin to the A4 pin on the Arduino.
SCL – Connect this pin to the A5 pin on the Arduino.
Step 3: Write Code to Interact with the EEPROM
Now that you have wired the 24LC256 EEPROM to the Arduino, you will need to write code to interact with the chip. You can use the Wire library in the Arduino IDE to communicate with the EEPROM using I2C protocol.
Here is an example code snippet that reads and writes data to the 24LC256 EEPROM:
#include <Wire.h>

void setup() {
  Wire.begin();
}

void loop() {
  Wire.beginTransmission(0x50);
  Wire.write(0);
  Wire.write("Hello, World!");
  Wire.endTransmission();
}
Step 4: Test Your Connection
After writing the code, upload it to your Arduino and open the Serial Monitor. You should see the message “Hello, World!” being written to the EEPROM. This confirms that your wiring is correct and the communication with the EEPROM is successful.
Conclusion
Congratulations! You have successfully wired a 24LC256 EEPROM to an Arduino and written data to the chip. EEPROMs are versatile memory devices that can be used in a wide range of applications, from storing configuration settings to logging sensor data. We hope this guide has been helpful in getting you started with using EEPROMs in your projects.
How to Wire a 24LC256 EEPROM
Welcome to our guide on how to wire a 24LC256 EEPROM! EEPROM, which stands for Electrically Erasable Programmable Read-Only Memory, is a type of non-volatile memory that can store data even when the power is turned off. The 24LC256 is a popular EEPROM chip manufactured by Microchip Technology that has a capacity of 256 kilobits, or 32 kilobytes, of memory.
Wiring a 24LC256 EEPROM is a straightforward process that involves connecting the chip to a microcontroller or other device using standard communication protocols. In this guide, we will walk you through the steps to wire a 24LC256 EEPROM to an Arduino microcontroller.
Materials Needed:
- 24LC256 EEPROM chip
- Arduino Uno microcontroller
- Breadboard
- Jumper wires
- USB cable
Step 1: Gather Your Materials
Before you begin wiring your 24LC256 EEPROM, make sure you have all the necessary materials listed above. Having everything ready will make the process much smoother.
Step 2: Connect the 24LC256 EEPROM to the Arduino
First, connect the 24LC256 EEPROM chip to the Arduino Uno microcontroller. You will need to connect the following pins:
VCC – Connect this pin to the 5V pin on the Arduino.
GND – Connect this pin to any GND pin on the Arduino.
SDA – Connect this pin to the A4 pin on the Arduino.
SCL – Connect this pin to the A5 pin on the Arduino.
Step 3: Write Code to Interact with the EEPROM
Now that you have wired the 24LC256 EEPROM to the Arduino, you will need to write code to interact with the chip. You can use the Wire library in the Arduino IDE to communicate with the EEPROM using I2C protocol.
Here is an example code snippet that reads and writes data to the 24LC256 EEPROM:
#include <Wire.h>

void setup() {
  Wire.begin();
}

void loop() {
  Wire.beginTransmission(0x50);
  Wire.write(0);
  Wire.write("Hello, World!");
  Wire.endTransmission();
}
Step 4: Test Your Connection
After writing the code, upload it to your Arduino and open the Serial Monitor. You should see the message “Hello, World!” being written to the EEPROM. This confirms that your wiring is correct and the communication with the EEPROM is successful.
Conclusion
Congratulations! You have successfully wired a 24LC256 EEPROM to an Arduino and written data to the chip. EEPROMs are versatile memory devices that can be used in a wide range of applications, from storing configuration settings to logging sensor data. We hope this guide has been helpful in getting you started with using EEPROMs in your projects.