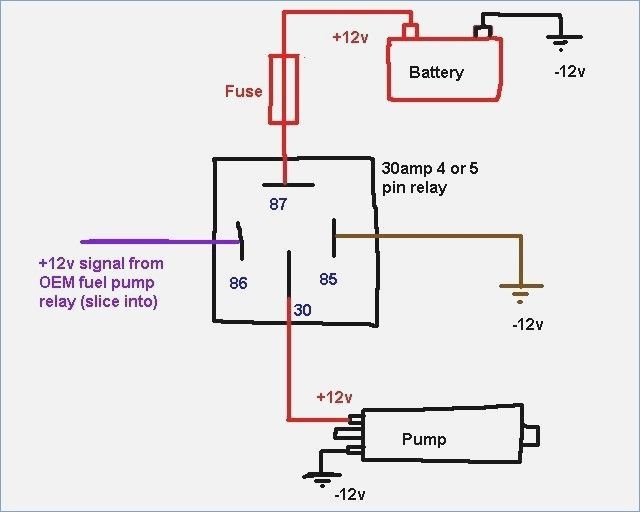
How to Wire a 12V Relay
When it comes to controlling high-voltage circuits with low-voltage signals, a relay is an essential component. A 12V relay is commonly used in automotive applications, home automation systems, and industrial control panels. In this article, we will guide you on how to wire a 12V relay to ensure safety and efficiency in your electrical circuit.
Step 1: Gather the Necessary Materials
Before you start wiring your 12V relay, make sure you have all the required materials handy. You will need a 12V relay, a power source (12V battery or power supply), a switch or control signal, and appropriate wires and connectors for the connections.
Step 2: Identify the Relay Pins
Most 12V relays have at least five pins on them. The common pin configurations include normally open (NO), normally closed (NC), and common (COM) pins. Before proceeding with the wiring process, identify these pins on your relay to understand how it functions.
Step 3: Connect the Power Source
Begin by connecting the positive terminal of your 12V power source to the COM pin of the relay. Next, connect the positive terminal of the load or device you want to control to the NO pin on the relay. Finally, connect the negative terminals of the power source and the load together.
Step 4: Wire the Control Signal
If you are using a switch or a control signal to trigger the relay, connect one end of the control signal to the COIL pin on the relay and the other end to the negative terminal of the power source. This will allow you to control the switching of the relay with the switch or signal.
Step 5: Test the Wiring
Before closing up the circuit, always test the wiring to ensure everything is connected correctly. Apply power to the system and check if the relay switches on and off as expected. If there are any issues, double-check the connections and troubleshoot accordingly.
Step 6: Secure the Connections
Once you have confirmed that the relay is working as intended, secure all the connections with appropriate wire connectors or soldering. Ensure that there are no loose connections or exposed wires that could pose a safety hazard.
Step 7: Install the Relay
Mount the relay in a secure location within your electrical system to prevent any damage or interference. Make sure the relay is easily accessible for maintenance or troubleshooting in the future.
Step 8: Final Checks
Before you power up your circuit, perform a final check of all the connections, wires, and components. Ensure that everything is in place and secure before applying power to prevent any accidents or malfunctions.
By following these steps and guidelines, you can wire a 12V relay effectively and safely. Remember to consult the relay’s datasheet for specific pin configurations and ratings to ensure compatibility with your circuit. If you have any doubts or questions, seek help from a professional electrician or engineer.