How to Use the Built-in DAC on an ESP32
If you are looking to utilize the built-in digital-to-analog converter (DAC) on your ESP32 microcontroller, you have come to the right place. DACs are essential for converting digital signals into analog voltages, which can be used for a variety of applications such as audio generation, voltage control, and much more.
In this article, we will walk you through the steps required to set up and use the built-in DAC on an ESP32. So, let’s get started!
Step 1: Pin Selection
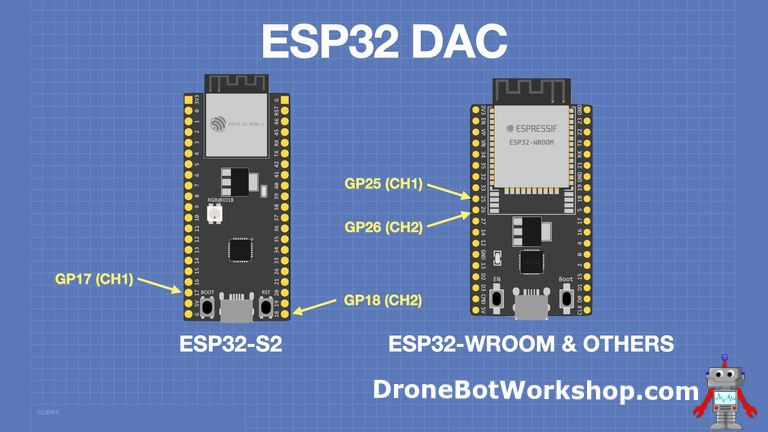
The ESP32 microcontroller has two built-in DAC channels, DAC1 and DAC2. These channels can be accessed through GPIO25 (DAC1) and GPIO26 (DAC2), respectively. Before you begin using the DAC, you need to make sure that your connections are properly set up.
Step 2: Initializing the DAC
To initialize the DAC on the ESP32, you first need to include the required header file and then call the dac_output_enable() function to enable the DAC channels. Here is a sample code snippet to help you get started:
#include "driver/dac.h"

void setup() {
  dac_output_enable(DAC_CHANNEL_1);
  dac_output_enable(DAC_CHANNEL_2);
}
Step 3: Writing Values to the DAC
Once you have initialized the DAC channels, you can start writing analog values to them using the dac_output_voltage() function. This function takes two arguments: the DAC channel (DAC_CHANNEL_1 or DAC_CHANNEL_2) and the voltage value to be written.
Here is an example code snippet demonstrating how to write a voltage value to DAC1:
#include "driver/dac.h"

void loop() {
  dac_output_voltage(DAC_CHANNEL_1, 1500); // Write 1.5V to DAC1
}
Step 4: Testing the DAC Output
To test the output of the DAC channels, you can connect them to an oscilloscope or a multimeter. By varying the voltage values written to the DAC, you should be able to observe the corresponding changes in the analog output.
Experiment with different voltage values and see how they affect the output waveform. This will help you understand the capabilities of the ESP32’s built-in DAC and how you can use it in your projects.
Conclusion
Using the built-in DAC on an ESP32 can open up a world of possibilities for your projects. Whether you are working on audio applications, sensor interfacing, or any other project that requires analog output, the DAC channels on the ESP32 can prove to be invaluable.
By following the steps outlined in this article, you should now have a good understanding of how to set up and use the built-in DAC on your ESP32. So, go ahead and start experimenting with the DAC channels to unlock their full potential!
How to Use the Built-in DAC on an ESP32
If you are looking to utilize the built-in digital-to-analog converter (DAC) on your ESP32 microcontroller, you have come to the right place. DACs are essential for converting digital signals into analog voltages, which can be used for a variety of applications such as audio generation, voltage control, and much more.
In this article, we will walk you through the steps required to set up and use the built-in DAC on an ESP32. So, let’s get started!
Step 1: Pin Selection
The ESP32 microcontroller has two built-in DAC channels, DAC1 and DAC2. These channels can be accessed through GPIO25 (DAC1) and GPIO26 (DAC2), respectively. Before you begin using the DAC, you need to make sure that your connections are properly set up.
Step 2: Initializing the DAC
To initialize the DAC on the ESP32, you first need to include the required header file and then call the dac_output_enable() function to enable the DAC channels. Here is a sample code snippet to help you get started:
#include "driver/dac.h"

void setup() {
  dac_output_enable(DAC_CHANNEL_1);
  dac_output_enable(DAC_CHANNEL_2);
}
Step 3: Writing Values to the DAC
Once you have initialized the DAC channels, you can start writing analog values to them using the dac_output_voltage() function. This function takes two arguments: the DAC channel (DAC_CHANNEL_1 or DAC_CHANNEL_2) and the voltage value to be written.
Here is an example code snippet demonstrating how to write a voltage value to DAC1:
#include "driver/dac.h"

void loop() {
  dac_output_voltage(DAC_CHANNEL_1, 1500); // Write 1.5V to DAC1
}
Step 4: Testing the DAC Output
To test the output of the DAC channels, you can connect them to an oscilloscope or a multimeter. By varying the voltage values written to the DAC, you should be able to observe the corresponding changes in the analog output.
Experiment with different voltage values and see how they affect the output waveform. This will help you understand the capabilities of the ESP32’s built-in DAC and how you can use it in your projects.
Conclusion
Using the built-in DAC on an ESP32 can open up a world of possibilities for your projects. Whether you are working on audio applications, sensor interfacing, or any other project that requires analog output, the DAC channels on the ESP32 can prove to be invaluable.
By following the steps outlined in this article, you should now have a good understanding of how to set up and use the built-in DAC on your ESP32. So, go ahead and start experimenting with the DAC channels to unlock their full potential!