How to Use Hardware Timers on an STM32 Microcontroller
Hardware timers on an STM32 microcontroller are versatile peripherals that can be used for a variety of tasks, ranging from generating PWM signals to measuring time intervals. In this article, we will discuss how to configure and use hardware timers on an STM32 microcontroller.
Step 1: Configuring the Timer
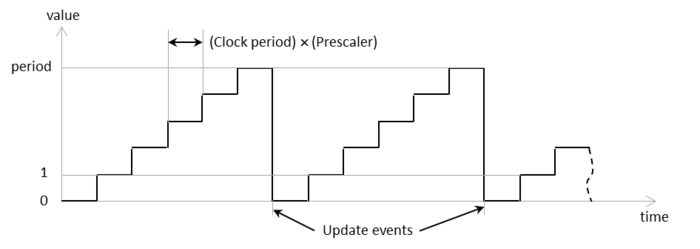
The first step in using a hardware timer on an STM32 microcontroller is to configure it. This involves setting the timer’s clock source, prescaler, period, and other settings based on the specific requirements of your application. For example, if you want to generate a PWM signal with a frequency of 1 kHz, you will need to set the prescaler and period values accordingly.
To configure a hardware timer on an STM32 microcontroller, you will typically use the HAL library provided by STMicroelectronics. The HAL library abstracts the low-level details of the microcontroller’s hardware, making it easier to configure and use peripherals like timers.
Step 2: Using the Timer
Once the timer is configured, you can start using it for your specific application. For example, if you want to generate a PWM signal using the timer, you can set the compare value to control the duty cycle of the signal. If you want to measure the time interval between two events, you can start the timer when the first event occurs and stop it when the second event occurs.
When using a hardware timer on an STM32 microcontroller, it is important to understand the timer’s resolution and limitations. For example, some timers may have a limited number of bits for the prescaler and period values, which can affect the range of frequencies that can be generated. Additionally, some timers may have hardware limitations that prevent them from being used for certain tasks.
Step 3: Handling Timer Interrupts
Hardware timers on an STM32 microcontroller can generate interrupts based on certain events, such as when the timer overflows or when a capture/compare event occurs. To handle timer interrupts, you will need to write an interrupt service routine (ISR) that is called when the interrupt occurs.
In the ISR, you can perform tasks such as updating the timer’s compare value, processing the captured value, or resetting the timer for the next interval. It is important to keep the ISR as short and efficient as possible to prevent interrupt latency and ensure timely response to the interrupt.
Conclusion
Hardware timers on an STM32 microcontroller are powerful peripherals that can be used for a wide range of applications. By following the steps outlined in this article, you can configure and use hardware timers effectively in your STM32 projects. Remember to refer to the microcontroller’s datasheet and reference manual for detailed information on the timer’s features and limitations.
Feel free to experiment with different timer configurations and applications to unleash the full potential of hardware timers on an STM32 microcontroller. Happy coding!
How to Use Hardware Timers on an STM32 Microcontroller
Hardware timers on an STM32 microcontroller are versatile peripherals that can be used for a variety of tasks, ranging from generating PWM signals to measuring time intervals. In this article, we will discuss how to configure and use hardware timers on an STM32 microcontroller.
Step 1: Configuring the Timer
The first step in using a hardware timer on an STM32 microcontroller is to configure it. This involves setting the timer’s clock source, prescaler, period, and other settings based on the specific requirements of your application. For example, if you want to generate a PWM signal with a frequency of 1 kHz, you will need to set the prescaler and period values accordingly.
To configure a hardware timer on an STM32 microcontroller, you will typically use the HAL library provided by STMicroelectronics. The HAL library abstracts the low-level details of the microcontroller’s hardware, making it easier to configure and use peripherals like timers.
Step 2: Using the Timer
Once the timer is configured, you can start using it for your specific application. For example, if you want to generate a PWM signal using the timer, you can set the compare value to control the duty cycle of the signal. If you want to measure the time interval between two events, you can start the timer when the first event occurs and stop it when the second event occurs.
When using a hardware timer on an STM32 microcontroller, it is important to understand the timer’s resolution and limitations. For example, some timers may have a limited number of bits for the prescaler and period values, which can affect the range of frequencies that can be generated. Additionally, some timers may have hardware limitations that prevent them from being used for certain tasks.
Step 3: Handling Timer Interrupts
Hardware timers on an STM32 microcontroller can generate interrupts based on certain events, such as when the timer overflows or when a capture/compare event occurs. To handle timer interrupts, you will need to write an interrupt service routine (ISR) that is called when the interrupt occurs.
In the ISR, you can perform tasks such as updating the timer’s compare value, processing the captured value, or resetting the timer for the next interval. It is important to keep the ISR as short and efficient as possible to prevent interrupt latency and ensure timely response to the interrupt.
Conclusion
Hardware timers on an STM32 microcontroller are powerful peripherals that can be used for a wide range of applications. By following the steps outlined in this article, you can configure and use hardware timers effectively in your STM32 projects. Remember to refer to the microcontroller’s datasheet and reference manual for detailed information on the timer’s features and limitations.
Feel free to experiment with different timer configurations and applications to unleash the full potential of hardware timers on an STM32 microcontroller. Happy coding!