How to use GPIO pins on a Raspberry Pi Pico?
If you’re looking to get started with using GPIO pins on your Raspberry Pi Pico, you’ve come to the right place! GPIO (General Purpose Input Output) pins are a crucial aspect of working with the Raspberry Pi Pico, allowing you to interact with various external devices such as sensors, motors, LEDs, and more. In this guide, we’ll walk you through the basics of using GPIO pins on your Raspberry Pi Pico, from understanding what GPIO pins are to writing code to control them.
Understanding GPIO Pins
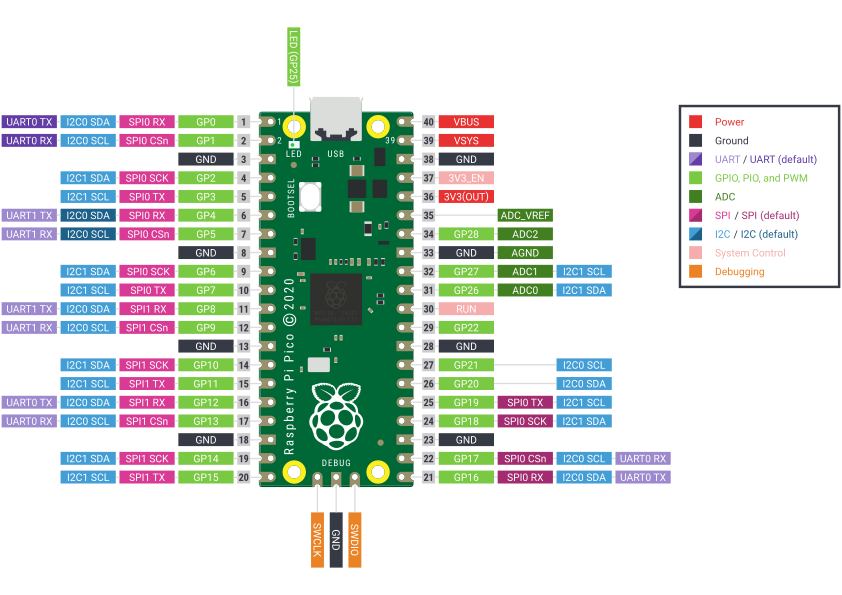
GPIO pins are the physical pins on the Raspberry Pi Pico that you can use for input and output operations. These pins can be programmed to either read data from external devices (input) or send data to external devices (output). Each GPIO pin on the Raspberry Pi Pico is numbered and has a specific function, making it crucial to understand the pin layout before you start using them.
On the Raspberry Pi Pico, there are a total of 26 GPIO pins available, each with a unique number assigned to it. These pins are divided into two GPIO pin banks, each with its own set of functions. GPIO pins are typically divided into three main categories: input pins, output pins, and power pins. Input pins are used to read data from external devices, output pins are used to send data to external devices, and power pins are used to provide power to external devices.
Working with GPIO Pins
Before you can start using GPIO pins on your Raspberry Pi Pico, you’ll need to write code in a programming language such as MicroPython or C/C++ to interface with the pins. When writing code to control GPIO pins, there are a few key steps you need to follow:
- Determine the pin number you want to use
- Set the pin mode (input or output)
- Read or write data to/from the pin
- Clean up the pin after you’re done using it
For example, if you wanted to turn on an LED connected to GPIO pin 21, you would first need to set pin 21 as an output pin and then write a HIGH signal to the pin to turn on the LED. Once you’re done using the GPIO pin, be sure to clean it up properly to avoid any issues with future projects.
Examples of GPIO Projects
Now that you understand the basics of using GPIO pins on your Raspberry Pi Pico, you can start exploring various projects that make use of these pins. Some popular GPIO projects for the Raspberry Pi Pico include:
- Blinking an LED
- Reading input from a button
- Controlling a servo motor
- Interfacing with sensors
By experimenting with these projects, you’ll gain valuable hands-on experience working with GPIO pins and be able to create your own innovative projects in no time!
Conclusion
Using GPIO pins on a Raspberry Pi Pico opens up a world of possibilities for creating exciting electronic projects. By understanding how GPIO pins work and following the proper steps to control them, you’ll be well on your way to building your own custom devices and accessories. So grab your Raspberry Pi Pico, start experimenting with GPIO pins, and unleash your creativity!
How to use GPIO pins on a Raspberry Pi Pico?
If you’re looking to get started with using GPIO pins on your Raspberry Pi Pico, you’ve come to the right place! GPIO (General Purpose Input Output) pins are a crucial aspect of working with the Raspberry Pi Pico, allowing you to interact with various external devices such as sensors, motors, LEDs, and more. In this guide, we’ll walk you through the basics of using GPIO pins on your Raspberry Pi Pico, from understanding what GPIO pins are to writing code to control them.
Understanding GPIO Pins
GPIO pins are the physical pins on the Raspberry Pi Pico that you can use for input and output operations. These pins can be programmed to either read data from external devices (input) or send data to external devices (output). Each GPIO pin on the Raspberry Pi Pico is numbered and has a specific function, making it crucial to understand the pin layout before you start using them.
On the Raspberry Pi Pico, there are a total of 26 GPIO pins available, each with a unique number assigned to it. These pins are divided into two GPIO pin banks, each with its own set of functions. GPIO pins are typically divided into three main categories: input pins, output pins, and power pins. Input pins are used to read data from external devices, output pins are used to send data to external devices, and power pins are used to provide power to external devices.
Working with GPIO Pins
Before you can start using GPIO pins on your Raspberry Pi Pico, you’ll need to write code in a programming language such as MicroPython or C/C++ to interface with the pins. When writing code to control GPIO pins, there are a few key steps you need to follow:
- Determine the pin number you want to use
- Set the pin mode (input or output)
- Read or write data to/from the pin
- Clean up the pin after you’re done using it
For example, if you wanted to turn on an LED connected to GPIO pin 21, you would first need to set pin 21 as an output pin and then write a HIGH signal to the pin to turn on the LED. Once you’re done using the GPIO pin, be sure to clean it up properly to avoid any issues with future projects.
Examples of GPIO Projects
Now that you understand the basics of using GPIO pins on your Raspberry Pi Pico, you can start exploring various projects that make use of these pins. Some popular GPIO projects for the Raspberry Pi Pico include:
- Blinking an LED
- Reading input from a button
- Controlling a servo motor
- Interfacing with sensors
By experimenting with these projects, you’ll gain valuable hands-on experience working with GPIO pins and be able to create your own innovative projects in no time!
Conclusion
Using GPIO pins on a Raspberry Pi Pico opens up a world of possibilities for creating exciting electronic projects. By understanding how GPIO pins work and following the proper steps to control them, you’ll be well on your way to building your own custom devices and accessories. So grab your Raspberry Pi Pico, start experimenting with GPIO pins, and unleash your creativity!