How to Use DMA on an STM32?
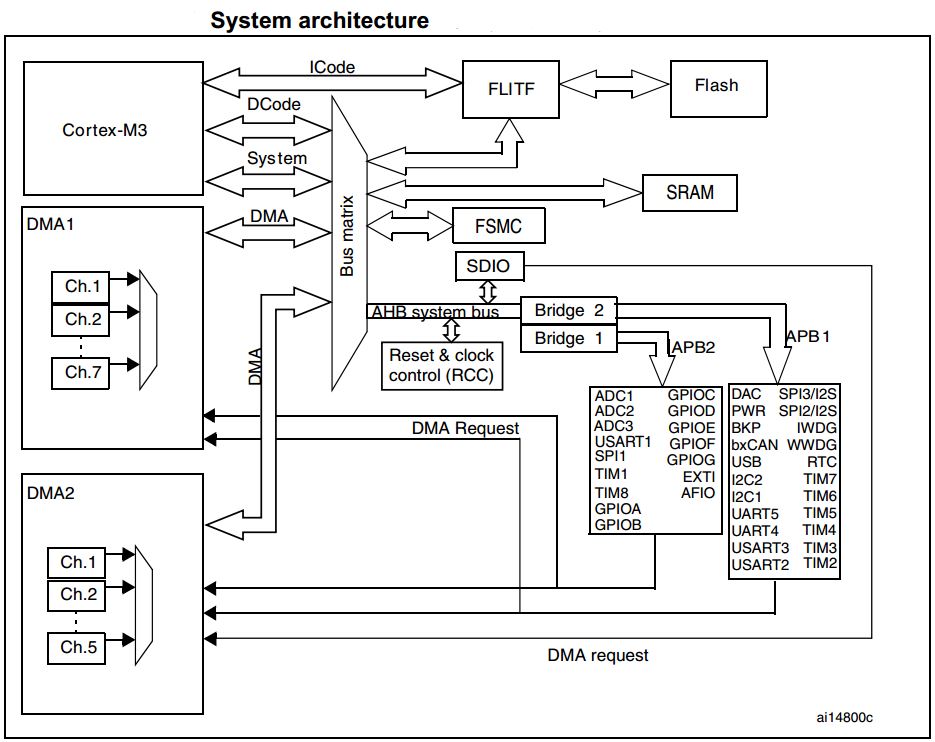
DMA, or Direct Memory Access, is a feature on STM32 microcontrollers that allows peripherals to access memory directly without involving the CPU. This can greatly improve the performance of your application by offloading data transfer tasks from the CPU. In this article, we will discuss how to set up and use DMA on an STM32 controller.
Step 1: Initializing DMA
The first step in using DMA on an STM32 controller is to initialize the DMA controller. This involves configuring the necessary registers and setting up the transfer parameters such as the source and destination addresses, the data size, and the transfer direction. The HAL (Hardware Abstraction Layer) library provided by STMicroelectronics makes this process relatively easy.
Here is a basic example of how to initialize DMA for a UART transmit operation:
HAL_DMA_Init(&hdma_usart1_tx); // Initialize the DMA controller
HAL_DMA_Start(&hdma_usart1_tx, (uint32_t)buffer, (uint32_t)&USART1->TDR, strlen(buffer)); // Start the DMA transfer
Step 2: Configuring DMA Requests
Next, you need to configure the DMA requests for the peripherals you want to use with DMA. STM32 controllers have a number of peripherals that support DMA transfers, such as UART, SPI, I2C, and ADC. You can configure the DMA requests using the CubeMX tool provided by STMicroelectronics.
For example, if you want to use DMA with the UART peripheral, you need to enable the DMA requests in the UART configuration settings. This will allow the UART peripheral to trigger DMA transfers when data needs to be transmitted or received.
Step 3: Handling DMA Interrupts
Once you have configured the DMA controller and set up the DMA requests for the peripherals you want to use, you need to handle the DMA interrupts in your code. DMA transfers can generate interrupts when the transfer is complete or when an error occurs. You can use these interrupts to perform additional processing or error handling.
Here is an example of how to handle a DMA interrupt for a UART receive operation:
void HAL_UART_RxCpltCallback(UART_HandleTypeDef *huart)
{
  // Handle DMA receive complete interrupt
}
Step 4: Testing DMA Transfers
Finally, you can test your DMA transfers to ensure that they are working correctly. You can do this by sending or receiving data using the peripherals you have configured for DMA transfers and checking that the data is transferred to the memory as expected.
By following these steps, you can effectively use DMA on an STM32 controller to improve the performance of your applications and offload data transfer tasks from the CPU. DMA is a powerful feature that can help you optimize your code and make your applications more efficient.


