How to Use an Analog Multiplexer with Arduino

Are you looking to expand the capabilities of your Arduino projects? Using an analog multiplexer can help you manage multiple analog inputs with ease. In this guide, we will show you how to use an analog multiplexer with Arduino.
What is an Analog Multiplexer?
An analog multiplexer, also known as a mux, is a component that allows you to select from multiple analog input signals and route them to a single analog output. This is particularly useful when you have limited analog input pins on your Arduino and need to connect multiple sensors or devices.
Materials Needed
- Arduino board
- Analog Multiplexer (such as the CD4051)
- Jumper wires
- Sensors or devices with analog outputs
- Breadboard
Wiring the Analog Multiplexer
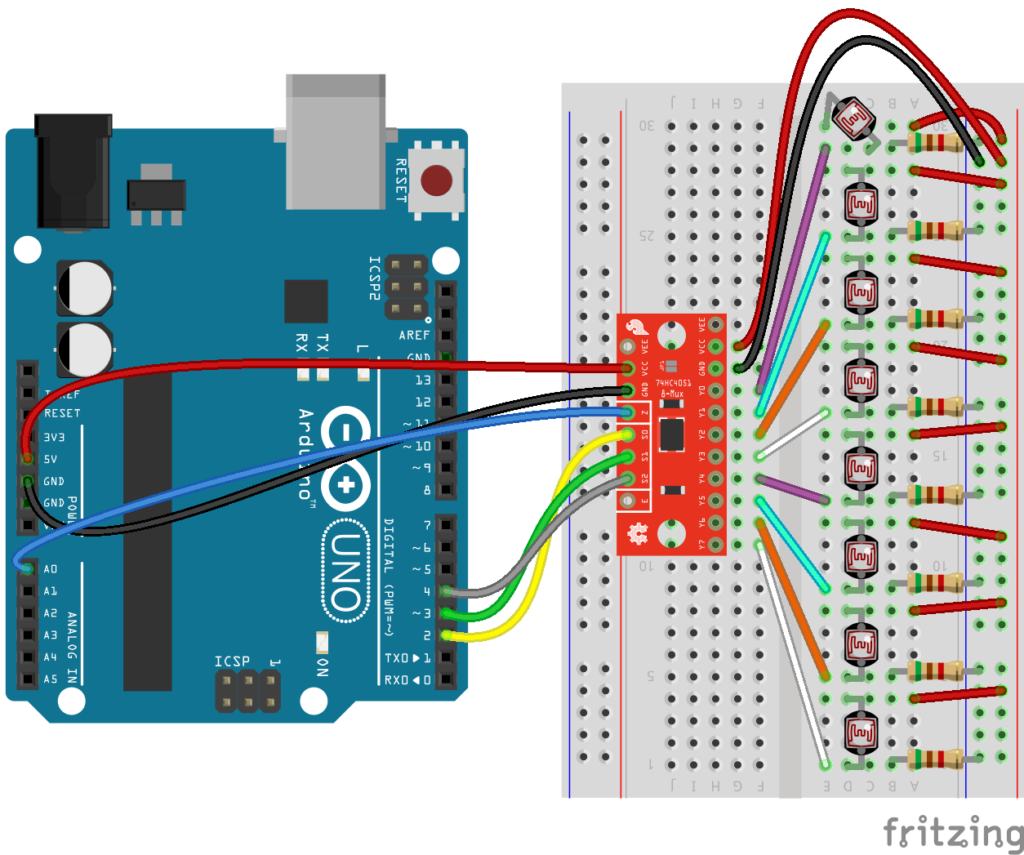
Start by placing the analog multiplexer on the breadboard. Connect the VCC pin to the 5V pin on the Arduino, the GND pin to the GND pin, and the EN pin to the digital pin of your choice. Then connect the SIG pin of the sensor/device to one of the input pins (Y0-Y7) on the multiplexer.

Coding with Arduino IDE
Open the Arduino IDE and create a new sketch. Include the CD4051 library (if needed) and define the input pins on the multiplexer. Then, in the loop, read the analog input of your sensor/device connected to the multiplexer and print the values to the serial monitor.
#include <CD4051.h>

const int S0 = 2;
const int S1 = 3;
const int S2 = 4;
const int sensorPin = 0;

CD4051 mux(S0, S1, S2);

void setup() {
  Serial.begin(9600);
}

void loop() {
  int sensorValue = mux.read(sensorPin);
  Serial.println(sensorValue);
  delay(500);
}
Testing
Upload the sketch to your Arduino board and open the serial monitor. You should see the analog values of your sensor/device being printed every half second. Test different inputs on the multiplexer to verify that the readings are accurate.
Conclusion
Using an analog multiplexer with Arduino is a great way to manage multiple analog inputs efficiently. With this guide, you can now incorporate multiple sensors or devices into your Arduino projects with ease. Experiment with different sensors and configurations to unleash the full potential of your projects!
How to Use an Analog Multiplexer with Arduino
Are you looking to expand the capabilities of your Arduino projects? Using an analog multiplexer can help you manage multiple analog inputs with ease. In this guide, we will show you how to use an analog multiplexer with Arduino.
What is an Analog Multiplexer?
An analog multiplexer, also known as a mux, is a component that allows you to select from multiple analog input signals and route them to a single analog output. This is particularly useful when you have limited analog input pins on your Arduino and need to connect multiple sensors or devices.
Materials Needed
- Arduino board
- Analog Multiplexer (such as the CD4051)
- Jumper wires
- Sensors or devices with analog outputs
- Breadboard
Wiring the Analog Multiplexer
Start by placing the analog multiplexer on the breadboard. Connect the VCC pin to the 5V pin on the Arduino, the GND pin to the GND pin, and the EN pin to the digital pin of your choice. Then connect the SIG pin of the sensor/device to one of the input pins (Y0-Y7) on the multiplexer.
Coding with Arduino IDE
Open the Arduino IDE and create a new sketch. Include the CD4051 library (if needed) and define the input pins on the multiplexer. Then, in the loop, read the analog input of your sensor/device connected to the multiplexer and print the values to the serial monitor.
#include <CD4051.h>

const int S0 = 2;
const int S1 = 3;
const int S2 = 4;
const int sensorPin = 0;

CD4051 mux(S0, S1, S2);

void setup() {
  Serial.begin(9600);
}

void loop() {
  int sensorValue = mux.read(sensorPin);
  Serial.println(sensorValue);
  delay(500);
}
Testing
Upload the sketch to your Arduino board and open the serial monitor. You should see the analog values of your sensor/device being printed every half second. Test different inputs on the multiplexer to verify that the readings are accurate.
Conclusion
Using an analog multiplexer with Arduino is a great way to manage multiple analog inputs efficiently. With this guide, you can now incorporate multiple sensors or devices into your Arduino projects with ease. Experiment with different sensors and configurations to unleash the full potential of your projects!