How to use a microcontroller to generate PWM audio?
In this article, we will explore how to use a microcontroller to generate PWM audio. Pulse Width Modulation (PWM) is a technique used to encode information in the form of a varying signal. In the context of audio, PWM can be used to create sound by rapidly switching a digital signal on and off. This method is commonly used in applications where generating sound from a microcontroller is required.
Before we dive into the details of how to generate PWM audio using a microcontroller, let’s first understand the basics of PWM. PWM works by varying the width of high and low pulses of a digital signal to encode information. By changing the duty cycle of the signal, we can control the average power delivered to a load, in this case, a speaker.
Now, let’s get started on how to use a microcontroller to generate PWM audio:
Step 1: Choose the right microcontroller
The first step in generating PWM audio using a microcontroller is to choose the right microcontroller for the task. Make sure the microcontroller you select has a PWM output feature and is capable of generating the required frequency for audio playback.
Step 2: Set up the PWM output
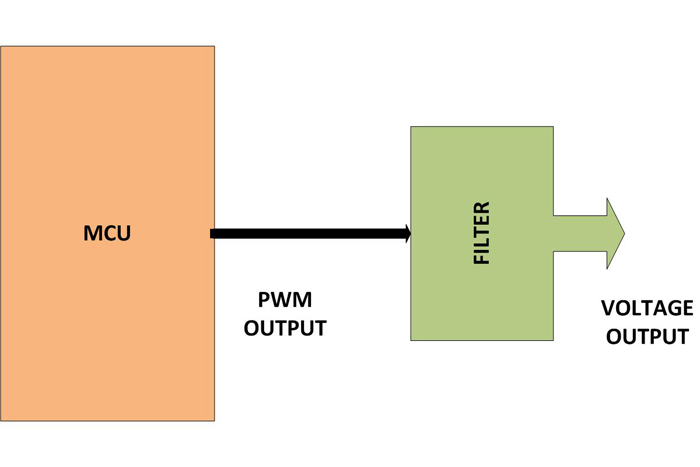
Once you have selected the appropriate microcontroller, the next step is to set up the PWM output. This involves configuring the microcontroller’s registers to generate a PWM signal with the desired frequency and duty cycle.
Most microcontrollers provide built-in libraries or functions to assist in setting up PWM output. Consult the microcontroller’s datasheet and reference manual for more information on how to configure the PWM output.
Step 3: Generate audio signal
After setting up the PWM output, you can now generate the audio signal. This involves creating a lookup table of audio samples and feeding them to the PWM output at regular intervals. By modulating the duty cycle of the PWM signal, you can control the volume and pitch of the audio playback.
It is important to consider the sampling rate and resolution of the PWM signal when generating audio. Higher sampling rates and resolutions will result in better audio quality but may require more processing power.
Step 4: Connect the speaker
Once you have generated the audio signal, the final step is to connect the speaker to the microcontroller. Make sure to properly interface the speaker with the PWM output and adjust the volume and pitch as needed.
Step 5: Test and adjust
After connecting the speaker, it’s time to test the PWM audio playback. Play different audio samples and adjust the parameters such as frequency and duty cycle to achieve the desired sound quality. Make sure to listen for any distortions or noise and fine-tune the settings accordingly.
By following these steps, you can successfully use a microcontroller to generate PWM audio. Experiment with different audio samples and settings to create unique sound effects and music. Have fun exploring the world of PWM audio!
How to use a microcontroller to generate PWM audio?
In this article, we will explore how to use a microcontroller to generate PWM audio. Pulse Width Modulation (PWM) is a technique used to encode information in the form of a varying signal. In the context of audio, PWM can be used to create sound by rapidly switching a digital signal on and off. This method is commonly used in applications where generating sound from a microcontroller is required.
Before we dive into the details of how to generate PWM audio using a microcontroller, let’s first understand the basics of PWM. PWM works by varying the width of high and low pulses of a digital signal to encode information. By changing the duty cycle of the signal, we can control the average power delivered to a load, in this case, a speaker.
Now, let’s get started on how to use a microcontroller to generate PWM audio:
Step 1: Choose the right microcontroller
The first step in generating PWM audio using a microcontroller is to choose the right microcontroller for the task. Make sure the microcontroller you select has a PWM output feature and is capable of generating the required frequency for audio playback.
Step 2: Set up the PWM output
Once you have selected the appropriate microcontroller, the next step is to set up the PWM output. This involves configuring the microcontroller’s registers to generate a PWM signal with the desired frequency and duty cycle.
Most microcontrollers provide built-in libraries or functions to assist in setting up PWM output. Consult the microcontroller’s datasheet and reference manual for more information on how to configure the PWM output.
Step 3: Generate audio signal
After setting up the PWM output, you can now generate the audio signal. This involves creating a lookup table of audio samples and feeding them to the PWM output at regular intervals. By modulating the duty cycle of the PWM signal, you can control the volume and pitch of the audio playback.
It is important to consider the sampling rate and resolution of the PWM signal when generating audio. Higher sampling rates and resolutions will result in better audio quality but may require more processing power.
Step 4: Connect the speaker
Once you have generated the audio signal, the final step is to connect the speaker to the microcontroller. Make sure to properly interface the speaker with the PWM output and adjust the volume and pitch as needed.
Step 5: Test and adjust
After connecting the speaker, it’s time to test the PWM audio playback. Play different audio samples and adjust the parameters such as frequency and duty cycle to achieve the desired sound quality. Make sure to listen for any distortions or noise and fine-tune the settings accordingly.
By following these steps, you can successfully use a microcontroller to generate PWM audio. Experiment with different audio samples and settings to create unique sound effects and music. Have fun exploring the world of PWM audio!