How to Use a Capacitive Touch Sensor with an ESP32
Capacitive touch sensors are becoming increasingly popular due to their versatility and ease of use. When paired with a powerful microcontroller like the ESP32, the possibilities are endless. In this tutorial, we will guide you through the process of using a capacitive touch sensor with an ESP32, allowing you to create interactive and touch-sensitive projects.
What You’ll Need
- ESP32 development board
- Capacitive touch sensor module
- Jumper wires
Setting Up the Hardware
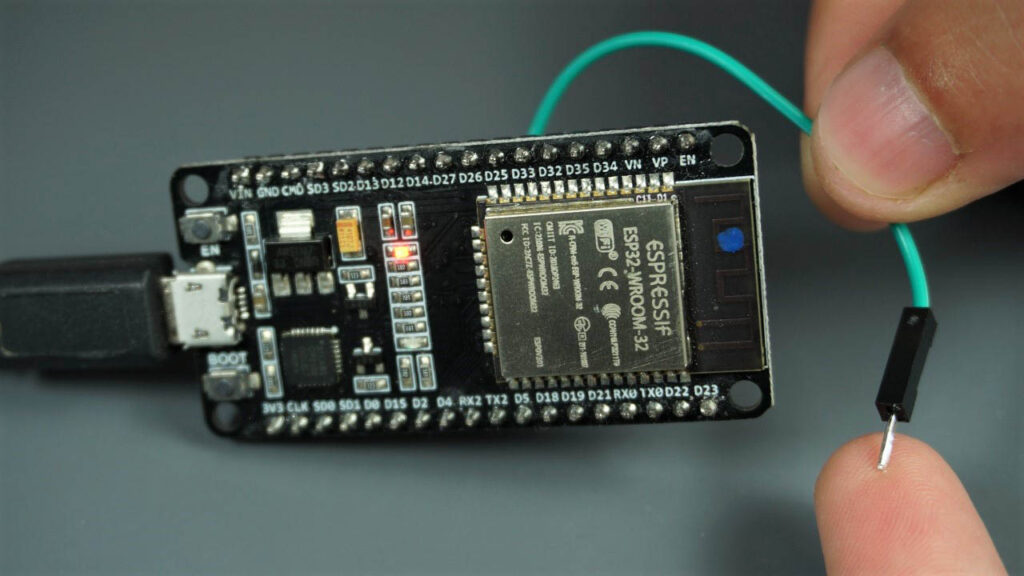
First, connect your capacitive touch sensor module to your ESP32 development board using jumper wires. Make sure to refer to the pinout diagram of your specific touch sensor module to ensure the correct connections. Typically, you will need to connect the sensor’s signal pin to one of the GPIO pins on the ESP32.
Next, power up your ESP32 development board either through a USB connection or an external power source. Your capacitive touch sensor should also be powered up and ready to use.
Programming the ESP32
Now it’s time to write some code to read the touch sensor data using the ESP32. You can use the Arduino IDE with the ESP32 board support installed to program your ESP32.
Here’s a simple example code snippet to get you started:
const int touchPin = 4; // Set the GPIO pin number connected to the touch sensor
int touchValue = 0; // Variable to store the touch sensor value

void setup() {
  Serial.begin(115200); // Initialize serial communication
}

void loop() {
  touchValue = touchRead(touchPin); // Read the touch sensor value
  Serial.println(touchValue); // Print the touch sensor value to the serial monitor
  delay(100); // Delay for better readability
}
Upload this code to your ESP32 using the Arduino IDE, and open the serial monitor to view the touch sensor data in real-time. You can further customize the code to trigger specific actions based on the touch sensor readings.
Experiment and Play
Now that you have successfully set up a capacitive touch sensor with your ESP32, the fun part begins. Experiment with different touch inputs and explore the possibilities of touch interaction in your projects. You can create touch-sensitive buttons, sliders, and even proximity sensors using capacitive touch technology.
Remember to refer to the datasheet of your capacitive touch sensor module for more advanced configurations and features. With a bit of creativity and experimentation, you can take your projects to the next level with capacitive touch sensing.
Conclusion
Using a capacitive touch sensor with an ESP32 opens up a world of possibilities for interactive and touch-sensitive projects. By following this tutorial and experimenting with different touch inputs, you can create unique and engaging projects that respond to touch interactions.
Remember to have fun while working on your projects and don’t be afraid to try out new ideas. Capacitive touch technology is a powerful tool that can add a new dimension to your projects, so go ahead and start exploring!
How to Use a Capacitive Touch Sensor with an ESP32
Capacitive touch sensors are becoming increasingly popular due to their versatility and ease of use. When paired with a powerful microcontroller like the ESP32, the possibilities are endless. In this tutorial, we will guide you through the process of using a capacitive touch sensor with an ESP32, allowing you to create interactive and touch-sensitive projects.
What You’ll Need
- ESP32 development board
- Capacitive touch sensor module
- Jumper wires
Setting Up the Hardware
First, connect your capacitive touch sensor module to your ESP32 development board using jumper wires. Make sure to refer to the pinout diagram of your specific touch sensor module to ensure the correct connections. Typically, you will need to connect the sensor’s signal pin to one of the GPIO pins on the ESP32.
Next, power up your ESP32 development board either through a USB connection or an external power source. Your capacitive touch sensor should also be powered up and ready to use.
Programming the ESP32
Now it’s time to write some code to read the touch sensor data using the ESP32. You can use the Arduino IDE with the ESP32 board support installed to program your ESP32.
Here’s a simple example code snippet to get you started:
const int touchPin = 4; // Set the GPIO pin number connected to the touch sensor
int touchValue = 0; // Variable to store the touch sensor value

void setup() {
  Serial.begin(115200); // Initialize serial communication
}

void loop() {
  touchValue = touchRead(touchPin); // Read the touch sensor value
  Serial.println(touchValue); // Print the touch sensor value to the serial monitor
  delay(100); // Delay for better readability
}
Upload this code to your ESP32 using the Arduino IDE, and open the serial monitor to view the touch sensor data in real-time. You can further customize the code to trigger specific actions based on the touch sensor readings.
Experiment and Play
Now that you have successfully set up a capacitive touch sensor with your ESP32, the fun part begins. Experiment with different touch inputs and explore the possibilities of touch interaction in your projects. You can create touch-sensitive buttons, sliders, and even proximity sensors using capacitive touch technology.
Remember to refer to the datasheet of your capacitive touch sensor module for more advanced configurations and features. With a bit of creativity and experimentation, you can take your projects to the next level with capacitive touch sensing.
Conclusion
Using a capacitive touch sensor with an ESP32 opens up a world of possibilities for interactive and touch-sensitive projects. By following this tutorial and experimenting with different touch inputs, you can create unique and engaging projects that respond to touch interactions.
Remember to have fun while working on your projects and don’t be afraid to try out new ideas. Capacitive touch technology is a powerful tool that can add a new dimension to your projects, so go ahead and start exploring!