How to Test a 2N3904 Transistor
Transistors are essential components in electronic circuits, and it’s important to know how to test them to ensure they are functioning correctly. The 2N3904 transistor is a popular choice due to its versatility and reliability. In this article, we will cover how to test a 2N3904 transistor using a multimeter and a simple test circuit.
What is a 2N3904 Transistor?
The 2N3904 is an NPN bipolar junction transistor commonly used for amplification or switching purposes in electronic circuits. It is a small, low power transistor with a maximum current rating of 200mA and a maximum voltage rating of 40V. The pinout of a typical 2N3904 transistor is as follows:
- Collector (C) – Pin 1
- Base (B) – Pin 2
- Emitter (E) – Pin 3
Testing a 2N3904 Transistor with a Multimeter
To test a 2N3904 transistor, you will need a digital multimeter set to the diode test or continuity mode. Follow these steps:
- Disconnect the transistor from the circuit.
- Set the multimeter to the diode test mode.
- Place the positive lead of the multimeter on the base (B) of the transistor and the negative lead on the emitter (E).
- Note down the reading on the multimeter. You should see a voltage drop of around 0.6V to 0.7V.
- Reverse the leads and check the reading again. You should see an open circuit or a reading of infinity.
- Repeat the same process for the collector (C) and emitter (E) pins.
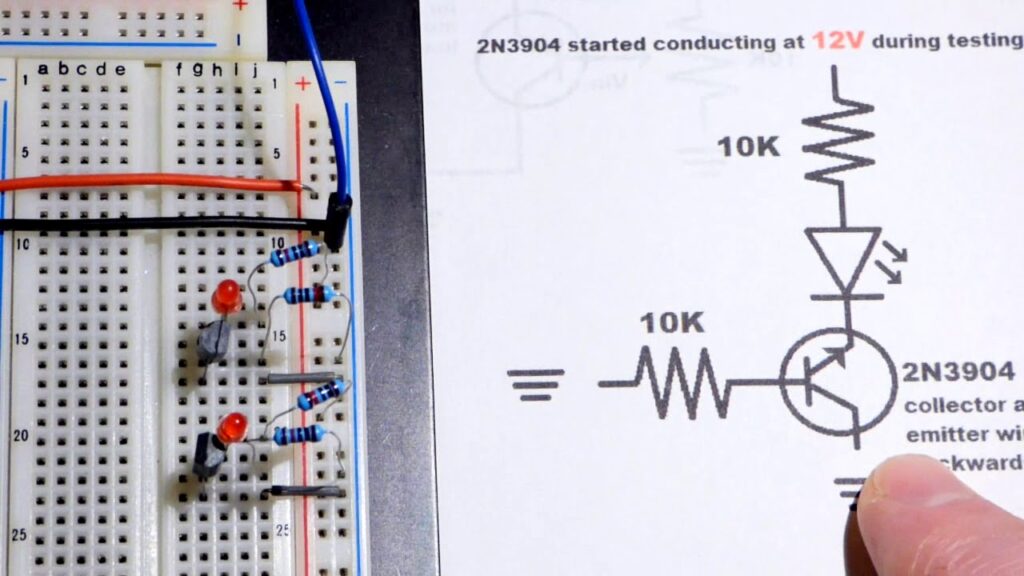
Testing a 2N3904 Transistor with a Test Circuit
If you prefer to test the transistor using a simple test circuit, you can follow these steps:
- Build a simple test circuit using a battery, a resistor, an LED, and the 2N3904 transistor.
- Connect the collector (C) of the transistor to the positive terminal of the battery.
- Connect the emitter (E) of the transistor to the negative terminal of the battery.
- Connect the base (B) of the transistor to the resistor and then to the positive terminal of the battery.
- Connect the other end of the resistor to the LED and then to the negative terminal of the battery.
- The LED should light up when the transistor is functioning correctly.
Conclusion
Testing a 2N3904 transistor is a simple process that can be done using a multimeter or a simple test circuit. By following the steps outlined in this article, you can quickly determine if a 2N3904 transistor is working correctly or if it needs to be replaced. Remember to handle transistors with care to avoid damaging them during testing.
How to Test a 2N3904 Transistor
Transistors are essential components in electronic circuits, and it’s important to know how to test them to ensure they are functioning correctly. The 2N3904 transistor is a popular choice due to its versatility and reliability. In this article, we will cover how to test a 2N3904 transistor using a multimeter and a simple test circuit.
What is a 2N3904 Transistor?
The 2N3904 is an NPN bipolar junction transistor commonly used for amplification or switching purposes in electronic circuits. It is a small, low power transistor with a maximum current rating of 200mA and a maximum voltage rating of 40V. The pinout of a typical 2N3904 transistor is as follows:
- Collector (C) – Pin 1
- Base (B) – Pin 2
- Emitter (E) – Pin 3
Testing a 2N3904 Transistor with a Multimeter
To test a 2N3904 transistor, you will need a digital multimeter set to the diode test or continuity mode. Follow these steps:
- Disconnect the transistor from the circuit.
- Set the multimeter to the diode test mode.
- Place the positive lead of the multimeter on the base (B) of the transistor and the negative lead on the emitter (E).
- Note down the reading on the multimeter. You should see a voltage drop of around 0.6V to 0.7V.
- Reverse the leads and check the reading again. You should see an open circuit or a reading of infinity.
- Repeat the same process for the collector (C) and emitter (E) pins.
Testing a 2N3904 Transistor with a Test Circuit
If you prefer to test the transistor using a simple test circuit, you can follow these steps:
- Build a simple test circuit using a battery, a resistor, an LED, and the 2N3904 transistor.
- Connect the collector (C) of the transistor to the positive terminal of the battery.
- Connect the emitter (E) of the transistor to the negative terminal of the battery.
- Connect the base (B) of the transistor to the resistor and then to the positive terminal of the battery.
- Connect the other end of the resistor to the LED and then to the negative terminal of the battery.
- The LED should light up when the transistor is functioning correctly.
Conclusion
Testing a 2N3904 transistor is a simple process that can be done using a multimeter or a simple test circuit. By following the steps outlined in this article, you can quickly determine if a 2N3904 transistor is working correctly or if it needs to be replaced. Remember to handle transistors with care to avoid damaging them during testing.