How to Set Up ESP8266 Wi-Fi Module
Setting up the ESP8266 Wi-Fi module is a quick and easy process that allows you to connect your projects to the internet wirelessly. Whether you are a beginner or an experienced maker, this guide will walk you through the steps to get your ESP8266 up and running in no time.
Step 1: Gather Your Materials
Before you start, make sure you have all the necessary materials:
- ESP8266 module
- USB-to-serial adapter
- Breadboard
- Jumper wires
- Computer with Arduino IDE installed
Step 2: Connect Your ESP8266 to Your Computer
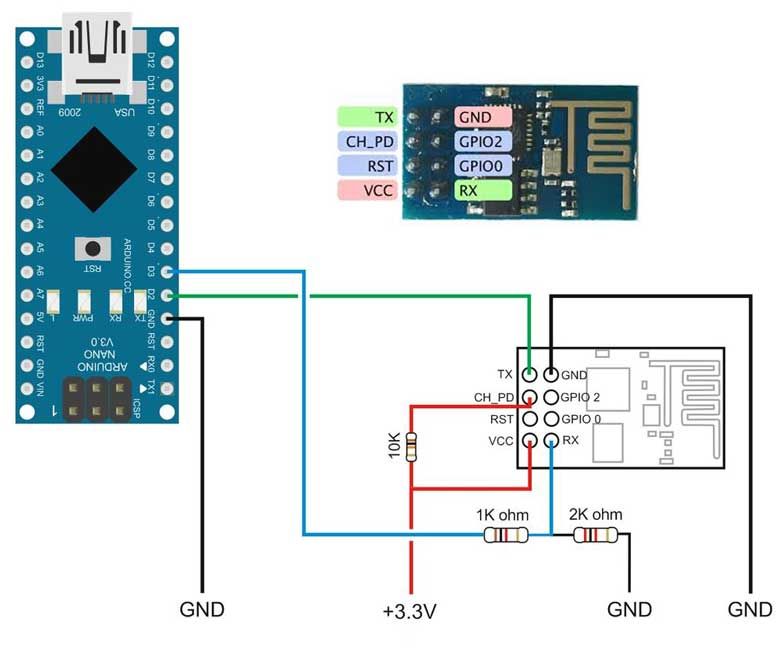
Using your USB-to-serial adapter, connect your ESP8266 module to your computer. Make sure to connect the appropriate pins: TX to RX, RX to TX, VCC to 3.3V, and GND to GND. This will allow your computer to communicate with the ESP8266.
Step 3: Install the ESP8266 Board in Arduino IDE
Open the Arduino IDE on your computer and go to File > Preferences. In the “Additional Board Manager URLs” field, add the following URL: http://arduino.esp8266.com/stable/package_esp8266com_index.json. Then, go to Tools > Board > Boards Manager and search for “esp8266”. Click Install to add the ESP8266 board to your Arduino IDE.
Step 4: Write and Upload Code to Your ESP8266
Now that you have installed the ESP8266 board in Arduino IDE, you can start writing and uploading code to your ESP8266 module. You can find example code and projects online to help you get started. Make sure to select the appropriate board and COM port in Arduino IDE before uploading your code.
Step 5: Connect Your ESP8266 to Wi-Fi
After uploading your code, disconnect your ESP8266 module from your computer and power it using an external power source, like a battery pack. Your ESP8266 will now connect to your Wi-Fi network and you can start using it to send and receive data wirelessly.
Step 6: Troubleshooting
If you encounter any issues during the setup process, make sure to check your wiring and board settings. Double-check your connections and ensure that you have selected the correct board and COM port in Arduino IDE. Additionally, make sure that your Wi-Fi network is working properly and that your code is error-free.
Conclusion
Setting up the ESP8266 Wi-Fi module is a straightforward process that opens up a world of possibilities for your projects. With a few simple steps, you can connect your devices to the internet and create innovative solutions. So grab your ESP8266 module and start exploring the endless opportunities that Wi-Fi connectivity has to offer!
How to Set Up ESP8266 Wi-Fi Module
Setting up the ESP8266 Wi-Fi module is a quick and easy process that allows you to connect your projects to the internet wirelessly. Whether you are a beginner or an experienced maker, this guide will walk you through the steps to get your ESP8266 up and running in no time.
Step 1: Gather Your Materials
Before you start, make sure you have all the necessary materials:
- ESP8266 module
- USB-to-serial adapter
- Breadboard
- Jumper wires
- Computer with Arduino IDE installed
Step 2: Connect Your ESP8266 to Your Computer
Using your USB-to-serial adapter, connect your ESP8266 module to your computer. Make sure to connect the appropriate pins: TX to RX, RX to TX, VCC to 3.3V, and GND to GND. This will allow your computer to communicate with the ESP8266.
Step 3: Install the ESP8266 Board in Arduino IDE
Open the Arduino IDE on your computer and go to File > Preferences. In the “Additional Board Manager URLs” field, add the following URL: http://arduino.esp8266.com/stable/package_esp8266com_index.json. Then, go to Tools > Board > Boards Manager and search for “esp8266”. Click Install to add the ESP8266 board to your Arduino IDE.
Step 4: Write and Upload Code to Your ESP8266
Now that you have installed the ESP8266 board in Arduino IDE, you can start writing and uploading code to your ESP8266 module. You can find example code and projects online to help you get started. Make sure to select the appropriate board and COM port in Arduino IDE before uploading your code.
Step 5: Connect Your ESP8266 to Wi-Fi
After uploading your code, disconnect your ESP8266 module from your computer and power it using an external power source, like a battery pack. Your ESP8266 will now connect to your Wi-Fi network and you can start using it to send and receive data wirelessly.
Step 6: Troubleshooting
If you encounter any issues during the setup process, make sure to check your wiring and board settings. Double-check your connections and ensure that you have selected the correct board and COM port in Arduino IDE. Additionally, make sure that your Wi-Fi network is working properly and that your code is error-free.
Conclusion
Setting up the ESP8266 Wi-Fi module is a straightforward process that opens up a world of possibilities for your projects. With a few simple steps, you can connect your devices to the internet and create innovative solutions. So grab your ESP8266 module and start exploring the endless opportunities that Wi-Fi connectivity has to offer!