How to set up an mBot robot for introductory projects?
Welcome to the exciting world of robotics! If you’re looking to start your journey in robotics with an mBot robot, you’ve come to the right place. In this comprehensive guide, we’ll walk you through the step-by-step process of setting up your mBot robot for your introductory projects. Let’s dive in!
Step 1: Unboxing your mBot
The first step in setting up your mBot robot is unboxing it. Carefully open the packaging and take out all the components included in the box. You should find the main body of the robot, wheels, sensors, and other accessories. Make sure to keep all the parts organized and in a safe place.
Step 2: Assembling the mBot
Next, it’s time to assemble your mBot robot. Follow the instructions provided in the user manual to put together the different parts of the robot. Make sure to tighten the screws properly and check that all the components are securely attached. Once you’ve assembled your mBot, it should look like a small robot ready to be programmed!
Step 3: Installing the software
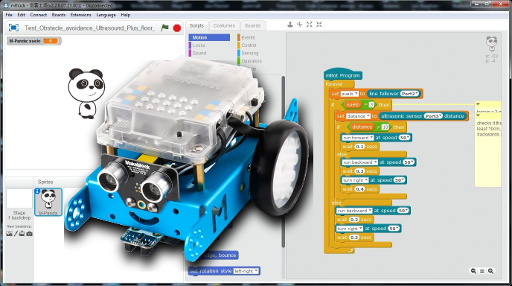
Now that your mBot is assembled, it’s time to install the necessary software on your computer. You can download the mBlock software from the official Makeblock website. This software will allow you to program your mBot robot using a block-based coding language. Follow the on-screen instructions to install the software on your computer.
Step 4: Connecting the mBot to the software
Once you’ve installed the mBlock software, you can connect your mBot robot to your computer using a USB cable. Make sure to turn on your mBot and select the correct device in the software. You should see your mBot connected to the software, ready to be programmed!
Step 5: Programming your mBot
Now comes the fun part – programming your mBot robot! With the mBlock software, you can drag and drop blocks of code to create different functions for your robot. Start with simple commands like moving forward, turning, and blinking the LED lights. As you get more comfortable with programming, you can create more complex sequences and loops to make your mBot perform exciting tasks.
Step 6: Testing your mBot
After programming your mBot robot, it’s time to test it out! Make sure to upload your code to the robot and watch as it comes to life. Test out different functions and see how your mBot responds to your commands. Don’t be afraid to experiment and tweak your code to make your robot do exactly what you want.
Step 7: Exploring new projects
Now that you’ve set up your mBot robot and programmed it for your introductory projects, the possibilities are endless. Explore new ideas and projects to challenge yourself and expand your robotics skills. Whether you’re interested in obstacle courses, maze-solving, or line-following robots, your mBot is ready to take on any challenge!
Conclusion
Congratulations on successfully setting up your mBot robot for your introductory projects! With the right software, programming skills, and creativity, you can create amazing projects with your mBot. Keep experimenting, learning, and pushing the boundaries of what your robot can do. Who knows – you might just come up with the next groundbreaking robotics innovation!


