How to set up an ESP8266 web server?
Setting up an ESP8266 web server is a great way to control your projects remotely. The ESP8266 is a powerful and versatile microcontroller that can connect to Wi-Fi networks, making it perfect for IoT applications. In this guide, we will walk you through the steps to set up your own ESP8266 web server. Let’s get started!
Step 1: Install the Arduino IDE and ESP8266 Library
The first step is to install the Arduino IDE on your computer. You can download the latest version from the official Arduino website. Once you have installed the IDE, you will need to add support for the ESP8266 by installing the ESP8266 library.
To install the ESP8266 library, open the Arduino IDE and go to File > Preferences. In the “Additional Boards Manager URLs” field, paste the following URL: http://arduino.esp8266.com/stable/package_esp8266com_index.json. Click “OK” to save the changes.
Next, go to Tools > Board > Board Manager and search for “ESP8266.” Click on “Install” to add support for the ESP8266 to the Arduino IDE.
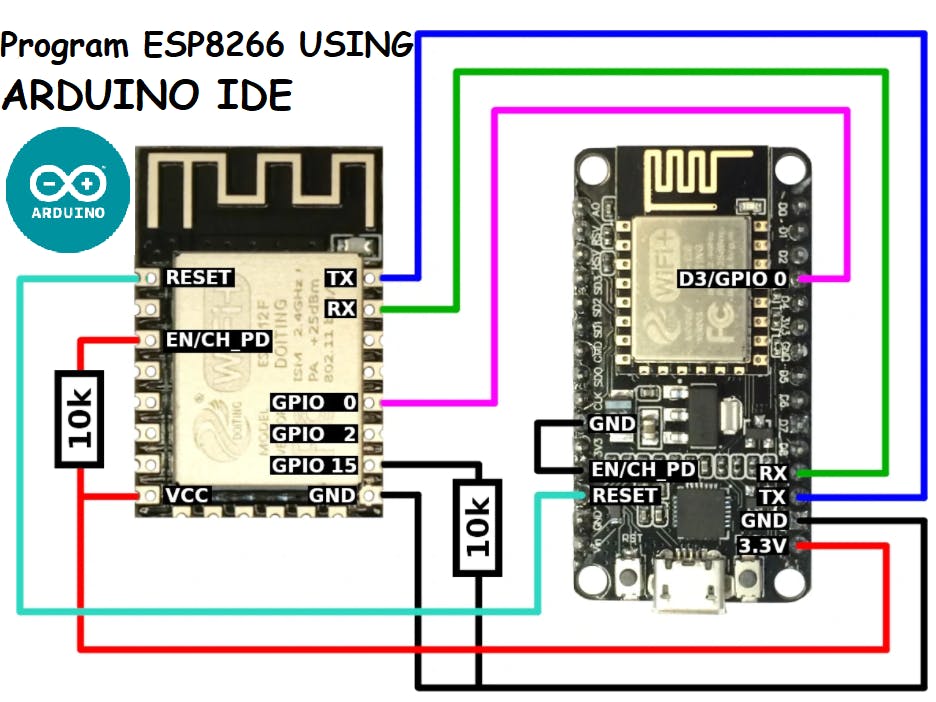
Step 2: Connect the ESP8266 to Your Computer
Before you can set up the web server, you need to connect the ESP8266 to your computer. You can do this by using a USB to Serial adapter or an FTDI programmer. Make sure to connect the TX pin of the adapter to the TX pin of the ESP8266 and the RX pin to the RX pin.
Open the Arduino IDE, go to Tools > Port, and select the correct port for your ESP8266. This will allow you to upload your code to the ESP8266.
Step 3: Upload the Web Server Code
Now that everything is set up, it’s time to upload the web server code to the ESP8266. You can find example code for a simple web server in the Arduino IDE by going to File > Examples > ESP8266WebServer > HelloServer.
Open the example code, make any necessary modifications, and upload it to the ESP8266 by clicking on the “Upload” button in the Arduino IDE. Once the code is uploaded, open the Serial Monitor to see the IP address assigned to the ESP8266.
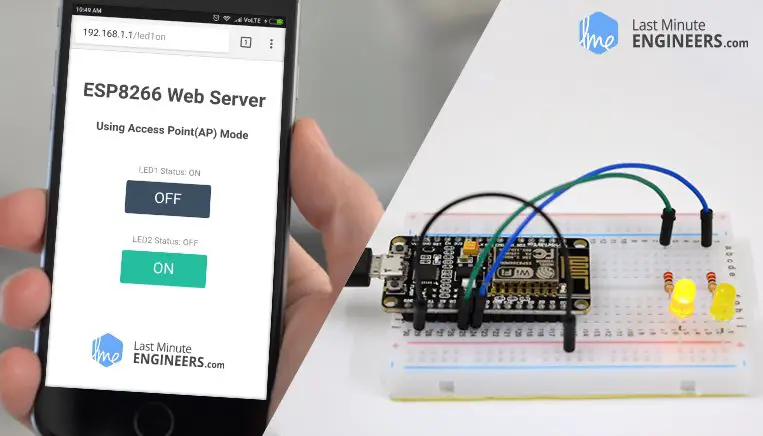
Step 4: Access the Web Server
With the web server code uploaded, you can now access the web server by entering the IP address assigned to the ESP8266 in a web browser. You should see a simple webpage with a message displayed on it.
From here, you can modify the web server code to add more functionality or control different aspects of your projects remotely. The possibilities are endless!
Conclusion
Setting up an ESP8266 web server is a fun and rewarding project that opens up a world of possibilities for remote control and monitoring. With the steps outlined in this guide, you can easily set up your own web server and start experimenting with IoT applications. Happy tinkering!
How to set up an ESP8266 web server?
Setting up an ESP8266 web server is a great way to control your projects remotely. The ESP8266 is a powerful and versatile microcontroller that can connect to Wi-Fi networks, making it perfect for IoT applications. In this guide, we will walk you through the steps to set up your own ESP8266 web server. Let’s get started!
Step 1: Install the Arduino IDE and ESP8266 Library
The first step is to install the Arduino IDE on your computer. You can download the latest version from the official Arduino website. Once you have installed the IDE, you will need to add support for the ESP8266 by installing the ESP8266 library.
To install the ESP8266 library, open the Arduino IDE and go to File > Preferences. In the “Additional Boards Manager URLs” field, paste the following URL: http://arduino.esp8266.com/stable/package_esp8266com_index.json. Click “OK” to save the changes.
Next, go to Tools > Board > Board Manager and search for “ESP8266.” Click on “Install” to add support for the ESP8266 to the Arduino IDE.
Step 2: Connect the ESP8266 to Your Computer
Before you can set up the web server, you need to connect the ESP8266 to your computer. You can do this by using a USB to Serial adapter or an FTDI programmer. Make sure to connect the TX pin of the adapter to the TX pin of the ESP8266 and the RX pin to the RX pin.
Open the Arduino IDE, go to Tools > Port, and select the correct port for your ESP8266. This will allow you to upload your code to the ESP8266.
Step 3: Upload the Web Server Code
Now that everything is set up, it’s time to upload the web server code to the ESP8266. You can find example code for a simple web server in the Arduino IDE by going to File > Examples > ESP8266WebServer > HelloServer.
Open the example code, make any necessary modifications, and upload it to the ESP8266 by clicking on the “Upload” button in the Arduino IDE. Once the code is uploaded, open the Serial Monitor to see the IP address assigned to the ESP8266.
Step 4: Access the Web Server
With the web server code uploaded, you can now access the web server by entering the IP address assigned to the ESP8266 in a web browser. You should see a simple webpage with a message displayed on it.
From here, you can modify the web server code to add more functionality or control different aspects of your projects remotely. The possibilities are endless!
Conclusion
Setting up an ESP8266 web server is a fun and rewarding project that opens up a world of possibilities for remote control and monitoring. With the steps outlined in this guide, you can easily set up your own web server and start experimenting with IoT applications. Happy tinkering!