How to Set Up an ESP32 as a BLE Beacon
Beacons are small, Bluetooth-enabled devices that transmit signals to nearby smartphones. These signals can trigger actions on the phone, such as displaying a notification or sending a alert. BLE (Bluetooth Low Energy) beacons are popular for indoor positioning, location-based marketing, and asset tracking applications. In this guide, we will show you how to set up an ESP32 as a BLE beacon.
Step 1: Acquire the Necessary Hardware
Before you can set up your ESP32 as a BLE beacon, you will need to gather the necessary hardware. You will need an ESP32 development board, a USB cable for programming, and a computer with the Arduino IDE installed. The ESP32 is a powerful microcontroller with built-in Wi-Fi and Bluetooth capabilities, making it ideal for IoT projects like BLE beacons.
Step 2: Install the Arduino IDE and ESP32 Board Support
The Arduino IDE is the software development environment used to program the ESP32. You will need to install the Arduino IDE on your computer and add support for the ESP32 board. Follow the instructions on the Arduino website to install the IDE and the necessary board support packages.
Step 3: Set Up the Arduino Sketch
Once you have the Arduino IDE and ESP32 board support installed, you can start setting up the Arduino sketch for the BLE beacon. Open the Arduino IDE, create a new sketch, and copy the following code into the editor:
#include
#include
#include

#define SERVICE_UUID "4fafc201-1fb5-459e-8fcc-c5c9c331914b"
#define CHARACTERISTIC_UUID "beb5483e-36e1-4688-b7f5-ea07361b26a8"

class MyServerCallbacks : public BLEServerCallbacks {
    void onConnect(BLEServer* pServer) {
    };
    void onDisconnect(BLEServer* pServer) {
    }
};

void setup() {
    BLEDevice::init("ESP32 BLE Beacon");
    BLEServer *pServer = BLEDevice::createServer();
    pServer->setCallbacks(new MyServerCallbacks());
    BLEService *pService = pServer->createService(SERVICE_UUID);
    BLECharacteristic *pCharacteristic = pService->createCharacteristic(
            CHARACTERISTIC_UUID,
            BLECharacteristic::PROPERTY_READ |
            BLECharacteristic::PROPERTY_WRITE
    );
    pCharacteristic->setValue("Hello World");
    pService->start();
    BLEAdvertising *pAdvertising = pServer->getAdvertising();
    pAdvertising->start();
}

void loop() {
    delay(2000);
}
This code snippet sets up a basic BLE beacon on the ESP32. The beacon’s service UUID and characteristic UUID are defined, and the beacon broadcasts a “Hello World” message. You can customize the UUIDs and message to suit your needs.
Step 4: Upload the Sketch to the ESP32
Connect your ESP32 development board to your computer using the USB cable. In the Arduino IDE, select the correct board and port from the Tools menu. Click the “Upload” button to compile and upload the sketch to the ESP32. Once the upload is complete, your ESP32 will begin broadcasting as a BLE beacon.
Step 5: Test the BLE Beacon
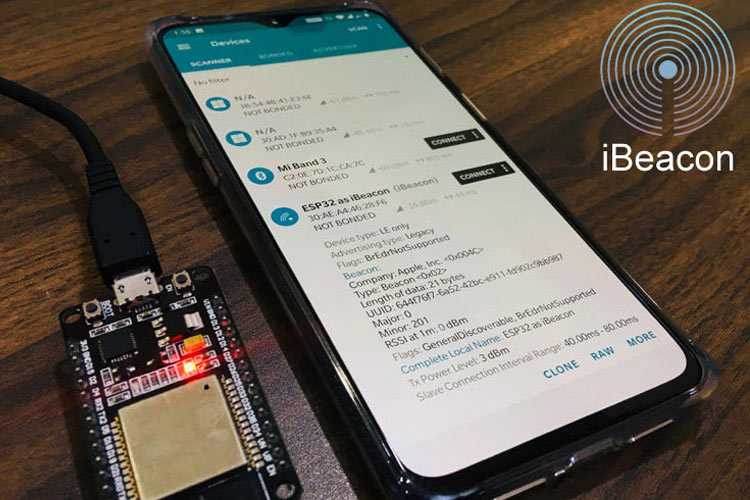
Open a BLE scanning app on your smartphone and scan for nearby devices. You should see your ESP32 beacon listed in the app with the “Hello World” message. Congratulations, you have successfully set up your ESP32 as a BLE beacon!
Conclusion
Setting up an ESP32 as a BLE beacon is a straightforward process that opens up a world of possibilities for IoT projects. Whether you are using beacons for location-based marketing, indoor navigation, or asset tracking, the ESP32’s versatility and power make it an ideal choice for BLE beacon applications.
How to Set Up an ESP32 as a BLE Beacon
Beacons are small, Bluetooth-enabled devices that transmit signals to nearby smartphones. These signals can trigger actions on the phone, such as displaying a notification or sending a alert. BLE (Bluetooth Low Energy) beacons are popular for indoor positioning, location-based marketing, and asset tracking applications. In this guide, we will show you how to set up an ESP32 as a BLE beacon.
Step 1: Acquire the Necessary Hardware
Before you can set up your ESP32 as a BLE beacon, you will need to gather the necessary hardware. You will need an ESP32 development board, a USB cable for programming, and a computer with the Arduino IDE installed. The ESP32 is a powerful microcontroller with built-in Wi-Fi and Bluetooth capabilities, making it ideal for IoT projects like BLE beacons.
Step 2: Install the Arduino IDE and ESP32 Board Support
The Arduino IDE is the software development environment used to program the ESP32. You will need to install the Arduino IDE on your computer and add support for the ESP32 board. Follow the instructions on the Arduino website to install the IDE and the necessary board support packages.
Step 3: Set Up the Arduino Sketch
Once you have the Arduino IDE and ESP32 board support installed, you can start setting up the Arduino sketch for the BLE beacon. Open the Arduino IDE, create a new sketch, and copy the following code into the editor:
#include
#include
#include

#define SERVICE_UUID "4fafc201-1fb5-459e-8fcc-c5c9c331914b"
#define CHARACTERISTIC_UUID "beb5483e-36e1-4688-b7f5-ea07361b26a8"

class MyServerCallbacks : public BLEServerCallbacks {
    void onConnect(BLEServer* pServer) {
    };
    void onDisconnect(BLEServer* pServer) {
    }
};

void setup() {
    BLEDevice::init("ESP32 BLE Beacon");
    BLEServer *pServer = BLEDevice::createServer();
    pServer->setCallbacks(new MyServerCallbacks());
    BLEService *pService = pServer->createService(SERVICE_UUID);
    BLECharacteristic *pCharacteristic = pService->createCharacteristic(
            CHARACTERISTIC_UUID,
            BLECharacteristic::PROPERTY_READ |
            BLECharacteristic::PROPERTY_WRITE
    );
    pCharacteristic->setValue("Hello World");
    pService->start();
    BLEAdvertising *pAdvertising = pServer->getAdvertising();
    pAdvertising->start();
}

void loop() {
    delay(2000);
}
This code snippet sets up a basic BLE beacon on the ESP32. The beacon’s service UUID and characteristic UUID are defined, and the beacon broadcasts a “Hello World” message. You can customize the UUIDs and message to suit your needs.
Step 4: Upload the Sketch to the ESP32
Connect your ESP32 development board to your computer using the USB cable. In the Arduino IDE, select the correct board and port from the Tools menu. Click the “Upload” button to compile and upload the sketch to the ESP32. Once the upload is complete, your ESP32 will begin broadcasting as a BLE beacon.
Step 5: Test the BLE Beacon
Open a BLE scanning app on your smartphone and scan for nearby devices. You should see your ESP32 beacon listed in the app with the “Hello World” message. Congratulations, you have successfully set up your ESP32 as a BLE beacon!
Conclusion
Setting up an ESP32 as a BLE beacon is a straightforward process that opens up a world of possibilities for IoT projects. Whether you are using beacons for location-based marketing, indoor navigation, or asset tracking, the ESP32’s versatility and power make it an ideal choice for BLE beacon applications.