How to Make a Simple Battery Monitor
Have you ever found yourself out and about with your phone or laptop only for it to suddenly die on you because the battery ran out? Or maybe you’re tired of constantly guessing how much juice is left in your rechargeable batteries. A simple battery monitor can help you keep track of your battery levels to avoid these frustrating situations. In this guide, we’ll show you how to make a simple battery monitor using easily accessible materials.
Materials Needed:
- Arduino board
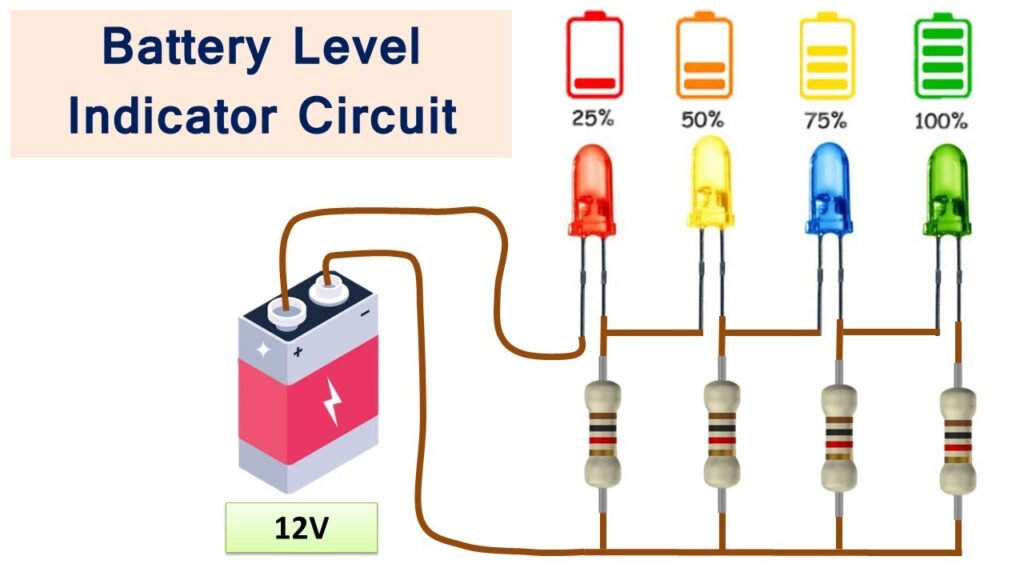
- Resistors
- LEDs (different colors)
- Jumper wires
- Breadboard
- Two 10kΩ resistors
Arduino is an open-source electronics platform that allows you to create interactive projects. You can purchase an Arduino board online or at your local electronics store. Resistors help limit the flow of current in a circuit. LEDs are small lights that indicate the battery level. Jumper wires are used to connect the components, and a breadboard is a handy tool for prototyping circuits. The 10kΩ resistors help prevent the LEDs from being damaged by too much current.
Step 1: Set Up Your Components
Start by connecting one of the 10kΩ resistors to a digital pin on the Arduino board and to the ground. Then connect the other 10kΩ resistor to the same digital pin and to the 5V pin on the board. Next, connect each LED to a different digital pin on the board.

Step 2: Write the Code
Open the Arduino IDE (Integrated Development Environment) on your computer and write the code for the battery monitor. You can find sample code online or write your own. The code should include instructions for reading the battery level and turning on the corresponding LED based on the level.
Step 3: Upload the Code
Connect your Arduino board to your computer using a USB cable. Compile the code in the Arduino IDE and upload it to the board. Make sure to check for any errors before uploading the code.
Step 4: Test Your Battery Monitor
Once the code is uploaded, disconnect the Arduino board from your computer and power it using a battery or USB power source. The LEDs should light up based on the battery level. Test different battery levels to ensure the monitor is working correctly.
Step 5: Customize Your Battery Monitor
Feel free to customize your battery monitor by adding more LEDs for different battery levels or incorporating a display screen to show the exact battery percentage. You can also experiment with different resistor values to adjust the sensitivity of the monitor.
Conclusion
Congratulations! You’ve successfully created a simple battery monitor to keep track of your battery levels. With this monitor, you’ll never have to worry about running out of battery power when you’re on the go. Feel free to share your battery monitor project with friends and family to help them stay charged up too!
How to Make a Simple Battery Monitor
Have you ever found yourself out and about with your phone or laptop only for it to suddenly die on you because the battery ran out? Or maybe you’re tired of constantly guessing how much juice is left in your rechargeable batteries. A simple battery monitor can help you keep track of your battery levels to avoid these frustrating situations. In this guide, we’ll show you how to make a simple battery monitor using easily accessible materials.
Materials Needed:
- Arduino board
- Resistors
- LEDs (different colors)
- Jumper wires
- Breadboard
- Two 10kΩ resistors
Arduino is an open-source electronics platform that allows you to create interactive projects. You can purchase an Arduino board online or at your local electronics store. Resistors help limit the flow of current in a circuit. LEDs are small lights that indicate the battery level. Jumper wires are used to connect the components, and a breadboard is a handy tool for prototyping circuits. The 10kΩ resistors help prevent the LEDs from being damaged by too much current.
Step 1: Set Up Your Components
Start by connecting one of the 10kΩ resistors to a digital pin on the Arduino board and to the ground. Then connect the other 10kΩ resistor to the same digital pin and to the 5V pin on the board. Next, connect each LED to a different digital pin on the board.
Step 2: Write the Code
Open the Arduino IDE (Integrated Development Environment) on your computer and write the code for the battery monitor. You can find sample code online or write your own. The code should include instructions for reading the battery level and turning on the corresponding LED based on the level.
Step 3: Upload the Code
Connect your Arduino board to your computer using a USB cable. Compile the code in the Arduino IDE and upload it to the board. Make sure to check for any errors before uploading the code.
Step 4: Test Your Battery Monitor
Once the code is uploaded, disconnect the Arduino board from your computer and power it using a battery or USB power source. The LEDs should light up based on the battery level. Test different battery levels to ensure the monitor is working correctly.
Step 5: Customize Your Battery Monitor
Feel free to customize your battery monitor by adding more LEDs for different battery levels or incorporating a display screen to show the exact battery percentage. You can also experiment with different resistor values to adjust the sensitivity of the monitor.
Conclusion
Congratulations! You’ve successfully created a simple battery monitor to keep track of your battery levels. With this monitor, you’ll never have to worry about running out of battery power when you’re on the go. Feel free to share your battery monitor project with friends and family to help them stay charged up too!