How to Make a Basic Light Dimmer Circuit
Are you looking to create a simple light dimmer circuit for your DIY project? With just a few components and a little bit of soldering, you can easily build your own basic light dimmer circuit. In this tutorial, we will guide you through the process step by step, so you can dim the lights in your bedroom, living room, or any other space with ease.
Materials Needed:
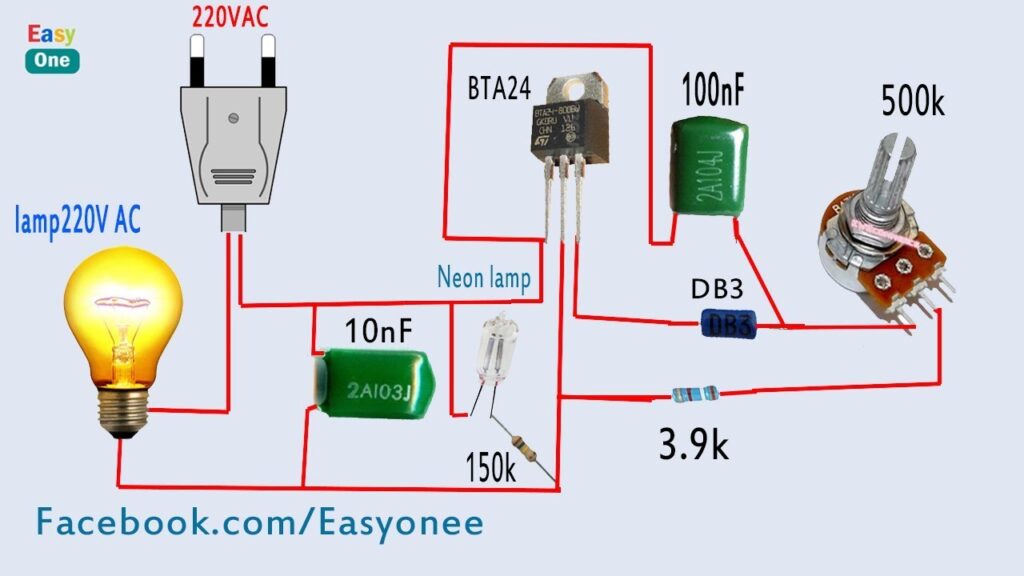
- Triac (such as BT136)
- Diac (such as DB3)
- Resistor (220-330 ohms)
- Capacitor (0.1uF)
- Potentiometer (10k ohms)
- LED bulb
- Connecting wires
- Soldering iron and solder
- Perfboard or breadboard
- Multimeter
Step-by-Step Instructions:
1. Start by setting up your workspace with all the necessary materials.
2. Place the Triac, Diac, resistor, capacitor, and potentiometer on the perfboard or breadboard.
3. Connect the components according to the schematic diagram. Make sure to double-check all connections before soldering.
4. Test the circuit with a multimeter to ensure there are no shorts or open circuits.
5. Connect the LED bulb to the circuit and power it up.
6. Turn the potentiometer to adjust the brightness of the LED bulb. You should see the light dimming as you turn the potentiometer.
Troubleshooting Tips:
If the light does not dim properly or flickers, try the following troubleshooting steps:
- Check all connections for loose wires or solder joints.
- Verify the values of the components are correct.
- Replace the potentiometer if it is faulty.
- Ensure the Triac and Diac are connected in the right orientation.
By following these steps, you can create a basic light dimmer circuit for your DIY projects. Have fun experimenting with different components and configurations to achieve the desired lighting effect in your space!
How to Make a Basic Light Dimmer Circuit
Are you looking to create a simple light dimmer circuit for your DIY project? With just a few components and a little bit of soldering, you can easily build your own basic light dimmer circuit. In this tutorial, we will guide you through the process step by step, so you can dim the lights in your bedroom, living room, or any other space with ease.
Materials Needed:
- Triac (such as BT136)
- Diac (such as DB3)
- Resistor (220-330 ohms)
- Capacitor (0.1uF)
- Potentiometer (10k ohms)
- LED bulb
- Connecting wires
- Soldering iron and solder
- Perfboard or breadboard
- Multimeter
Step-by-Step Instructions:
1. Start by setting up your workspace with all the necessary materials.
2. Place the Triac, Diac, resistor, capacitor, and potentiometer on the perfboard or breadboard.
3. Connect the components according to the schematic diagram. Make sure to double-check all connections before soldering.
4. Test the circuit with a multimeter to ensure there are no shorts or open circuits.
5. Connect the LED bulb to the circuit and power it up.
6. Turn the potentiometer to adjust the brightness of the LED bulb. You should see the light dimming as you turn the potentiometer.
Troubleshooting Tips:
If the light does not dim properly or flickers, try the following troubleshooting steps:
- Check all connections for loose wires or solder joints.
- Verify the values of the components are correct.
- Replace the potentiometer if it is faulty.
- Ensure the Triac and Diac are connected in the right orientation.
By following these steps, you can create a basic light dimmer circuit for your DIY projects. Have fun experimenting with different components and configurations to achieve the desired lighting effect in your space!