How to Interface an OLED Display with an ESP8266
Are you looking to add a sleek OLED display to your ESP8266 project? In this tutorial, we will show you how to interface an OLED display with an ESP8266 microcontroller. OLED displays are known for their crisp and vibrant displays, making them a popular choice for projects that require visual feedback.
What You Will Need:
- ESP8266 microcontroller
- OLED display module
- Jumper wires
- Soldering iron (optional)
Step 1: Setting Up the Hardware
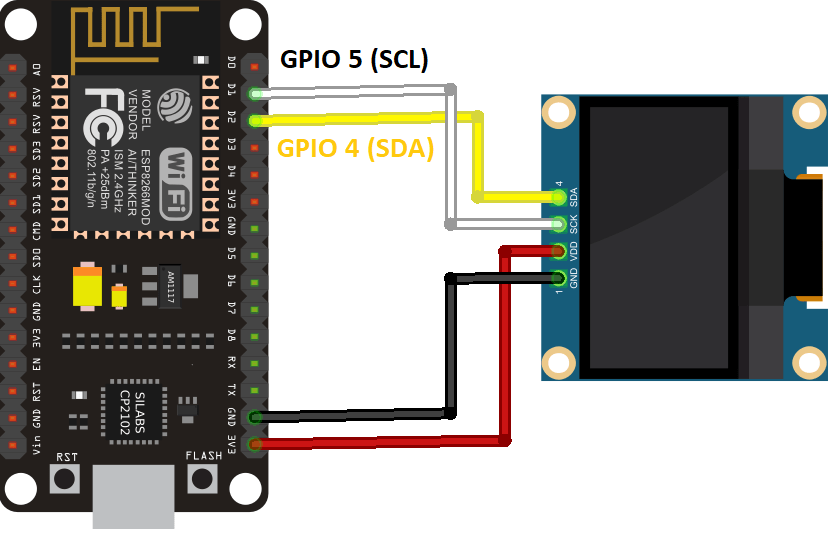
Before we can start interfacing the OLED display with the ESP8266, we need to set up the hardware. First, connect the OLED display module to the ESP8266 using jumper wires. Make sure to connect the VCC pin of the OLED display to the 3.3V pin of the ESP8266, the GND pin to the GND pin, and the SDA and SCL pins to the appropriate GPIO pins on the ESP8266. If needed, you can also solder the connections for a more secure fit.
Step 2: Installing the Libraries
Next, we need to install the necessary libraries to drive the OLED display. You can use libraries like Adafruit’s SSD1306 library to easily communicate with the OLED display. Simply download the library and include it in your Arduino IDE by going to Sketch > Include Library > Add .ZIP Library.
Step 3: Writing the Code
Now it’s time to write the code to display content on the OLED display. You can start by initializing the OLED display in your setup function and then use functions like display.clearDisplay() and display.setTextSize() to control what is displayed on the screen. You can also display text, graphics, and even animations on the OLED display.
Step 4: Uploading the Code
Once you have written the code, upload it to your ESP8266 board using the Arduino IDE. Make sure to select the correct board and port in the Tools menu before uploading the code. Once the code is uploaded, you should see your content displayed on the OLED screen!
Step 5: Testing and Troubleshooting
After uploading the code, it’s time to test your setup and troubleshoot any issues that may arise. Check for any loose connections, incorrect wiring, or programming errors that could prevent the OLED display from functioning properly. With a bit of patience and perseverance, you will have a fully functional OLED display interfaced with your ESP8266!
Conclusion
Adding an OLED display to your ESP8266 project can take it to the next level by providing visual feedback and information. With the right hardware setup, libraries, and code, you can easily interface an OLED display with an ESP8266 microcontroller. So, what are you waiting for? Start experimenting with OLED displays and enhance your projects today!
How to Interface an OLED Display with an ESP8266
Are you looking to add a sleek OLED display to your ESP8266 project? In this tutorial, we will show you how to interface an OLED display with an ESP8266 microcontroller. OLED displays are known for their crisp and vibrant displays, making them a popular choice for projects that require visual feedback.
What You Will Need:
- ESP8266 microcontroller
- OLED display module
- Jumper wires
- Soldering iron (optional)
Step 1: Setting Up the Hardware
Before we can start interfacing the OLED display with the ESP8266, we need to set up the hardware. First, connect the OLED display module to the ESP8266 using jumper wires. Make sure to connect the VCC pin of the OLED display to the 3.3V pin of the ESP8266, the GND pin to the GND pin, and the SDA and SCL pins to the appropriate GPIO pins on the ESP8266. If needed, you can also solder the connections for a more secure fit.
Step 2: Installing the Libraries
Next, we need to install the necessary libraries to drive the OLED display. You can use libraries like Adafruit’s SSD1306 library to easily communicate with the OLED display. Simply download the library and include it in your Arduino IDE by going to Sketch > Include Library > Add .ZIP Library.
Step 3: Writing the Code
Now it’s time to write the code to display content on the OLED display. You can start by initializing the OLED display in your setup function and then use functions like display.clearDisplay() and display.setTextSize() to control what is displayed on the screen. You can also display text, graphics, and even animations on the OLED display.
Step 4: Uploading the Code
Once you have written the code, upload it to your ESP8266 board using the Arduino IDE. Make sure to select the correct board and port in the Tools menu before uploading the code. Once the code is uploaded, you should see your content displayed on the OLED screen!
Step 5: Testing and Troubleshooting
After uploading the code, it’s time to test your setup and troubleshoot any issues that may arise. Check for any loose connections, incorrect wiring, or programming errors that could prevent the OLED display from functioning properly. With a bit of patience and perseverance, you will have a fully functional OLED display interfaced with your ESP8266!
Conclusion
Adding an OLED display to your ESP8266 project can take it to the next level by providing visual feedback and information. With the right hardware setup, libraries, and code, you can easily interface an OLED display with an ESP8266 microcontroller. So, what are you waiting for? Start experimenting with OLED displays and enhance your projects today!