How to Interface a Keypad with a PIC Microcontroller
Keypads are commonly used as input devices in various electronic projects. They allow users to interact with a system by pressing different buttons to perform specific functions. In this article, we will explore how to interface a keypad with a PIC microcontroller, enabling you to create your own projects that require user input.
Interfacing a keypad with a PIC microcontroller involves connecting the individual keys on the keypad to the input ports of the microcontroller. This allows the microcontroller to detect which key has been pressed and take appropriate action based on that input.
Before we begin, make sure you have the following components:
- PIC microcontroller (such as PIC16F877A)
- 4×4 matrix keypad
- Jumper wires
- Resistors (optional, for pull-up/down configuration)
To interface the keypad with the PIC microcontroller, follow these steps:
Step 1: Connect the Keypad Pins to the Microcontroller
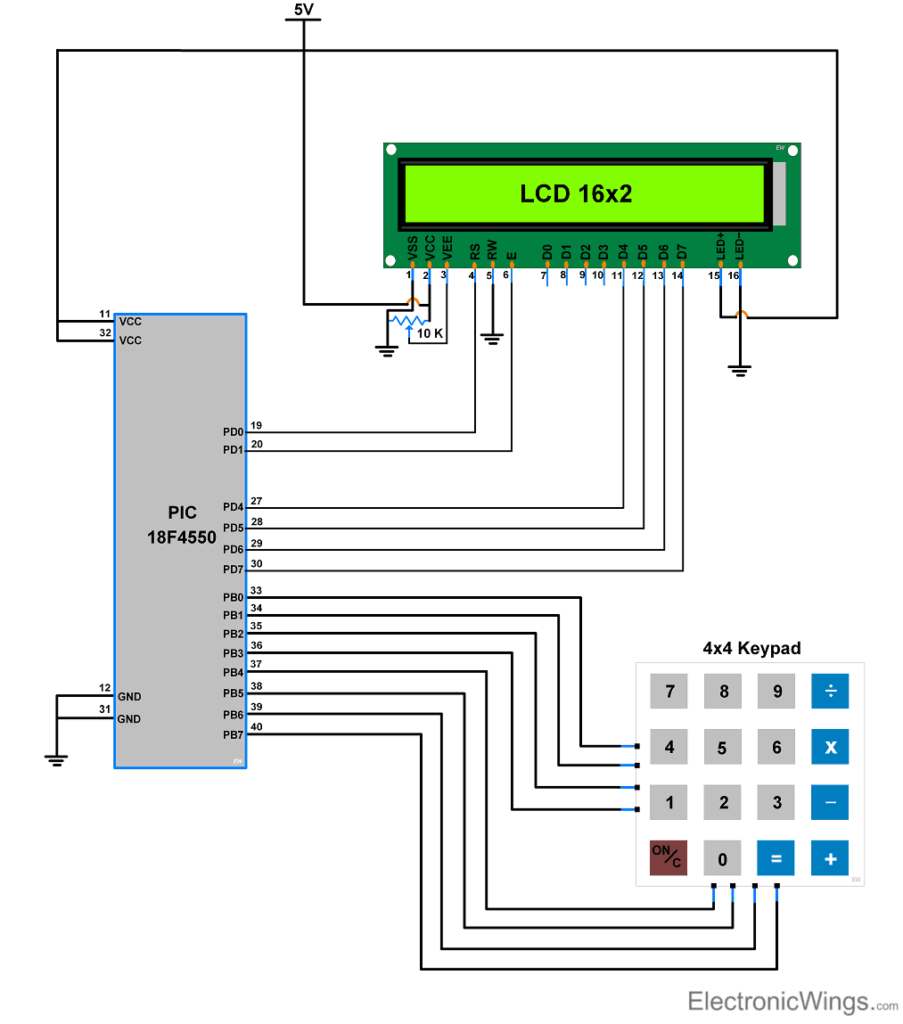
Identify the rows and columns on the 4×4 matrix keypad. Typically, the rows are connected to the output pins on the keypad, while the columns are connected to the input pins. Use jumper wires to connect the keypad pins to the corresponding input/output pins on the PIC microcontroller.
It is essential to configure the keypad pins as either inputs or outputs based on your microcontroller’s specifications. You may also need to use pull-up or pull-down resistors to ensure stable input signals.
Step 2: Read Keypad Input in the PIC Microcontroller Code
In your PIC microcontroller code, implement a keypad scanning algorithm to read input from the keypad. This algorithm typically involves iterating through each row and checking the corresponding columns to detect which key has been pressed.
Based on the key detected, you can perform specific actions or functions in your project. You may also consider debouncing the keypad input to eliminate any noise or false triggering.
Step 3: Implement User Interface Logic
With the keypad input successfully read in the PIC microcontroller code, you can now implement the user interface logic of your project. This may involve menu navigation, password input, or any other user interaction based on the keypad input.
Test your project thoroughly to ensure the keypad interface works as intended and provides a seamless user experience. Make any necessary adjustments to improve functionality and eliminate any bugs or issues.
By following these steps, you can successfully interface a keypad with a PIC microcontroller and create projects that require user input. Experiment with different keypad configurations and functionalities to enhance your projects and develop your skills in microcontroller programming.
Have fun exploring the possibilities of keypad interfacing with PIC microcontrollers and unleash your creativity in electronic projects!
How to Interface a Keypad with a PIC Microcontroller
Keypads are commonly used as input devices in various electronic projects. They allow users to interact with a system by pressing different buttons to perform specific functions. In this article, we will explore how to interface a keypad with a PIC microcontroller, enabling you to create your own projects that require user input.
Interfacing a keypad with a PIC microcontroller involves connecting the individual keys on the keypad to the input ports of the microcontroller. This allows the microcontroller to detect which key has been pressed and take appropriate action based on that input.
Before we begin, make sure you have the following components:
- PIC microcontroller (such as PIC16F877A)
- 4×4 matrix keypad
- Jumper wires
- Resistors (optional, for pull-up/down configuration)
To interface the keypad with the PIC microcontroller, follow these steps:
Step 1: Connect the Keypad Pins to the Microcontroller
Identify the rows and columns on the 4×4 matrix keypad. Typically, the rows are connected to the output pins on the keypad, while the columns are connected to the input pins. Use jumper wires to connect the keypad pins to the corresponding input/output pins on the PIC microcontroller.
It is essential to configure the keypad pins as either inputs or outputs based on your microcontroller’s specifications. You may also need to use pull-up or pull-down resistors to ensure stable input signals.
Step 2: Read Keypad Input in the PIC Microcontroller Code
In your PIC microcontroller code, implement a keypad scanning algorithm to read input from the keypad. This algorithm typically involves iterating through each row and checking the corresponding columns to detect which key has been pressed.
Based on the key detected, you can perform specific actions or functions in your project. You may also consider debouncing the keypad input to eliminate any noise or false triggering.
Step 3: Implement User Interface Logic
With the keypad input successfully read in the PIC microcontroller code, you can now implement the user interface logic of your project. This may involve menu navigation, password input, or any other user interaction based on the keypad input.
Test your project thoroughly to ensure the keypad interface works as intended and provides a seamless user experience. Make any necessary adjustments to improve functionality and eliminate any bugs or issues.
By following these steps, you can successfully interface a keypad with a PIC microcontroller and create projects that require user input. Experiment with different keypad configurations and functionalities to enhance your projects and develop your skills in microcontroller programming.
Have fun exploring the possibilities of keypad interfacing with PIC microcontrollers and unleash your creativity in electronic projects!