How to Integrate ESP8266 with Node-RED?
Are you ready to take your IoT projects to the next level by integrating ESP8266 with Node-RED? In this tutorial, we’ll walk you through the process step by step so you can harness the power of these two incredible tools together. Let’s get started!
What is ESP8266?
ESP8266 is a low-cost Wi-Fi microchip with full TCP/IP stack and microcontroller capability produced by Espressif Systems. It is widely used in IoT applications due to its affordability and ease of use. With ESP8266, you can connect your devices to the internet and facilitate communication between them.
What is Node-RED?
Node-RED is a flow-based development tool for visual programming developed by IBM. It is built on top of Node.js and provides a browser-based editor that makes it easy to wire together devices, APIs, and online services. Node-RED simplifies the process of wiring together APIs and hardware devices for IoT projects.
Why Integrate ESP8266 with Node-RED?
By integrating ESP8266 with Node-RED, you can create powerful IoT applications with minimal effort. Node-RED’s visual programming interface makes it easy to wire together different components and services, while ESP8266 enables your devices to connect to the internet and communicate with each other. Together, these two tools can streamline the development process and help you create innovative IoT solutions.
Step 1: Install Node-RED
The first step in integrating ESP8266 with Node-RED is to install Node-RED on your computer or server. You can easily do this by following the installation instructions on the official Node-RED website. Once Node-RED is up and running, you can start building your IoT flows and connecting different devices and services.
Step 2: Set Up ESP8266
Next, you’ll need to set up your ESP8266 device to connect to your Wi-Fi network. You can do this by flashing the ESP8266 firmware with the appropriate code using the Arduino IDE. Once your ESP8266 is connected to Wi-Fi, it can begin sending and receiving data over the internet.
Step 3: Create IoT Flows in Node-RED
Now that both Node-RED and ESP8266 are set up, it’s time to start building your IoT flows in Node-RED. You can create flows that read data from sensors connected to your ESP8266 device, send commands to control your devices, and visualize your data in real-time. With Node-RED’s intuitive interface, you can easily wire together different nodes to create complex IoT applications.
Step 4: Connect ESP8266 to Node-RED
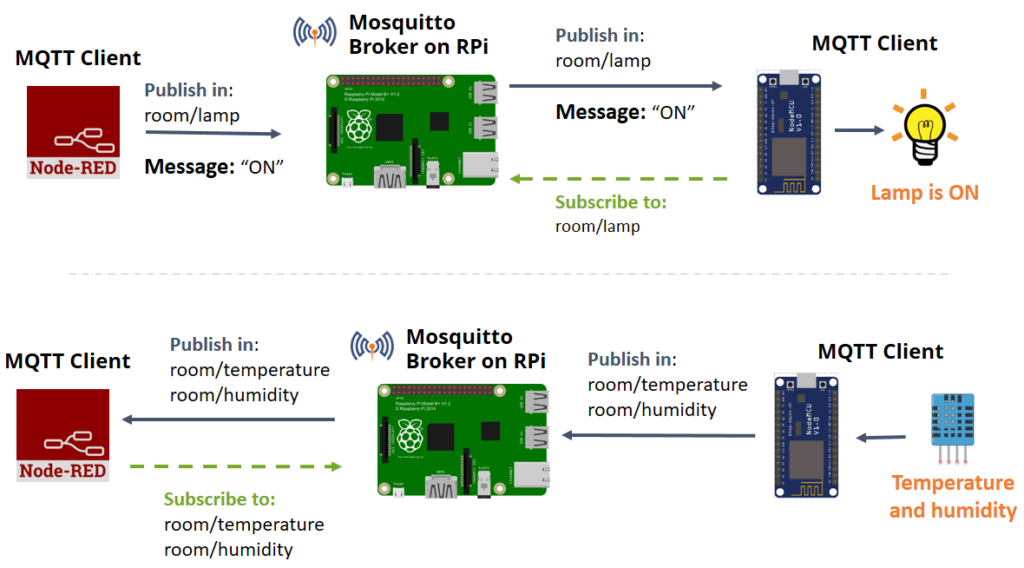
To connect your ESP8266 device to Node-RED, you can use the MQTT protocol for communication. MQTT is a lightweight messaging protocol that is ideal for IoT applications. By setting up an MQTT broker on Node-RED and configuring your ESP8266 device to publish and subscribe to MQTT topics, you can establish a reliable communication channel between the two.
Step 5: Test Your Integration
Once you have connected your ESP8266 device to Node-RED, it’s time to test your integration. Send some test messages from your ESP8266 device to Node-RED and verify that they are received successfully. You can also send commands from Node-RED to your ESP8266 device and check if they are executed as expected. Testing is crucial to ensure that your integration is working smoothly.
Step 6: Expand Your Project
Now that you have successfully integrated ESP8266 with Node-RED, you can start expanding your project and adding more features. You can connect additional devices to your Node-RED flows, create dashboards to visualize your data, and even integrate with cloud services for advanced functionality. The possibilities are endless once you have the foundation in place.
Conclusion
Integrating ESP8266 with Node-RED opens up a world of possibilities for your IoT projects. By combining the power of ESP8266 for device connectivity and Node-RED for visual programming, you can create innovative IoT applications with ease. Follow the steps outlined in this tutorial to bring your IoT projects to life and unlock the full potential of these two powerful tools.
How to Integrate ESP8266 with Node-RED?
Are you ready to take your IoT projects to the next level by integrating ESP8266 with Node-RED? In this tutorial, we’ll walk you through the process step by step so you can harness the power of these two incredible tools together. Let’s get started!
What is ESP8266?
ESP8266 is a low-cost Wi-Fi microchip with full TCP/IP stack and microcontroller capability produced by Espressif Systems. It is widely used in IoT applications due to its affordability and ease of use. With ESP8266, you can connect your devices to the internet and facilitate communication between them.
What is Node-RED?
Node-RED is a flow-based development tool for visual programming developed by IBM. It is built on top of Node.js and provides a browser-based editor that makes it easy to wire together devices, APIs, and online services. Node-RED simplifies the process of wiring together APIs and hardware devices for IoT projects.
Why Integrate ESP8266 with Node-RED?
By integrating ESP8266 with Node-RED, you can create powerful IoT applications with minimal effort. Node-RED’s visual programming interface makes it easy to wire together different components and services, while ESP8266 enables your devices to connect to the internet and communicate with each other. Together, these two tools can streamline the development process and help you create innovative IoT solutions.
Step 1: Install Node-RED
The first step in integrating ESP8266 with Node-RED is to install Node-RED on your computer or server. You can easily do this by following the installation instructions on the official Node-RED website. Once Node-RED is up and running, you can start building your IoT flows and connecting different devices and services.
Step 2: Set Up ESP8266
Next, you’ll need to set up your ESP8266 device to connect to your Wi-Fi network. You can do this by flashing the ESP8266 firmware with the appropriate code using the Arduino IDE. Once your ESP8266 is connected to Wi-Fi, it can begin sending and receiving data over the internet.
Step 3: Create IoT Flows in Node-RED
Now that both Node-RED and ESP8266 are set up, it’s time to start building your IoT flows in Node-RED. You can create flows that read data from sensors connected to your ESP8266 device, send commands to control your devices, and visualize your data in real-time. With Node-RED’s intuitive interface, you can easily wire together different nodes to create complex IoT applications.
Step 4: Connect ESP8266 to Node-RED
To connect your ESP8266 device to Node-RED, you can use the MQTT protocol for communication. MQTT is a lightweight messaging protocol that is ideal for IoT applications. By setting up an MQTT broker on Node-RED and configuring your ESP8266 device to publish and subscribe to MQTT topics, you can establish a reliable communication channel between the two.
Step 5: Test Your Integration
Once you have connected your ESP8266 device to Node-RED, it’s time to test your integration. Send some test messages from your ESP8266 device to Node-RED and verify that they are received successfully. You can also send commands from Node-RED to your ESP8266 device and check if they are executed as expected. Testing is crucial to ensure that your integration is working smoothly.
Step 6: Expand Your Project
Now that you have successfully integrated ESP8266 with Node-RED, you can start expanding your project and adding more features. You can connect additional devices to your Node-RED flows, create dashboards to visualize your data, and even integrate with cloud services for advanced functionality. The possibilities are endless once you have the foundation in place.
Conclusion
Integrating ESP8266 with Node-RED opens up a world of possibilities for your IoT projects. By combining the power of ESP8266 for device connectivity and Node-RED for visual programming, you can create innovative IoT applications with ease. Follow the steps outlined in this tutorial to bring your IoT projects to life and unlock the full potential of these two powerful tools.