How to Install an Inverter in a Camper Van
Are you looking to add some extra power to your camper van for all your electronic devices? Installing an inverter is a great way to do just that. An inverter will allow you to use and charge your devices while on the road, giving you the convenience of home even when you’re in the great outdoors. In this guide, we’ll walk you through the steps to install an inverter in your camper van.
1. Choose the Right Inverter
Before beginning the installation process, you’ll need to choose the right inverter for your needs. Consider the size and capacity of the inverter, as well as the type of devices you’ll be using with it. A pure sine wave inverter is usually recommended for sensitive electronic devices, while a modified sine wave inverter is more budget-friendly.
- Calculate the total wattage of all devices you plan to use simultaneously
- Choose an inverter with a continuous load rating that exceeds your calculated wattage
- Consider additional features such as USB ports or remote control capabilities
2. Locate a Suitable Installation Spot
Next, you’ll need to find a suitable spot to install your inverter. Make sure to choose a location that is well-ventilated and protected from moisture and vibration. Some common installation spots include under the driver’s seat, in a storage compartment, or in a dedicated electronics cabinet.
- Avoid installing the inverter near heat sources or flammable materials
- Ensure there is enough clearance for air circulation around the inverter
- Use insulated mounting hardware to secure the inverter in place
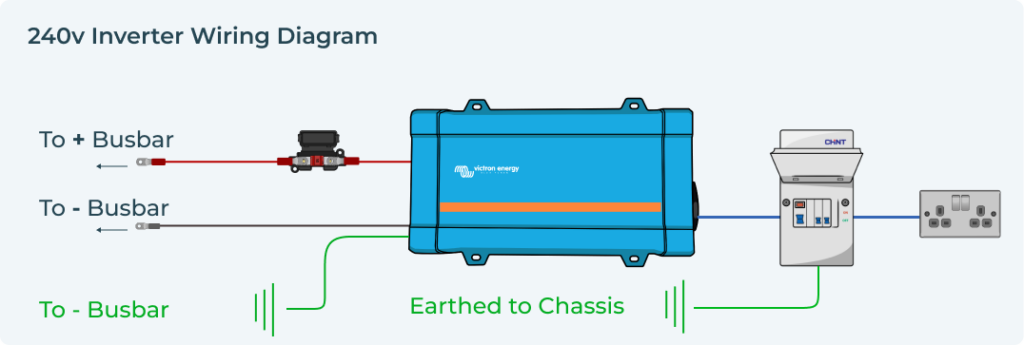
3. Connect the Inverter to the Battery
Now it’s time to connect your inverter to the camper van’s battery. To do this, you’ll need to connect the red wire from the inverter to the positive terminal of the battery and the black wire to the negative terminal. Make sure to use proper gauge wire for the connection and secure the wires using crimp connectors or soldering.
- Install an in-line fuse near the battery to protect your inverter from electrical surges
- Use a multimeter to ensure the correct polarity before connecting the inverter
- Consider installing a battery isolation switch for added safety
4. Test the Inverter
Once everything is connected, it’s time to test your inverter. Start by turning on the inverter and plugging in a small device to ensure it’s working correctly. If everything is functioning as it should, you’re all set to enjoy the benefits of your new power source on the road!
By following these simple steps, you can easily install an inverter in your camper van and enjoy the convenience of powering your devices while on the go. Have fun exploring the great outdoors with all the comforts of home!
How to Install an Inverter in a Camper Van
Are you looking to add some extra power to your camper van for all your electronic devices? Installing an inverter is a great way to do just that. An inverter will allow you to use and charge your devices while on the road, giving you the convenience of home even when you’re in the great outdoors. In this guide, we’ll walk you through the steps to install an inverter in your camper van.
1. Choose the Right Inverter
Before beginning the installation process, you’ll need to choose the right inverter for your needs. Consider the size and capacity of the inverter, as well as the type of devices you’ll be using with it. A pure sine wave inverter is usually recommended for sensitive electronic devices, while a modified sine wave inverter is more budget-friendly.
- Calculate the total wattage of all devices you plan to use simultaneously
- Choose an inverter with a continuous load rating that exceeds your calculated wattage
- Consider additional features such as USB ports or remote control capabilities
2. Locate a Suitable Installation Spot
Next, you’ll need to find a suitable spot to install your inverter. Make sure to choose a location that is well-ventilated and protected from moisture and vibration. Some common installation spots include under the driver’s seat, in a storage compartment, or in a dedicated electronics cabinet.
- Avoid installing the inverter near heat sources or flammable materials
- Ensure there is enough clearance for air circulation around the inverter
- Use insulated mounting hardware to secure the inverter in place
3. Connect the Inverter to the Battery
Now it’s time to connect your inverter to the camper van’s battery. To do this, you’ll need to connect the red wire from the inverter to the positive terminal of the battery and the black wire to the negative terminal. Make sure to use proper gauge wire for the connection and secure the wires using crimp connectors or soldering.
- Install an in-line fuse near the battery to protect your inverter from electrical surges
- Use a multimeter to ensure the correct polarity before connecting the inverter
- Consider installing a battery isolation switch for added safety
4. Test the Inverter
Once everything is connected, it’s time to test your inverter. Start by turning on the inverter and plugging in a small device to ensure it’s working correctly. If everything is functioning as it should, you’re all set to enjoy the benefits of your new power source on the road!
By following these simple steps, you can easily install an inverter in your camper van and enjoy the convenience of powering your devices while on the go. Have fun exploring the great outdoors with all the comforts of home!