How to Flash OpenWrt on a Smart Plug
If you’re looking to maximize the potential of your smart plug, flashing OpenWrt onto it can unlock a world of possibilities. OpenWrt is a customizable Linux-based firmware that can transform your smart plug into a versatile device that can do much more than its original purpose.
Flashing OpenWrt on a smart plug may sound complex, but with the right tools and guidance, it can be a relatively straightforward process. In this guide, we’ll walk you through the steps to flash OpenWrt on your smart plug and reap the benefits of this powerful firmware.
Things You’ll Need:
- A compatible smart plug (make sure it’s supported by OpenWrt)
- A computer with an internet connection
- A USB-to-serial adapter
- A stable power source
- Patience and attention to detail
Step 1: Research and Preparation
Before you begin, it’s essential to research whether your smart plug is compatible with OpenWrt. Visit the OpenWrt website to check the list of supported devices and ensure that your smart plug is included.
Next, gather all the necessary tools and materials listed above to ensure a smooth flashing process. Make sure your computer is fully charged or connected to a power source to avoid interruptions during the flashing procedure.
Step 2: Flashing OpenWrt
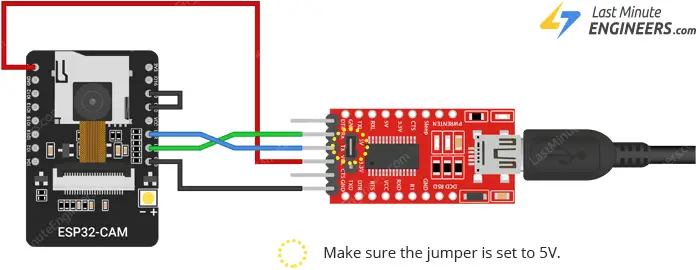
Connect your smart plug to your computer using the USB-to-serial adapter. Follow the instructions provided by the OpenWrt documentation to put your smart plug in the flashing mode. This typically involves connecting specific pins on the device to enter the bootloader mode.
Once your smart plug is in flashing mode, use the OpenWrt firmware image to flash the device. Follow the step-by-step instructions provided by OpenWrt carefully to ensure a successful flashing process. Be patient and allow the firmware to install completely before disconnecting the device.
Step 3: Configuration and Testing
After flashing OpenWrt onto your smart plug, you can now configure it to suit your needs. Access the OpenWrt web interface by entering the device’s IP address in your web browser and set up the necessary configurations.
Test the functionality of your smart plug to ensure that it’s working as expected with OpenWrt installed. Explore the various features and options available with OpenWrt to customize your smart plug according to your preferences.
Conclusion
Flashing OpenWrt on a smart plug opens up a world of possibilities and customization options for your device. By following the steps outlined in this guide and being patient throughout the process, you can unlock the full potential of your smart plug with OpenWrt firmware.
Enjoy the enhanced functionality and versatility that OpenWrt brings to your smart plug, and explore the endless opportunities to optimize your device for your specific needs.
How to Flash OpenWrt on a Smart Plug
If you’re looking to maximize the potential of your smart plug, flashing OpenWrt onto it can unlock a world of possibilities. OpenWrt is a customizable Linux-based firmware that can transform your smart plug into a versatile device that can do much more than its original purpose.
Flashing OpenWrt on a smart plug may sound complex, but with the right tools and guidance, it can be a relatively straightforward process. In this guide, we’ll walk you through the steps to flash OpenWrt on your smart plug and reap the benefits of this powerful firmware.
Things You’ll Need:
- A compatible smart plug (make sure it’s supported by OpenWrt)
- A computer with an internet connection
- A USB-to-serial adapter
- A stable power source
- Patience and attention to detail
Step 1: Research and Preparation
Before you begin, it’s essential to research whether your smart plug is compatible with OpenWrt. Visit the OpenWrt website to check the list of supported devices and ensure that your smart plug is included.
Next, gather all the necessary tools and materials listed above to ensure a smooth flashing process. Make sure your computer is fully charged or connected to a power source to avoid interruptions during the flashing procedure.
Step 2: Flashing OpenWrt
Connect your smart plug to your computer using the USB-to-serial adapter. Follow the instructions provided by the OpenWrt documentation to put your smart plug in the flashing mode. This typically involves connecting specific pins on the device to enter the bootloader mode.
Once your smart plug is in flashing mode, use the OpenWrt firmware image to flash the device. Follow the step-by-step instructions provided by OpenWrt carefully to ensure a successful flashing process. Be patient and allow the firmware to install completely before disconnecting the device.
Step 3: Configuration and Testing
After flashing OpenWrt onto your smart plug, you can now configure it to suit your needs. Access the OpenWrt web interface by entering the device’s IP address in your web browser and set up the necessary configurations.
Test the functionality of your smart plug to ensure that it’s working as expected with OpenWrt installed. Explore the various features and options available with OpenWrt to customize your smart plug according to your preferences.
Conclusion
Flashing OpenWrt on a smart plug opens up a world of possibilities and customization options for your device. By following the steps outlined in this guide and being patient throughout the process, you can unlock the full potential of your smart plug with OpenWrt firmware.
Enjoy the enhanced functionality and versatility that OpenWrt brings to your smart plug, and explore the endless opportunities to optimize your device for your specific needs.