How to Create a Solar-Powered LED Circuit
If you’re looking for a fun and eco-friendly DIY project, creating a solar-powered LED circuit is a great choice. Not only is it a sustainable way to power your LEDs, but it also provides a hands-on learning experience in electrical circuits and renewable energy. In this step-by-step guide, we’ll walk you through the process of building your own solar-powered LED circuit.
Materials Needed:
- Solar panel (5V)
- LED lights
- Resistors
- Breadboard
- Jumper wires
- Soldering iron
- Solder
Step 1: Understand the Basics
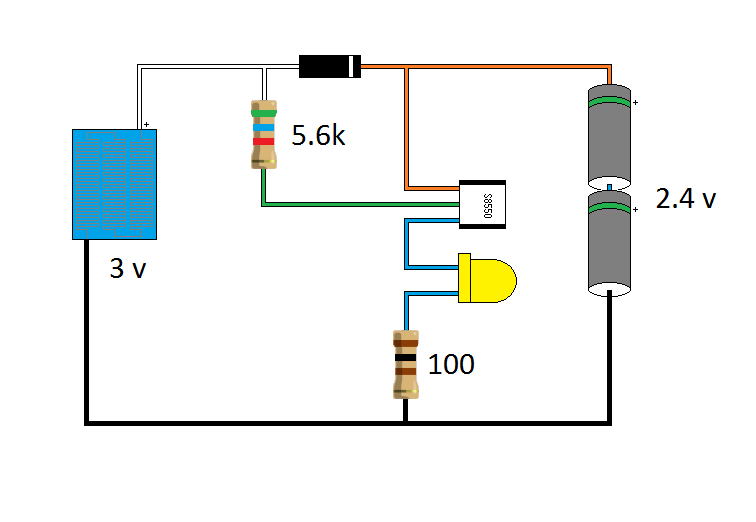
Before you start building your solar-powered LED circuit, it’s important to understand the basics of how it works. Solar panels convert sunlight into electrical energy, which can then be stored in a battery or used to power devices directly. LEDs (Light Emitting Diodes) are energy-efficient light sources that require very low voltage to operate. By combining these two components, you can create a self-sustaining lighting system that runs on renewable energy.
Step 2: Connect the Components
Start by placing the solar panel on the breadboard, making sure to connect the positive and negative terminals correctly. Next, connect the LED lights to the breadboard, along with the appropriate resistors to limit the current flow. Use jumper wires to make the necessary connections between the components, ensuring a secure and stable setup.
Step 3: Test the Circuit
Once you’ve connected all the components, it’s time to test the circuit. Place the solar panel in direct sunlight and observe the LED lights turning on. If the lights don’t turn on, double-check your connections and make sure everything is properly connected. Adjust the positioning of the solar panel to maximize sunlight exposure and optimize the performance of the circuit.
Step 4: Customize and Expand
After successfully creating a basic solar-powered LED circuit, you can customize and expand it to suit your needs. Add more LED lights for increased brightness, incorporate a rechargeable battery for extended usage, or experiment with different resistor values to achieve the desired brightness levels. The possibilities are endless, so feel free to get creative and make your solar-powered LED circuit unique.
Step 5: Enjoy Your Solar-Powered Creation
Congratulations! You’ve successfully created a solar-powered LED circuit that harnesses the power of the sun to illuminate your surroundings. Whether you use it for outdoor lighting, decorative purposes, or educational projects, your solar-powered LED circuit is a great example of sustainable technology in action. Embrace the power of solar energy and continue exploring the world of renewable energy solutions through hands-on experimentation and creativity.
By following these steps and experimenting with different configurations, you can learn more about electrical circuits, solar power, and LED technology. So gather your materials, roll up your sleeves, and embark on a rewarding journey to create your own solar-powered LED circuit. Happy tinkering!


