How to Create a Smart Switch Circuit
Creating your own smart switch circuit can be a fun and rewarding project. With a smart switch, you can control your lights, appliances, or other devices remotely using your smartphone or voice assistant. In this article, we will guide you through the process of building your own smart switch circuit.
Materials Required
- Microcontroller (e.g., Arduino or ESP8266)
- Relay module
- Bluetooth or Wi-Fi module
- Perfboard or PCB
- LEDs
- Resistors
- Jumper wires
- Soldering iron and solder
- Breadboard
- Power supply
- Enclosure
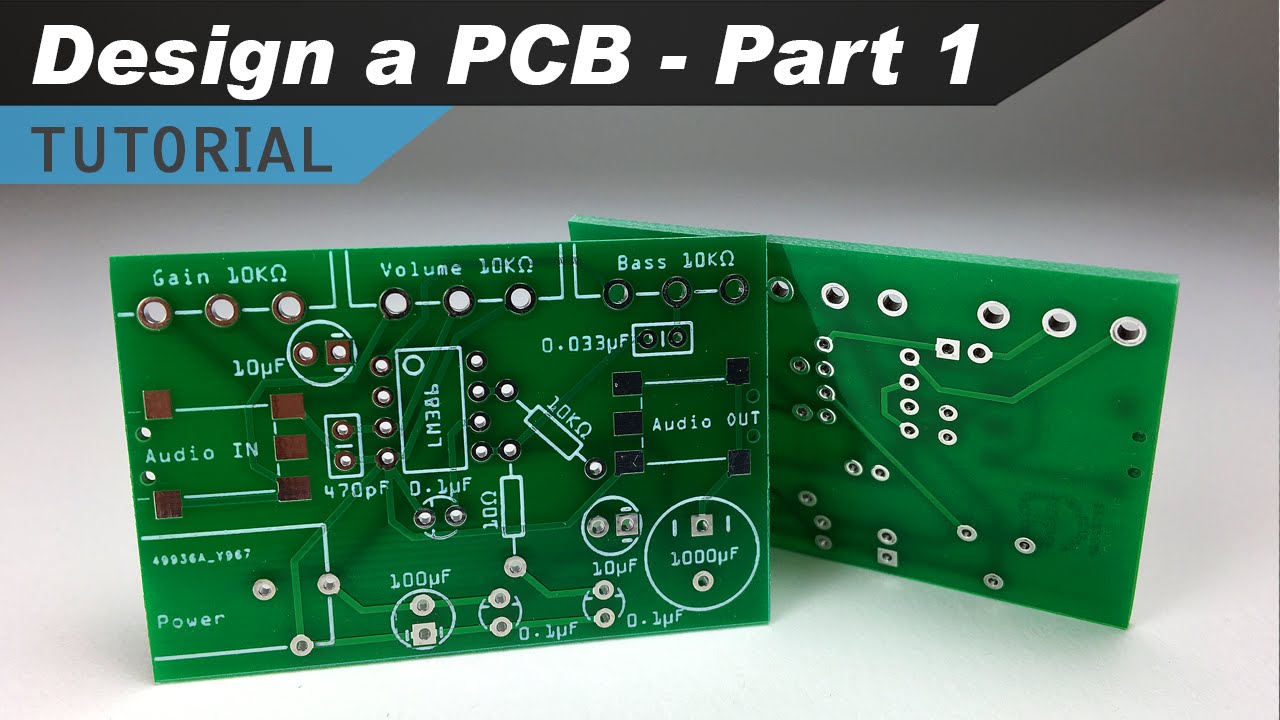
Circuit Design
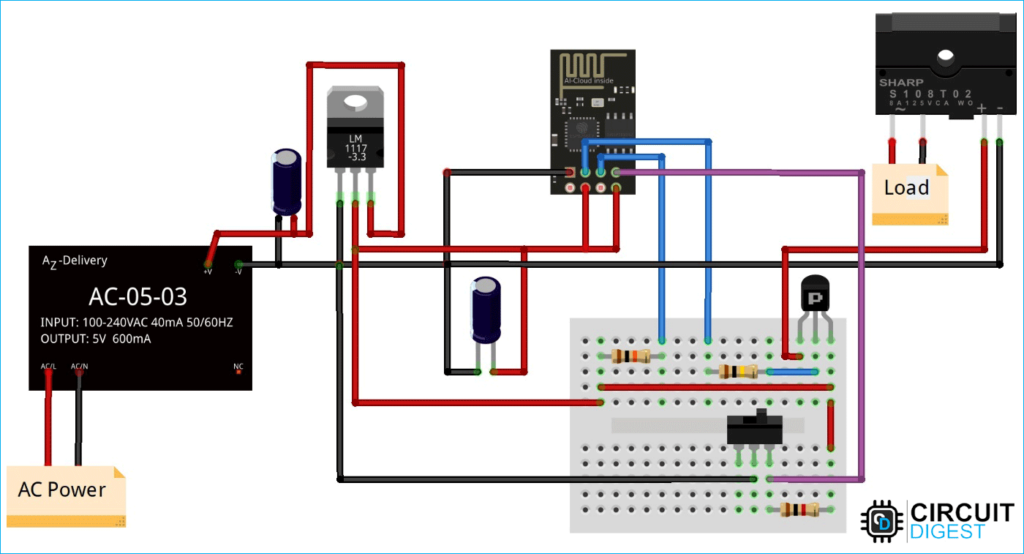
Before you start building your smart switch circuit, you need to design a schematic. The basic idea is to connect the microcontroller to the relay module, which will act as a switch to control the devices. You also need to include the Bluetooth or Wi-Fi module for remote communication.
Start by connecting the microcontroller to the relay module using jumper wires. Make sure to follow the datasheet of the relay module to correctly wire it to the microcontroller. Next, connect the Bluetooth or Wi-Fi module to the microcontroller as per the module’s datasheet.
Circuit Assembly
Once you have designed the circuit, it’s time to assemble it. You can either use a perfboard or a PCB for a more permanent solution. Start by soldering the components onto the board following your schematic design.
After soldering the components, connect the power supply to the circuit and test it using a breadboard. Make sure everything is working as expected before moving on to the next step.
Programming
Now that the circuit is assembled, you need to write the code for the microcontroller. Depending on the microcontroller you are using, you can write the code in Arduino IDE or any other suitable platform.
The code should include functions to control the relay module and communicate with the Bluetooth or Wi-Fi module. You can also add additional features like timers or scheduling for automation.
Testing and Integration
After programming the microcontroller, upload the code and test the smart switch circuit. You can use your smartphone or a computer to send commands to the circuit through Bluetooth or Wi-Fi.
Once you are satisfied with the functionality, you can integrate the smart switch circuit into your home or office. Make sure to properly enclose the circuit in an enclosure for safety and aesthetics.
Conclusion
Creating a smart switch circuit is a fun and rewarding project that can enhance the convenience and efficiency of your home or office. By following the steps outlined in this article, you can build your own smart switch circuit and enjoy the benefits of smart home technology.
How to Create a Smart Switch Circuit
Creating your own smart switch circuit can be a fun and rewarding project. With a smart switch, you can control your lights, appliances, or other devices remotely using your smartphone or voice assistant. In this article, we will guide you through the process of building your own smart switch circuit.
Materials Required
- Microcontroller (e.g., Arduino or ESP8266)
- Relay module
- Bluetooth or Wi-Fi module
- Perfboard or PCB
- LEDs
- Resistors
- Jumper wires
- Soldering iron and solder
- Breadboard
- Power supply
- Enclosure
Circuit Design
Before you start building your smart switch circuit, you need to design a schematic. The basic idea is to connect the microcontroller to the relay module, which will act as a switch to control the devices. You also need to include the Bluetooth or Wi-Fi module for remote communication.
Start by connecting the microcontroller to the relay module using jumper wires. Make sure to follow the datasheet of the relay module to correctly wire it to the microcontroller. Next, connect the Bluetooth or Wi-Fi module to the microcontroller as per the module’s datasheet.
Circuit Assembly
Once you have designed the circuit, it’s time to assemble it. You can either use a perfboard or a PCB for a more permanent solution. Start by soldering the components onto the board following your schematic design.
After soldering the components, connect the power supply to the circuit and test it using a breadboard. Make sure everything is working as expected before moving on to the next step.
Programming
Now that the circuit is assembled, you need to write the code for the microcontroller. Depending on the microcontroller you are using, you can write the code in Arduino IDE or any other suitable platform.
The code should include functions to control the relay module and communicate with the Bluetooth or Wi-Fi module. You can also add additional features like timers or scheduling for automation.
Testing and Integration
After programming the microcontroller, upload the code and test the smart switch circuit. You can use your smartphone or a computer to send commands to the circuit through Bluetooth or Wi-Fi.
Once you are satisfied with the functionality, you can integrate the smart switch circuit into your home or office. Make sure to properly enclose the circuit in an enclosure for safety and aesthetics.
Conclusion
Creating a smart switch circuit is a fun and rewarding project that can enhance the convenience and efficiency of your home or office. By following the steps outlined in this article, you can build your own smart switch circuit and enjoy the benefits of smart home technology.