How to create a remote temperature sensor with ESP32
In this guide, we will walk you through the process of creating a remote temperature sensor using an ESP32 microcontroller. The ESP32 is a powerful Wi-Fi and Bluetooth-enabled microcontroller that is perfect for creating Internet of Things (IoT) projects.
By the end of this tutorial, you will have a working temperature sensor that can wirelessly transmit data to a server or your mobile device. Let’s get started!
Materials you will need:
- ESP32 microcontroller
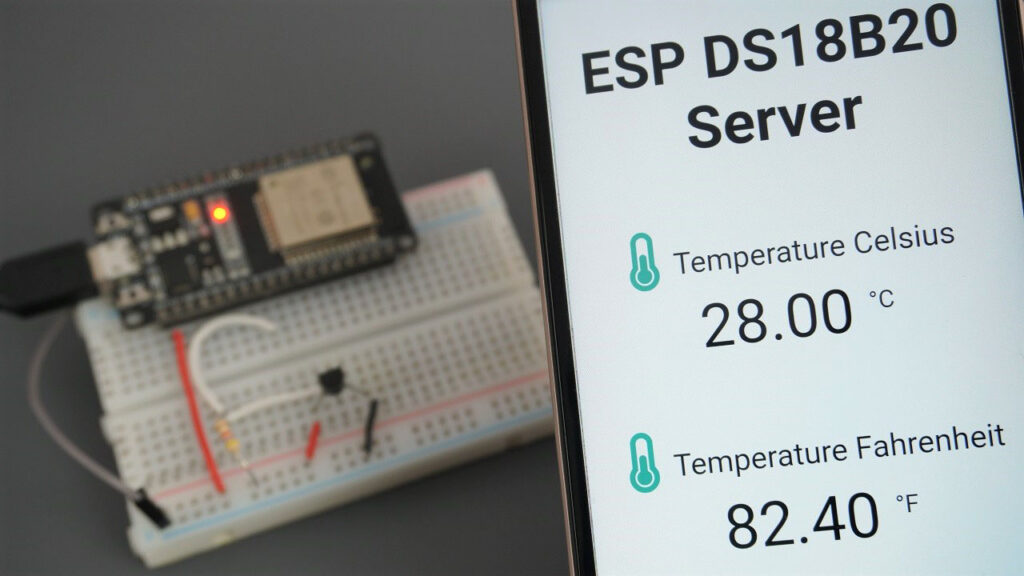
- Temperature sensor (such as DS18B20)
- Jumper wires
- Breadboard
- USB cable
- Computer with Arduino IDE
Step 1: Setting up your ESP32
First, you will need to set up your ESP32 microcontroller. Connect it to your computer using the USB cable and open the Arduino IDE. Make sure you have installed the ESP32 board support by following the instructions on the Espressif website.
Once you have installed the board support, select your ESP32 board from the Tools menu in the Arduino IDE. Choose the correct port and upload a simple sketch to test if your board is working correctly.
Step 2: Connecting the temperature sensor
Next, you will need to connect the temperature sensor to your ESP32. Use the jumper wires to connect the sensor to the appropriate pins on the ESP32. Make sure to follow the datasheet of your sensor to properly wire it.
For example, if you are using the DS18B20 sensor, you will need to connect the data pin to one of the GPIO pins on the ESP32, the VCC pin to 3.3V, and the GND pin to GND.
Step 3: Coding the temperature sensor
Now it’s time to code your temperature sensor. Write a simple sketch in the Arduino IDE that reads the temperature data from the sensor and prints it to the serial monitor. Make sure to include the necessary libraries for your sensor.
Once you have successfully coded the sensor, upload the sketch to your ESP32. Open the serial monitor to view the temperature readings from the sensor.
Step 4: Creating a remote server
To make your temperature sensor remote, you will need to set up a server that can receive the sensor data over Wi-Fi. You can use platforms like Thinger.io, Blynk, or create your own server using Node.js.
Follow the instructions on your chosen platform to set up a server and receive data from your ESP32. Make sure to configure the ESP32 to send the temperature data to the server at regular intervals.
Step 5: Monitoring the temperature remotely
Once your server is set up and receiving data from the ESP32, you can monitor the temperature remotely. You can view the temperature readings on a web dashboard, mobile app, or even receive notifications when the temperature reaches a certain threshold.
Congratulations! You have successfully created a remote temperature sensor with ESP32. Feel free to expand on this project by adding more sensors or integrating it with other IoT devices.
How to create a remote temperature sensor with ESP32
In this guide, we will walk you through the process of creating a remote temperature sensor using an ESP32 microcontroller. The ESP32 is a powerful Wi-Fi and Bluetooth-enabled microcontroller that is perfect for creating Internet of Things (IoT) projects.
By the end of this tutorial, you will have a working temperature sensor that can wirelessly transmit data to a server or your mobile device. Let’s get started!
Materials you will need:
- ESP32 microcontroller
- Temperature sensor (such as DS18B20)
- Jumper wires
- Breadboard
- USB cable
- Computer with Arduino IDE
Step 1: Setting up your ESP32
First, you will need to set up your ESP32 microcontroller. Connect it to your computer using the USB cable and open the Arduino IDE. Make sure you have installed the ESP32 board support by following the instructions on the Espressif website.
Once you have installed the board support, select your ESP32 board from the Tools menu in the Arduino IDE. Choose the correct port and upload a simple sketch to test if your board is working correctly.
Step 2: Connecting the temperature sensor
Next, you will need to connect the temperature sensor to your ESP32. Use the jumper wires to connect the sensor to the appropriate pins on the ESP32. Make sure to follow the datasheet of your sensor to properly wire it.
For example, if you are using the DS18B20 sensor, you will need to connect the data pin to one of the GPIO pins on the ESP32, the VCC pin to 3.3V, and the GND pin to GND.
Step 3: Coding the temperature sensor
Now it’s time to code your temperature sensor. Write a simple sketch in the Arduino IDE that reads the temperature data from the sensor and prints it to the serial monitor. Make sure to include the necessary libraries for your sensor.
Once you have successfully coded the sensor, upload the sketch to your ESP32. Open the serial monitor to view the temperature readings from the sensor.
Step 4: Creating a remote server
To make your temperature sensor remote, you will need to set up a server that can receive the sensor data over Wi-Fi. You can use platforms like Thinger.io, Blynk, or create your own server using Node.js.
Follow the instructions on your chosen platform to set up a server and receive data from your ESP32. Make sure to configure the ESP32 to send the temperature data to the server at regular intervals.
Step 5: Monitoring the temperature remotely
Once your server is set up and receiving data from the ESP32, you can monitor the temperature remotely. You can view the temperature readings on a web dashboard, mobile app, or even receive notifications when the temperature reaches a certain threshold.
Congratulations! You have successfully created a remote temperature sensor with ESP32. Feel free to expand on this project by adding more sensors or integrating it with other IoT devices.