How to Create a Relay-Based Control Circuit
Relay-based control circuits are a versatile and reliable solution for automating and controlling various devices and systems. A relay is an electrically operated switch that allows you to control a high-power circuit with a low-power signal. In this article, we will guide you through the process of creating your own relay-based control circuit. Let’s get started!
Step 1: Gather the Necessary Components
- Relay
- Power supply
- Switch
- Diode
- Resistors
- LED (optional for visual indication)
- Wire
Before you begin assembling your relay-based control circuit, make sure you have all the necessary components at hand. These components are essential for building a functional circuit that meets your specific requirements.
Step 2: Design the Circuit
Start by designing the control circuit on a breadboard or a circuit design software. Determine the input and output requirements of your circuit, as well as the desired functionality. Sketch out the circuit diagram, including the relay, power supply, switch, diode, resistors, and any additional components.
Make sure to carefully consider the voltage and current ratings of each component to ensure they are compatible with one another. Pay special attention to the pin configurations of the relay and verify that they match your circuit design.
Step 3: Assemble the Circuit
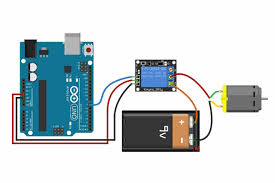
Once you have finalized the circuit design, it’s time to assemble the components on a breadboard or a PCB. Begin by connecting the power supply to the relay coil, and then connect the other end of the coil to the switch. Add the diode in parallel with the relay coil to protect the circuit from voltage spikes.
Next, connect the NO (Normally Open) and COM (Common) terminals of the relay to the load you want to control. If you are using an LED for visual indication, connect it in parallel with the load. Complete the circuit by connecting the power supply to the switch, and your relay-based control circuit is ready for testing.
Step 4: Test the Circuit
Before applying power to your relay-based control circuit, double-check all connections to ensure they are secure and correct. Turn on the power supply and test the functionality of the circuit by activating the switch. You should hear the relay click as it switches the load on and off.
If the circuit is not functioning as expected, recheck the wiring and component values. Make any necessary adjustments and retest the circuit until it operates correctly. Once you are satisfied with the performance, you can proceed to integrate the control circuit into your larger system or project.
Conclusion
Creating a relay-based control circuit is a rewarding and practical way to automate devices and systems. By following the steps outlined in this guide, you can design and build your own relay-based control circuit to suit your specific needs. Experiment with different components and configurations to customize your circuit and unlock its full potential. Have fun exploring the world of relay-based control circuits!


