How to create a flying robot for aerial photography?
Are you looking to take your aerial photography to new heights? Literally? Creating your own flying robot can be a rewarding and exciting project that allows you to capture unique and stunning shots from above. In this article, we will guide you through the process of building your own flying robot for aerial photography.
Step 1: Research and Planning
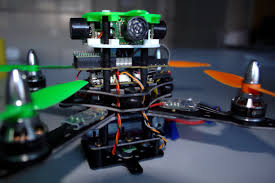
The first step in creating a flying robot for aerial photography is to do your research. You will need to familiarize yourself with the various components that make up a drone, including motors, propellers, flight controllers, and cameras. It’s important to understand how these components work together to create a stable and efficient flying machine.
- Research the different types of drones available on the market
- Decide on the size and type of drone you want to build
- Create a budget for your project
Step 2: Gather Your Materials
Once you have a clear plan in place, it’s time to gather all the necessary materials for your flying robot. This may include:
- Frame: Choose a lightweight and durable frame for your drone
- Flight Controller: Select a reliable flight controller that suits your needs
- Propellers: Make sure to choose the right size and pitch for your drone
- Motor: Choose motors that are powerful enough to lift your drone and camera
- Battery: Select a high-capacity battery for longer flight times
Step 3: Assemble Your Drone
Now comes the fun part – assembling your flying robot! Follow the instructions provided with your components to build your drone from the ground up. Make sure to double-check all connections and test each component before moving on to the next step.
Step 4: Install Your Camera
One of the most important components of your flying robot for aerial photography is the camera. Make sure to mount your camera securely to your drone and adjust the angle to capture the best shots. You may also want to consider using a gimbal for stabilization.
Step 5: Test and Adjust
Before taking your flying robot out for its maiden flight, it’s essential to test all components and make any necessary adjustments. Check the balance of your drone, calibrate the flight controller, and ensure that all systems are functioning correctly.
Step 6: Take to the Skies
Once you are confident that your flying robot is ready for flight, it’s time to take to the skies! Start with short test flights to ensure that everything is working as it should. As you gain more experience, you can experiment with different flight modes and camera settings to capture unique and stunning aerial photographs.
Building a flying robot for aerial photography can be a challenging but rewarding experience. With careful planning, research, and testing, you can create a drone that allows you to capture breathtaking shots from above. So what are you waiting for? Get started on your flying robot project today!
How to create a flying robot for aerial photography?
Are you looking to take your aerial photography to new heights? Literally? Creating your own flying robot can be a rewarding and exciting project that allows you to capture unique and stunning shots from above. In this article, we will guide you through the process of building your own flying robot for aerial photography.
Step 1: Research and Planning
The first step in creating a flying robot for aerial photography is to do your research. You will need to familiarize yourself with the various components that make up a drone, including motors, propellers, flight controllers, and cameras. It’s important to understand how these components work together to create a stable and efficient flying machine.
- Research the different types of drones available on the market
- Decide on the size and type of drone you want to build
- Create a budget for your project
Step 2: Gather Your Materials
Once you have a clear plan in place, it’s time to gather all the necessary materials for your flying robot. This may include:
- Frame: Choose a lightweight and durable frame for your drone
- Flight Controller: Select a reliable flight controller that suits your needs
- Propellers: Make sure to choose the right size and pitch for your drone
- Motor: Choose motors that are powerful enough to lift your drone and camera
- Battery: Select a high-capacity battery for longer flight times
Step 3: Assemble Your Drone
Now comes the fun part – assembling your flying robot! Follow the instructions provided with your components to build your drone from the ground up. Make sure to double-check all connections and test each component before moving on to the next step.
Step 4: Install Your Camera
One of the most important components of your flying robot for aerial photography is the camera. Make sure to mount your camera securely to your drone and adjust the angle to capture the best shots. You may also want to consider using a gimbal for stabilization.
Step 5: Test and Adjust
Before taking your flying robot out for its maiden flight, it’s essential to test all components and make any necessary adjustments. Check the balance of your drone, calibrate the flight controller, and ensure that all systems are functioning correctly.
Step 6: Take to the Skies
Once you are confident that your flying robot is ready for flight, it’s time to take to the skies! Start with short test flights to ensure that everything is working as it should. As you gain more experience, you can experiment with different flight modes and camera settings to capture unique and stunning aerial photographs.
Building a flying robot for aerial photography can be a challenging but rewarding experience. With careful planning, research, and testing, you can create a drone that allows you to capture breathtaking shots from above. So what are you waiting for? Get started on your flying robot project today!