How to Connect Raspberry Pi to MQTT
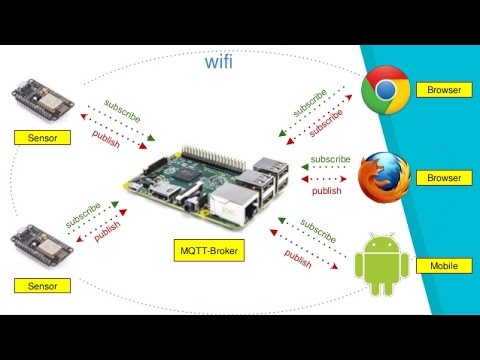
MQTT (Message Queuing Telemetry Transport) is a lightweight messaging protocol designed for IoT (Internet of Things) devices to communicate with each other efficiently. It is commonly used to connect devices such as sensors, actuators, and microcontrollers to a central server or broker. In this article, we will guide you on how to connect your Raspberry Pi to MQTT so that you can start building your own IoT projects.
Step 1: Install MQTT Broker on Raspberry Pi
The first step is to install an MQTT broker on your Raspberry Pi. Mosquitto is a popular open-source MQTT broker that you can install using the following commands:
sudo apt-get update
sudo apt-get install mosquitto mosquitto-clients
Once the installation is complete, you can start the Mosquitto service by running the following command:
sudo systemctl start mosquitto
You can also enable Mosquitto to start on boot by running:
sudo systemctl enable mosquitto
Step 2: Install MQTT Client on Raspberry Pi
Next, you will need to install an MQTT client on your Raspberry Pi to send and receive messages. You can use the Mosquitto client by executing the following command:
sudo apt-get install mosquitto-clients
After installing the client, you can subscribe to a topic by running:
mosquitto_sub -h localhost -t topic
And publish a message to a topic by running:
mosquitto_pub -h localhost -t topic -m "Hello, World!"
Step 3: Connect Raspberry Pi to MQTT Broker
Now that you have set up the MQTT broker and client on your Raspberry Pi, it’s time to connect them. You can use the paho-mqtt library in Python to create a connection to the MQTT broker. Here’s a simple example:
import paho.mqtt.client as mqtt

def on_connect(client, userdata, flags, rc):
    print("Connected with result code " + str(rc))
    client.subscribe("topic")

def on_message(client, userdata, msg):
    print(msg.topic + " " + str(msg.payload))

client = mqtt.Client()
client.on_connect = on_connect
client.on_message = on_message

client.connect("localhost", 1883, 60)

client.loop_forever()
By running this Python script on your Raspberry Pi, you can start sending and receiving messages from the MQTT broker. You can customize the script to suit your needs, such as subscribing to different topics or publishing messages based on sensor readings.
Conclusion
Connecting your Raspberry Pi to MQTT opens up a world of possibilities for building IoT projects. With the right tools and knowledge, you can create a network of smart devices that communicate seamlessly with each other. Follow the steps outlined in this article to get started on your IoT journey with Raspberry Pi and MQTT.
How to Connect Raspberry Pi to MQTT
MQTT (Message Queuing Telemetry Transport) is a lightweight messaging protocol designed for IoT (Internet of Things) devices to communicate with each other efficiently. It is commonly used to connect devices such as sensors, actuators, and microcontrollers to a central server or broker. In this article, we will guide you on how to connect your Raspberry Pi to MQTT so that you can start building your own IoT projects.
Step 1: Install MQTT Broker on Raspberry Pi
The first step is to install an MQTT broker on your Raspberry Pi. Mosquitto is a popular open-source MQTT broker that you can install using the following commands:
sudo apt-get update
sudo apt-get install mosquitto mosquitto-clients
Once the installation is complete, you can start the Mosquitto service by running the following command:
sudo systemctl start mosquitto
You can also enable Mosquitto to start on boot by running:
sudo systemctl enable mosquitto
Step 2: Install MQTT Client on Raspberry Pi
Next, you will need to install an MQTT client on your Raspberry Pi to send and receive messages. You can use the Mosquitto client by executing the following command:
sudo apt-get install mosquitto-clients
After installing the client, you can subscribe to a topic by running:
mosquitto_sub -h localhost -t topic
And publish a message to a topic by running:
mosquitto_pub -h localhost -t topic -m "Hello, World!"
Step 3: Connect Raspberry Pi to MQTT Broker
Now that you have set up the MQTT broker and client on your Raspberry Pi, it’s time to connect them. You can use the paho-mqtt library in Python to create a connection to the MQTT broker. Here’s a simple example:
import paho.mqtt.client as mqtt

def on_connect(client, userdata, flags, rc):
    print("Connected with result code " + str(rc))
    client.subscribe("topic")

def on_message(client, userdata, msg):
    print(msg.topic + " " + str(msg.payload))

client = mqtt.Client()
client.on_connect = on_connect
client.on_message = on_message

client.connect("localhost", 1883, 60)

client.loop_forever()
By running this Python script on your Raspberry Pi, you can start sending and receiving messages from the MQTT broker. You can customize the script to suit your needs, such as subscribing to different topics or publishing messages based on sensor readings.
Conclusion
Connecting your Raspberry Pi to MQTT opens up a world of possibilities for building IoT projects. With the right tools and knowledge, you can create a network of smart devices that communicate seamlessly with each other. Follow the steps outlined in this article to get started on your IoT journey with Raspberry Pi and MQTT.