How to Connect an ESP8266 WiFi Module
If you are looking to connect an ESP8266 WiFi module to your project, you are in the right place! This powerful little module is perfect for adding wireless connectivity to your DIY electronics projects. In this guide, we will walk you through the process of connecting and setting up your ESP8266 WiFi module.
Step 1: Gather Your Materials
- ESP8266 WiFi module
- USB to Serial adapter
- Jumper wires
- Breadboard
- Computer with Arduino IDE installed
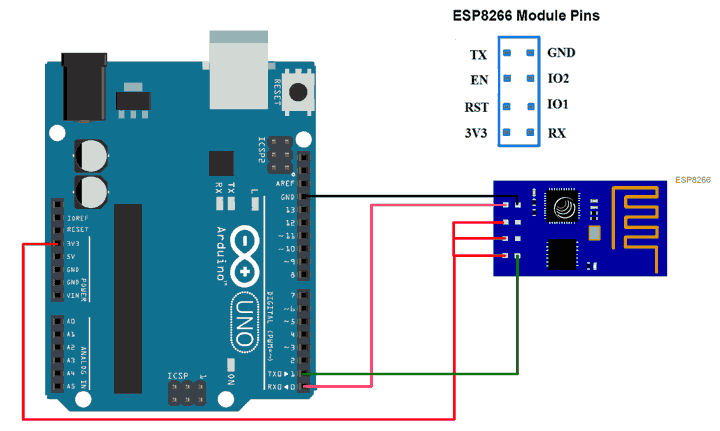
Step 2: Wiring Up Your ESP8266
First, connect your ESP8266 WiFi module to your breadboard using jumper wires. Make sure to connect the following pins:
- VCC to 3.3V
- GND to GND
- TX to RX of the USB to Serial adapter
- RX to TX of the USB to Serial adapter
- CH_PD to 3.3V
Once your connections are made, plug in your USB to Serial adapter to your computer and open the Arduino IDE.
Step 3: Upload the Sketch
Next, you will need to upload a sample sketch to your ESP8266 module using the Arduino IDE. Go to File > Examples > ESP8266 > Blink to load the Blink example.
Make sure to select the correct board and port in the Tools menu, then click on the upload button to send the sketch to your ESP8266 module.
If everything is connected correctly, you should see the onboard LED of the ESP8266 module start blinking!
Step 4: Connect to WiFi
Now that you have successfully uploaded a sketch to your ESP8266 module, it’s time to connect to a WiFi network. Open the Serial Monitor in the Arduino IDE and set the baud rate to 115200.
You will see a message prompting you to enter the SSID and password of your WiFi network. Once entered, the ESP8266 module will automatically connect to the network.
Step 5: Test Your Connection
To test if your ESP8266 module is successfully connected to the WiFi network, you can upload a simple sketch that retrieves the IP address of the module. Open File > Examples > ESP8266 > WiFi > WiFiScan to load the WiFiScan example.
Upload the sketch to your ESP8266 module and open the Serial Monitor. You should see the IP address of the module printed on the screen, confirming that it is connected to the WiFi network.
Conclusion
Connecting an ESP8266 WiFi module may seem daunting at first, but by following these steps, you can easily add wireless connectivity to your projects. From uploading sketches to connecting to WiFi networks, the ESP8266 module opens up endless possibilities for your DIY electronics projects. So grab your ESP8266 module and get started!
How to Connect an ESP8266 WiFi Module
If you are looking to connect an ESP8266 WiFi module to your project, you are in the right place! This powerful little module is perfect for adding wireless connectivity to your DIY electronics projects. In this guide, we will walk you through the process of connecting and setting up your ESP8266 WiFi module.
Step 1: Gather Your Materials
- ESP8266 WiFi module
- USB to Serial adapter
- Jumper wires
- Breadboard
- Computer with Arduino IDE installed
Step 2: Wiring Up Your ESP8266
First, connect your ESP8266 WiFi module to your breadboard using jumper wires. Make sure to connect the following pins:
- VCC to 3.3V
- GND to GND
- TX to RX of the USB to Serial adapter
- RX to TX of the USB to Serial adapter
- CH_PD to 3.3V
Once your connections are made, plug in your USB to Serial adapter to your computer and open the Arduino IDE.
Step 3: Upload the Sketch
Next, you will need to upload a sample sketch to your ESP8266 module using the Arduino IDE. Go to File > Examples > ESP8266 > Blink to load the Blink example.
Make sure to select the correct board and port in the Tools menu, then click on the upload button to send the sketch to your ESP8266 module.
If everything is connected correctly, you should see the onboard LED of the ESP8266 module start blinking!
Step 4: Connect to WiFi
Now that you have successfully uploaded a sketch to your ESP8266 module, it’s time to connect to a WiFi network. Open the Serial Monitor in the Arduino IDE and set the baud rate to 115200.
You will see a message prompting you to enter the SSID and password of your WiFi network. Once entered, the ESP8266 module will automatically connect to the network.
Step 5: Test Your Connection
To test if your ESP8266 module is successfully connected to the WiFi network, you can upload a simple sketch that retrieves the IP address of the module. Open File > Examples > ESP8266 > WiFi > WiFiScan to load the WiFiScan example.
Upload the sketch to your ESP8266 module and open the Serial Monitor. You should see the IP address of the module printed on the screen, confirming that it is connected to the WiFi network.
Conclusion
Connecting an ESP8266 WiFi module may seem daunting at first, but by following these steps, you can easily add wireless connectivity to your projects. From uploading sketches to connecting to WiFi networks, the ESP8266 module opens up endless possibilities for your DIY electronics projects. So grab your ESP8266 module and get started!