How to Connect a BH1750 Light Sensor to ESP32?
In this tutorial, we will guide you through the process of connecting a BH1750 light sensor to an ESP32 microcontroller. The BH1750 is a digital ambient light sensor that measures the intensity of light in the surrounding environment. By connecting this sensor to an ESP32, you can create projects that respond to changes in light levels, such as automatic lighting systems or light intensity monitors.
Materials Required:
- ESP32 development board
- BH1750 light sensor module
- Jumper wires
- Computer with Arduino IDE installed
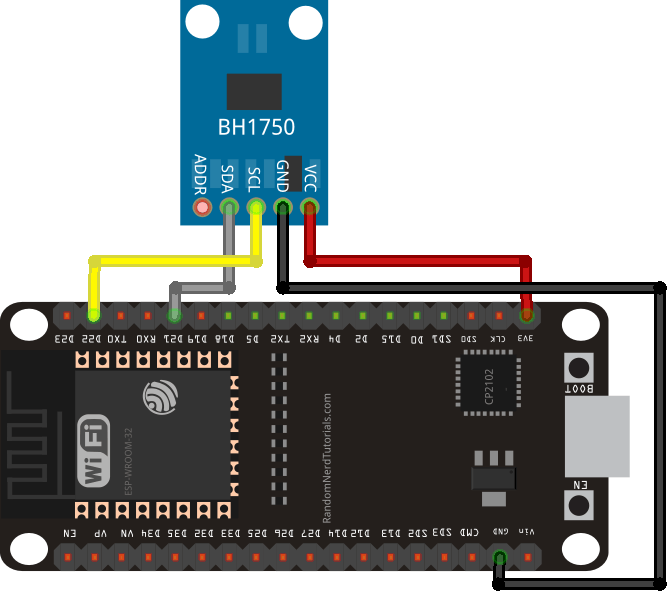
Step 1: Wiring the BH1750 Light Sensor to ESP32
First, let’s start by wiring the BH1750 light sensor to the ESP32. The BH1750 sensor has four pins: VCC, GND, SCL, and SDA. The SCL and SDA pins are used for I2C communication, so we will connect them to the corresponding pins on the ESP32.
Connect the VCC pin of the BH1750 sensor to the 3.3V pin on the ESP32. Connect the GND pin of the sensor to the GND pin on the ESP32. Connect the SCL pin of the sensor to pin 22 (SCL) on the ESP32. Connect the SDA pin of the sensor to pin 21 (SDA) on the ESP32.

Step 2: Installing the BH1750 Library
Next, we need to install the BH1750 library in the Arduino IDE. To do this, open the Arduino IDE and go to Sketch > Include Library > Manage Libraries. In the Library Manager, search for “BH1750” and install the library developed by Christopher Walker.
Once the library is installed, you can include it in your Arduino sketch by adding the following line at the beginning of your code:
#include <BH1750.h>
Step 3: Writing the Arduino Sketch
Now that we have wired the sensor and installed the library, let’s write the Arduino sketch that reads data from the BH1750 sensor and sends it to the serial monitor. Copy and paste the following code into the Arduino IDE:
#include <Wire.h>

#include <BH1750.h>


BH1750 lightMeter;


void setup() {

 Serial.begin(9600);

 Wire.begin();

 lightMeter.begin();

}


void loop() {

 uint16_t lux = lightMeter.readLightLevel();

 Serial.print("Light: ");

 Serial.print(lux);

 Serial.println(" lx");

 delay(1000);

}
Step 4: Uploading the Sketch to ESP32
Connect your ESP32 to the computer using a USB cable. Make sure the correct board and port are selected in the Arduino IDE. Then, click the “Upload” button to compile and upload the sketch to the ESP32. Open the serial monitor to view the light intensity readings from the BH1750 sensor.
Conclusion
Congratulations! You have successfully connected a BH1750 light sensor to an ESP32 and read light intensity data using Arduino. You can now use this setup to create various projects that respond to changes in light levels. Experiment with different threshold values to trigger actions based on the light intensity.
We hope you found this tutorial helpful. Stay tuned for more exciting projects and tutorials using ESP32 and various sensors!
How to Connect a BH1750 Light Sensor to ESP32?
In this tutorial, we will guide you through the process of connecting a BH1750 light sensor to an ESP32 microcontroller. The BH1750 is a digital ambient light sensor that measures the intensity of light in the surrounding environment. By connecting this sensor to an ESP32, you can create projects that respond to changes in light levels, such as automatic lighting systems or light intensity monitors.
Materials Required:
- ESP32 development board
- BH1750 light sensor module
- Jumper wires
- Computer with Arduino IDE installed
Step 1: Wiring the BH1750 Light Sensor to ESP32
First, let’s start by wiring the BH1750 light sensor to the ESP32. The BH1750 sensor has four pins: VCC, GND, SCL, and SDA. The SCL and SDA pins are used for I2C communication, so we will connect them to the corresponding pins on the ESP32.
Connect the VCC pin of the BH1750 sensor to the 3.3V pin on the ESP32. Connect the GND pin of the sensor to the GND pin on the ESP32. Connect the SCL pin of the sensor to pin 22 (SCL) on the ESP32. Connect the SDA pin of the sensor to pin 21 (SDA) on the ESP32.
Step 2: Installing the BH1750 Library
Next, we need to install the BH1750 library in the Arduino IDE. To do this, open the Arduino IDE and go to Sketch > Include Library > Manage Libraries. In the Library Manager, search for “BH1750” and install the library developed by Christopher Walker.
Once the library is installed, you can include it in your Arduino sketch by adding the following line at the beginning of your code:
#include <BH1750.h>
Step 3: Writing the Arduino Sketch
Now that we have wired the sensor and installed the library, let’s write the Arduino sketch that reads data from the BH1750 sensor and sends it to the serial monitor. Copy and paste the following code into the Arduino IDE:
#include <Wire.h>

#include <BH1750.h>


BH1750 lightMeter;


void setup() {

 Serial.begin(9600);

 Wire.begin();

 lightMeter.begin();

}


void loop() {

 uint16_t lux = lightMeter.readLightLevel();

 Serial.print("Light: ");

 Serial.print(lux);

 Serial.println(" lx");

 delay(1000);

}
Step 4: Uploading the Sketch to ESP32
Connect your ESP32 to the computer using a USB cable. Make sure the correct board and port are selected in the Arduino IDE. Then, click the “Upload” button to compile and upload the sketch to the ESP32. Open the serial monitor to view the light intensity readings from the BH1750 sensor.
Conclusion
Congratulations! You have successfully connected a BH1750 light sensor to an ESP32 and read light intensity data using Arduino. You can now use this setup to create various projects that respond to changes in light levels. Experiment with different threshold values to trigger actions based on the light intensity.
We hope you found this tutorial helpful. Stay tuned for more exciting projects and tutorials using ESP32 and various sensors!