How to Connect a 4017 Decade Counter
Decade counters are commonly used in electronic circuits to count events or trigger outputs based on a specific count sequence. The 4017 decade counter is a popular integrated circuit (IC) that can count from 0 to 9 in a sequence. In this article, we will walk you through the steps to properly connect a 4017 decade counter in your circuit.
Step 1: Gather Your Materials
Before you begin connecting your 4017 decade counter, make sure you have all the necessary materials on hand. You will need:
- 4017 decade counter IC
- Breadboard
- Jumper wires
- LEDs
- Resistors
- Power supply
Step 2: Identify the Pins
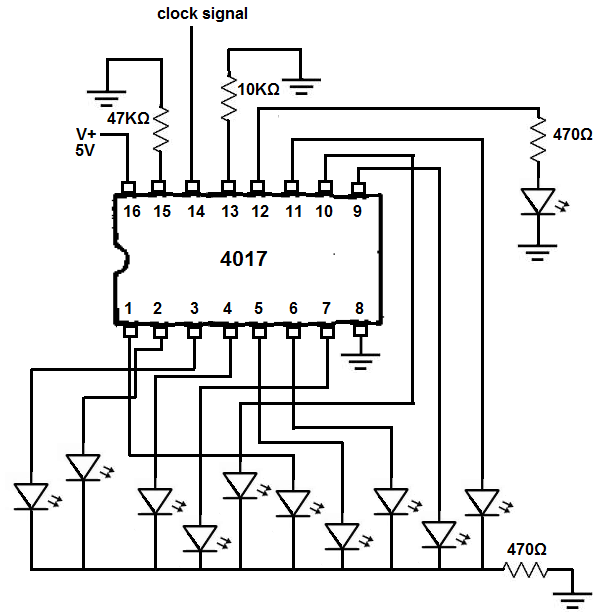
The 4017 decade counter IC has 16 pins, each serving a specific function. It is important to identify the pins correctly before connecting them. Here is a brief overview of the pinout:
- Pin 1: Clock Input (CLK)
- Pin 2: Enable Input (EN)
- Pin 3: Data Input (D0)
- Pin 12: Reset Input (RST)
- Pin 15: Clock Enable (CE)
- Pins 4-10: Outputs Q0-Q9
Step 3: Connect the IC to the Breadboard
Start by placing the 4017 decade counter IC on the breadboard. Make sure to align the IC with the breadboard’s rows to ensure a secure connection. Connect the power supply’s positive (+) and negative (-) terminals to the IC’s VCC and GND pins, respectively.
Step 4: Connect the Clock Input
Connect a jumper wire from the clock input (pin 1) of the 4017 IC to any clock signal source, such as a 555 timer IC set up in astable mode. The clock input triggers the counting sequence of the decade counter.
Step 5: Connect the LEDs
Connect an LED and a current-limiting resistor in series to each of the output pins (Q0-Q9) of the 4017 IC. This will allow you to visually see the counting sequence as the LEDs light up in order.
Step 6: Apply Power and Test
Once you have connected all the necessary components, apply power to the circuit and observe the LEDs as they light up in sequence. If everything is connected correctly, the 4017 decade counter should count from 0 to 9 and then reset back to 0.
Conclusion
Connecting a 4017 decade counter is a simple yet rewarding experience in the world of electronics. By following the steps outlined in this article, you can create your own counting sequence circuit and gain a better understanding of how decade counters work. Have fun experimenting with different clock sources and output configurations to customize your circuit further!
How to Connect a 4017 Decade Counter
Decade counters are commonly used in electronic circuits to count events or trigger outputs based on a specific count sequence. The 4017 decade counter is a popular integrated circuit (IC) that can count from 0 to 9 in a sequence. In this article, we will walk you through the steps to properly connect a 4017 decade counter in your circuit.
Step 1: Gather Your Materials
Before you begin connecting your 4017 decade counter, make sure you have all the necessary materials on hand. You will need:
- 4017 decade counter IC
- Breadboard
- Jumper wires
- LEDs
- Resistors
- Power supply
Step 2: Identify the Pins
The 4017 decade counter IC has 16 pins, each serving a specific function. It is important to identify the pins correctly before connecting them. Here is a brief overview of the pinout:
- Pin 1: Clock Input (CLK)
- Pin 2: Enable Input (EN)
- Pin 3: Data Input (D0)
- Pin 12: Reset Input (RST)
- Pin 15: Clock Enable (CE)
- Pins 4-10: Outputs Q0-Q9
Step 3: Connect the IC to the Breadboard
Start by placing the 4017 decade counter IC on the breadboard. Make sure to align the IC with the breadboard’s rows to ensure a secure connection. Connect the power supply’s positive (+) and negative (-) terminals to the IC’s VCC and GND pins, respectively.
Step 4: Connect the Clock Input
Connect a jumper wire from the clock input (pin 1) of the 4017 IC to any clock signal source, such as a 555 timer IC set up in astable mode. The clock input triggers the counting sequence of the decade counter.
Step 5: Connect the LEDs
Connect an LED and a current-limiting resistor in series to each of the output pins (Q0-Q9) of the 4017 IC. This will allow you to visually see the counting sequence as the LEDs light up in order.
Step 6: Apply Power and Test
Once you have connected all the necessary components, apply power to the circuit and observe the LEDs as they light up in sequence. If everything is connected correctly, the 4017 decade counter should count from 0 to 9 and then reset back to 0.
Conclusion
Connecting a 4017 decade counter is a simple yet rewarding experience in the world of electronics. By following the steps outlined in this article, you can create your own counting sequence circuit and gain a better understanding of how decade counters work. Have fun experimenting with different clock sources and output configurations to customize your circuit further!