How to Build a Simple Off-Grid Solar System
Are you looking to go off the grid and harness the power of the sun? Building a simple off-grid solar system is easier than you think! In this guide, we will walk you through the step-by-step process of setting up your own off-grid solar system. From selecting the right components to wiring everything together, this article covers everything you need to know to get started.
Step 1: Assess Your Energy Needs
The first step in building an off-grid solar system is to assess your energy needs. Calculate how much energy you use on a daily basis to determine the size of the system you will need. Consider the appliances and devices you will be powering with the solar system and make a list of their power requirements.
Step 2: Select Your Solar Panels
Once you have determined your energy needs, it’s time to choose the right solar panels for your system. There are a variety of solar panels available on the market, so do some research to find the best ones for your budget and energy requirements. Keep in mind that higher efficiency panels will be more costly, but they will also generate more power.
Step 3: Choose a Charge Controller
A charge controller is an essential component of any off-grid solar system. It regulates the flow of electricity from the solar panels to the batteries, preventing overcharging and damage to the batteries. Make sure to select a charge controller that is compatible with your solar panels and batteries.
Step 4: Pick Your Batteries
Batteries are used to store the electricity generated by the solar panels for use during periods of low sunlight. When selecting batteries for your off-grid solar system, consider factors such as capacity, voltage, and cycle life. Deep cycle batteries are typically used in solar systems due to their ability to withstand frequent discharges.
Step 5: Install an Inverter
An inverter is needed to convert the DC electricity generated by the solar panels and stored in the batteries into AC electricity that can be used to power your appliances. Choose an inverter that is capable of handling the peak power demands of your devices to avoid overloading the system.
Step 6: Wire Everything Together
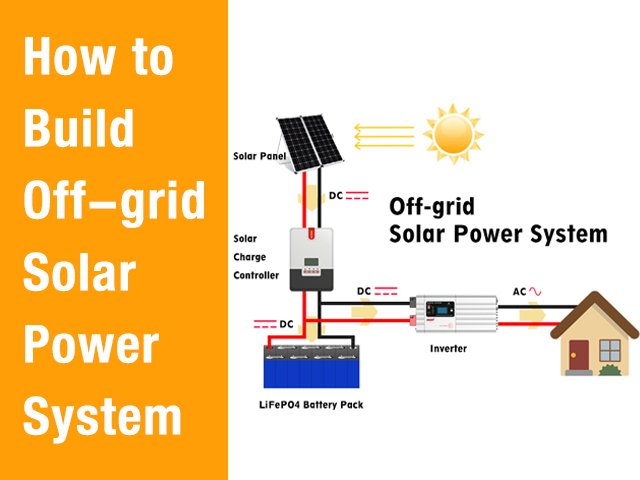
Once you have all the components for your off-grid solar system, it’s time to wire everything together. Follow the manufacturer’s instructions to connect the solar panels, charge controller, batteries, and inverter in the correct sequence. Make sure to use proper wiring and safety precautions to avoid accidents.
Step 7: Test Your System
Before relying on your off-grid solar system for power, be sure to test the system to ensure everything is working properly. Check the voltage and current output of the solar panels, monitor the battery charge level, and confirm that the inverter is converting electricity correctly. Make any necessary adjustments to optimize performance.
Step 8: Enjoy Your Off-Grid Power
Congratulations! You have successfully built a simple off-grid solar system. Now you can enjoy the freedom of generating your own clean, renewable energy and living off the grid. Monitor your system regularly to ensure it continues to operate efficiently and make adjustments as needed to maximize your power generation.
Building an off-grid solar system may seem daunting at first, but with the right components and a little know-how, it is entirely achievable. By following the steps outlined in this guide, you can create a sustainable power source that will reduce your reliance on traditional energy sources and save you money in the long run. So go ahead and take the plunge into off-grid living – the sun is waiting to power your next adventure!
How to Build a Simple Off-Grid Solar System
Are you looking to go off the grid and harness the power of the sun? Building a simple off-grid solar system is easier than you think! In this guide, we will walk you through the step-by-step process of setting up your own off-grid solar system. From selecting the right components to wiring everything together, this article covers everything you need to know to get started.
Step 1: Assess Your Energy Needs
The first step in building an off-grid solar system is to assess your energy needs. Calculate how much energy you use on a daily basis to determine the size of the system you will need. Consider the appliances and devices you will be powering with the solar system and make a list of their power requirements.
Step 2: Select Your Solar Panels
Once you have determined your energy needs, it’s time to choose the right solar panels for your system. There are a variety of solar panels available on the market, so do some research to find the best ones for your budget and energy requirements. Keep in mind that higher efficiency panels will be more costly, but they will also generate more power.
Step 3: Choose a Charge Controller
A charge controller is an essential component of any off-grid solar system. It regulates the flow of electricity from the solar panels to the batteries, preventing overcharging and damage to the batteries. Make sure to select a charge controller that is compatible with your solar panels and batteries.
Step 4: Pick Your Batteries
Batteries are used to store the electricity generated by the solar panels for use during periods of low sunlight. When selecting batteries for your off-grid solar system, consider factors such as capacity, voltage, and cycle life. Deep cycle batteries are typically used in solar systems due to their ability to withstand frequent discharges.
Step 5: Install an Inverter
An inverter is needed to convert the DC electricity generated by the solar panels and stored in the batteries into AC electricity that can be used to power your appliances. Choose an inverter that is capable of handling the peak power demands of your devices to avoid overloading the system.
Step 6: Wire Everything Together
Once you have all the components for your off-grid solar system, it’s time to wire everything together. Follow the manufacturer’s instructions to connect the solar panels, charge controller, batteries, and inverter in the correct sequence. Make sure to use proper wiring and safety precautions to avoid accidents.
Step 7: Test Your System
Before relying on your off-grid solar system for power, be sure to test the system to ensure everything is working properly. Check the voltage and current output of the solar panels, monitor the battery charge level, and confirm that the inverter is converting electricity correctly. Make any necessary adjustments to optimize performance.
Step 8: Enjoy Your Off-Grid Power
Congratulations! You have successfully built a simple off-grid solar system. Now you can enjoy the freedom of generating your own clean, renewable energy and living off the grid. Monitor your system regularly to ensure it continues to operate efficiently and make adjustments as needed to maximize your power generation.
Building an off-grid solar system may seem daunting at first, but with the right components and a little know-how, it is entirely achievable. By following the steps outlined in this guide, you can create a sustainable power source that will reduce your reliance on traditional energy sources and save you money in the long run. So go ahead and take the plunge into off-grid living – the sun is waiting to power your next adventure!