Do you want to learn how to build a simple LED cube circuit? LED cubes are a fun and engaging project that can help you improve your electronics and soldering skills. In this article, we will guide you through the process of building a basic 3x3x3 LED cube using common electronic components. Let’s get started!
Gather Your Materials
Before you begin building your LED cube, make sure you have all the necessary materials. Here is a list of what you will need:
- 27 LEDs (preferably in different colors for a visually appealing cube)
- 9 100 ohm resistors
- Arduino Uno or any other microcontroller
- Prototyping board or breadboard
- Jumper wires
- Soldering iron and solder
Building the Cube
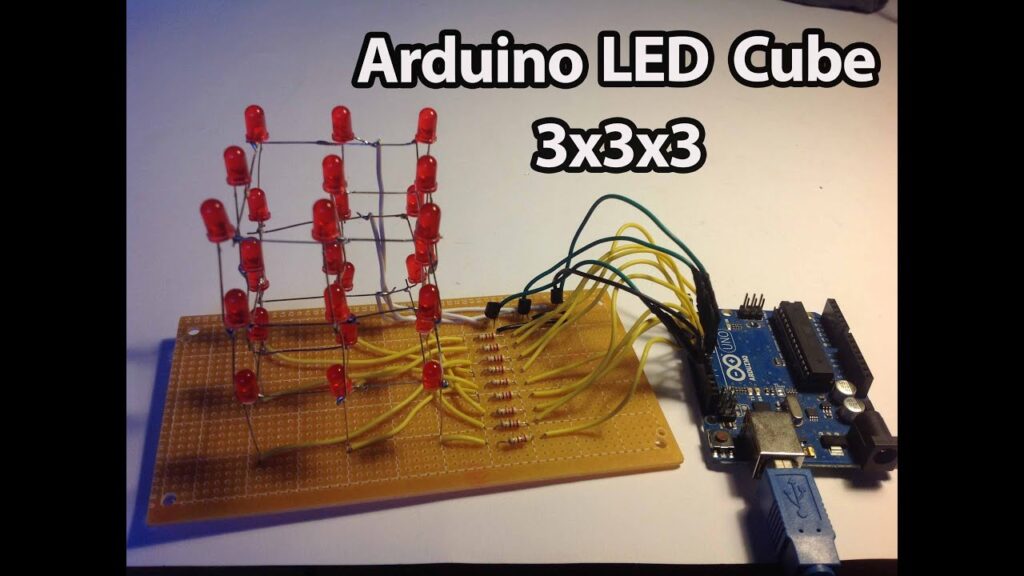
Start by arranging the LEDs in a 3x3x3 grid formation on the prototyping board or breadboard. Make sure to leave space between each LED to avoid short circuits. Connect the longer leg of each LED (the positive leg, also known as the anode) to the digital pins on the microcontroller using the jumper wires. Then, connect the shorter leg of each LED to a 100 ohm resistor, which is then connected to the ground pin of the microcontroller. This will help limit the current flowing through the LEDs and protect them from burning out.
Once you have connected all the LEDs and resistors, it’s time to upload the code to the microcontroller. You can find many pre-written LED cube patterns and animations online that you can use for your cube. Alternatively, you can write your own code to create custom patterns. Upload the code to the microcontroller using the Arduino IDE or any other programming software compatible with your microcontroller.
Testing Your Cube
After uploading the code, power up the circuit by connecting the microcontroller to a power source. Your LED cube should now light up and display the programmed patterns. If you encounter any issues, double-check your wiring and code to ensure everything is connected correctly. Troubleshooting electronics projects can be challenging, but it’s a great way to learn and improve your skills.
Experiment with different LED patterns and animations to customize your cube and make it unique. LED cubes are versatile and can be programmed to display various patterns, including text, shapes, and even simple games. Get creative and have fun exploring the possibilities!
Conclusion
Building a simple LED cube circuit is a rewarding and educational project that can help you learn more about electronics and programming. By following the steps outlined in this article and experimenting with different patterns, you can create a visually stunning LED cube that showcases your skills and creativity. So what are you waiting for? Get started on your LED cube project today!
Do you want to learn how to build a simple LED cube circuit? LED cubes are a fun and engaging project that can help you improve your electronics and soldering skills. In this article, we will guide you through the process of building a basic 3x3x3 LED cube using common electronic components. Let’s get started!
Gather Your Materials
Before you begin building your LED cube, make sure you have all the necessary materials. Here is a list of what you will need:
- 27 LEDs (preferably in different colors for a visually appealing cube)
- 9 100 ohm resistors
- Arduino Uno or any other microcontroller
- Prototyping board or breadboard
- Jumper wires
- Soldering iron and solder
Building the Cube
Start by arranging the LEDs in a 3x3x3 grid formation on the prototyping board or breadboard. Make sure to leave space between each LED to avoid short circuits. Connect the longer leg of each LED (the positive leg, also known as the anode) to the digital pins on the microcontroller using the jumper wires. Then, connect the shorter leg of each LED to a 100 ohm resistor, which is then connected to the ground pin of the microcontroller. This will help limit the current flowing through the LEDs and protect them from burning out.
Once you have connected all the LEDs and resistors, it’s time to upload the code to the microcontroller. You can find many pre-written LED cube patterns and animations online that you can use for your cube. Alternatively, you can write your own code to create custom patterns. Upload the code to the microcontroller using the Arduino IDE or any other programming software compatible with your microcontroller.
Testing Your Cube
After uploading the code, power up the circuit by connecting the microcontroller to a power source. Your LED cube should now light up and display the programmed patterns. If you encounter any issues, double-check your wiring and code to ensure everything is connected correctly. Troubleshooting electronics projects can be challenging, but it’s a great way to learn and improve your skills.
Experiment with different LED patterns and animations to customize your cube and make it unique. LED cubes are versatile and can be programmed to display various patterns, including text, shapes, and even simple games. Get creative and have fun exploring the possibilities!
Conclusion
Building a simple LED cube circuit is a rewarding and educational project that can help you learn more about electronics and programming. By following the steps outlined in this article and experimenting with different patterns, you can create a visually stunning LED cube that showcases your skills and creativity. So what are you waiting for? Get started on your LED cube project today!