How to Build a House Cleaning Robot from Scratch?
Are you tired of spending hours cleaning your house every week? Do you dream of a robot that can do the work for you? Well, the good news is that you can actually build your own house cleaning robot from scratch! It may sound like something out of a sci-fi movie, but with the right tools and knowledge, you can make this dream a reality. In this article, we will walk you through the process of building your very own house cleaning robot step by step.
Step 1: Gather Your Supplies
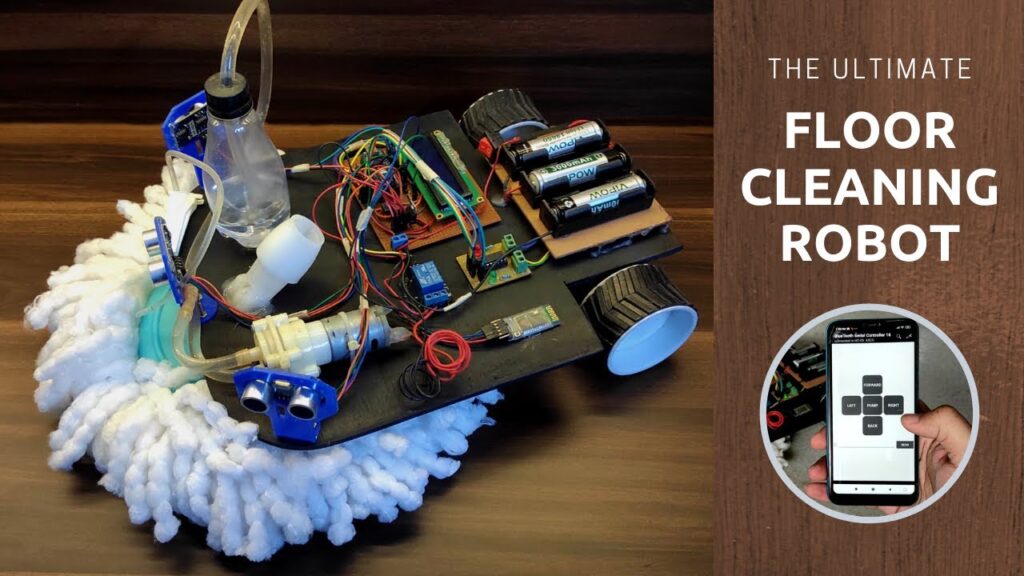
The first step in building a house cleaning robot is to gather all the necessary supplies. You will need:
- Microcontroller (such as Arduino or Raspberry Pi)
- Motors
- Sensors (such as ultrasonic or infrared sensors)
- Battery pack
- Wheels
- Chassis
- Cleaning attachments (brushes, mops, etc.)
Step 2: Assemble the Chassis
Once you have gathered all your supplies, it’s time to assemble the chassis of your robot. This will serve as the body of your cleaning robot and will house all the components. Follow the instructions provided with your chassis kit to put it together.
Step 3: Install the Motors and Wheels
Next, you will need to install the motors and wheels on your robot. The motors will be responsible for moving the robot around, while the wheels will allow it to navigate different surfaces. Make sure to secure the motors and wheels tightly to avoid any wobbling.
Step 4: Add the Sensors
Now it’s time to add the sensors to your cleaning robot. Sensors are crucial for detecting obstacles and navigating around your home. Place the sensors strategically on the robot so that they have a clear line of sight.
Step 5: Connect Everything to the Microcontroller
The microcontroller is the brain of your cleaning robot. Connect all the components – motors, sensors, and battery pack – to the microcontroller following the wiring diagram provided with your kit. This will allow you to control the robot’s movements and functions.
Step 6: Program the Robot
Now comes the fun part – programming your cleaning robot! Use the programming language supported by your microcontroller to write code that will enable your robot to clean your house efficiently. You can find plenty of online resources and tutorials to help you with this step.
Step 7: Test and Fine-Tune
After you have completed the construction and programming of your house cleaning robot, it’s time to test it out! Set it loose in a small area and see how it performs. Make adjustments to the code or the hardware as needed to improve its cleaning capabilities.
Step 8: Enjoy Your Clean House!
Congratulations! You have successfully built your very own house cleaning robot from scratch. Sit back, relax, and let your robot do all the hard work for you. With your new cleaning companion, you can enjoy a spotless house without lifting a finger!
How to Build a House Cleaning Robot from Scratch?
Are you tired of spending hours cleaning your house every week? Do you dream of a robot that can do the work for you? Well, the good news is that you can actually build your own house cleaning robot from scratch! It may sound like something out of a sci-fi movie, but with the right tools and knowledge, you can make this dream a reality. In this article, we will walk you through the process of building your very own house cleaning robot step by step.
Step 1: Gather Your Supplies
The first step in building a house cleaning robot is to gather all the necessary supplies. You will need:
- Microcontroller (such as Arduino or Raspberry Pi)
- Motors
- Sensors (such as ultrasonic or infrared sensors)
- Battery pack
- Wheels
- Chassis
- Cleaning attachments (brushes, mops, etc.)
Step 2: Assemble the Chassis
Once you have gathered all your supplies, it’s time to assemble the chassis of your robot. This will serve as the body of your cleaning robot and will house all the components. Follow the instructions provided with your chassis kit to put it together.
Step 3: Install the Motors and Wheels
Next, you will need to install the motors and wheels on your robot. The motors will be responsible for moving the robot around, while the wheels will allow it to navigate different surfaces. Make sure to secure the motors and wheels tightly to avoid any wobbling.
Step 4: Add the Sensors
Now it’s time to add the sensors to your cleaning robot. Sensors are crucial for detecting obstacles and navigating around your home. Place the sensors strategically on the robot so that they have a clear line of sight.
Step 5: Connect Everything to the Microcontroller
The microcontroller is the brain of your cleaning robot. Connect all the components – motors, sensors, and battery pack – to the microcontroller following the wiring diagram provided with your kit. This will allow you to control the robot’s movements and functions.
Step 6: Program the Robot
Now comes the fun part – programming your cleaning robot! Use the programming language supported by your microcontroller to write code that will enable your robot to clean your house efficiently. You can find plenty of online resources and tutorials to help you with this step.
Step 7: Test and Fine-Tune
After you have completed the construction and programming of your house cleaning robot, it’s time to test it out! Set it loose in a small area and see how it performs. Make adjustments to the code or the hardware as needed to improve its cleaning capabilities.
Step 8: Enjoy Your Clean House!
Congratulations! You have successfully built your very own house cleaning robot from scratch. Sit back, relax, and let your robot do all the hard work for you. With your new cleaning companion, you can enjoy a spotless house without lifting a finger!