How to Add an Auxiliary Input to an Older Car?
Are you tired of listening to the same old radio stations in your older car? Adding an auxiliary input can be a game-changer when it comes to enjoying your favorite music or podcasts on the road. In this article, we will guide you through the process of adding an auxiliary input to your older car, so you can connect your phone or other devices and listen to whatever you want. Let’s get started!
Step 1: Determine the Type of AUX Input
Before you begin the installation process, you need to determine the type of AUX input that is most suitable for your car. There are two main types of auxiliary inputs: wired and Bluetooth. Wired AUX inputs require a physical connection between your device and the car’s audio system, while Bluetooth AUX inputs allow for wireless connectivity.
If your car does not have Bluetooth capabilities, you may opt for a wired AUX input for a more straightforward installation process. However, if you prefer a wireless connection, you can choose a Bluetooth AUX input for added convenience.
Step 2: Gather the Necessary Tools
- Wire stripper
- Electrical tape
- AUX cable
- Bluetooth receiver (if opting for Bluetooth)
- Screwdriver set
- Pliers
Step 3: Locate the Car Stereo
Locate your car stereo and identify the audio input ports available. Common locations for the audio input ports include the front dashboard, center console, or glove compartment. Once you have located the audio input ports, you can proceed with the installation process.
Step 4: Install the AUX Input
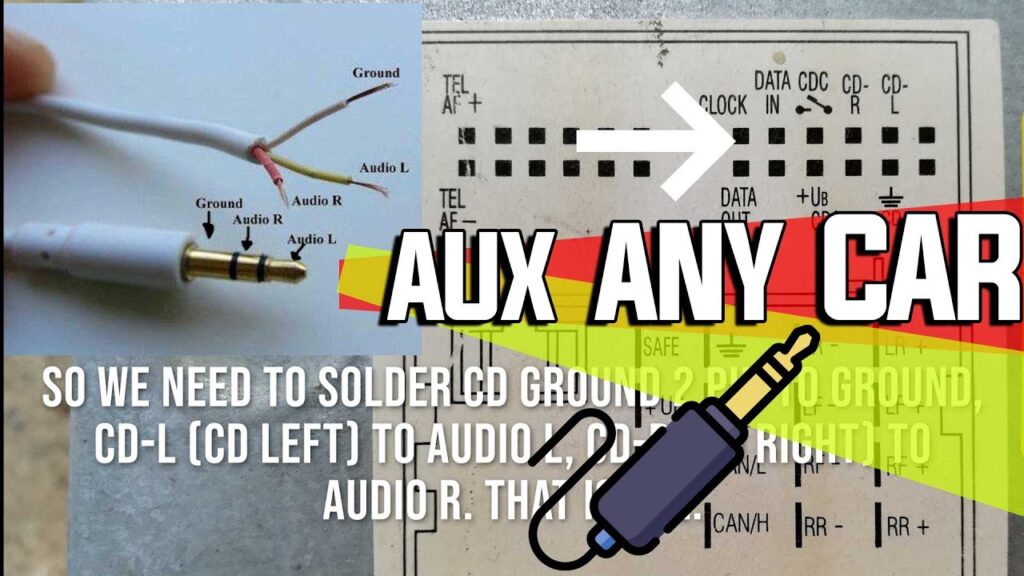
For a wired AUX input, connect one end of the AUX cable to the audio input port on your car stereo and the other end to your device. Use the wire stripper to strip the ends of the AUX cable and connect them securely with electrical tape.
If you are installing a Bluetooth AUX input, plug the Bluetooth receiver into the audio input port on your car stereo. Pair the Bluetooth receiver with your device following the manufacturer’s instructions. Once paired, you can enjoy wireless audio streaming in your car.
Step 5: Test the Connection
After the installation process is complete, test the AUX input connection by playing music or audio from your device. Ensure that the audio is transmitted clearly through your car stereo without any disruptions. If you encounter any issues, double-check the connections and settings on both your device and car stereo.
Step 6: Enjoy Your Music On-the-Go
Congratulations! You have successfully added an auxiliary input to your older car. Now you can enjoy your favorite music, podcasts, and other audio content on-the-go. Whether you’re commuting to work or embarking on a road trip, having an auxiliary input in your car can enhance your driving experience.
Remember to drive safely and responsibly while enjoying your music. Stay tuned for more car hacks and DIY tips on our blog. Until next time, happy driving!
How to Add an Auxiliary Input to an Older Car?
Are you tired of listening to the same old radio stations in your older car? Adding an auxiliary input can be a game-changer when it comes to enjoying your favorite music or podcasts on the road. In this article, we will guide you through the process of adding an auxiliary input to your older car, so you can connect your phone or other devices and listen to whatever you want. Let’s get started!
Step 1: Determine the Type of AUX Input
Before you begin the installation process, you need to determine the type of AUX input that is most suitable for your car. There are two main types of auxiliary inputs: wired and Bluetooth. Wired AUX inputs require a physical connection between your device and the car’s audio system, while Bluetooth AUX inputs allow for wireless connectivity.
If your car does not have Bluetooth capabilities, you may opt for a wired AUX input for a more straightforward installation process. However, if you prefer a wireless connection, you can choose a Bluetooth AUX input for added convenience.
Step 2: Gather the Necessary Tools
- Wire stripper
- Electrical tape
- AUX cable
- Bluetooth receiver (if opting for Bluetooth)
- Screwdriver set
- Pliers
Step 3: Locate the Car Stereo
Locate your car stereo and identify the audio input ports available. Common locations for the audio input ports include the front dashboard, center console, or glove compartment. Once you have located the audio input ports, you can proceed with the installation process.
Step 4: Install the AUX Input
For a wired AUX input, connect one end of the AUX cable to the audio input port on your car stereo and the other end to your device. Use the wire stripper to strip the ends of the AUX cable and connect them securely with electrical tape.
If you are installing a Bluetooth AUX input, plug the Bluetooth receiver into the audio input port on your car stereo. Pair the Bluetooth receiver with your device following the manufacturer’s instructions. Once paired, you can enjoy wireless audio streaming in your car.
Step 5: Test the Connection
After the installation process is complete, test the AUX input connection by playing music or audio from your device. Ensure that the audio is transmitted clearly through your car stereo without any disruptions. If you encounter any issues, double-check the connections and settings on both your device and car stereo.
Step 6: Enjoy Your Music On-the-Go
Congratulations! You have successfully added an auxiliary input to your older car. Now you can enjoy your favorite music, podcasts, and other audio content on-the-go. Whether you’re commuting to work or embarking on a road trip, having an auxiliary input in your car can enhance your driving experience.
Remember to drive safely and responsibly while enjoying your music. Stay tuned for more car hacks and DIY tips on our blog. Until next time, happy driving!