Best way to use a rotary potentiometer for input?
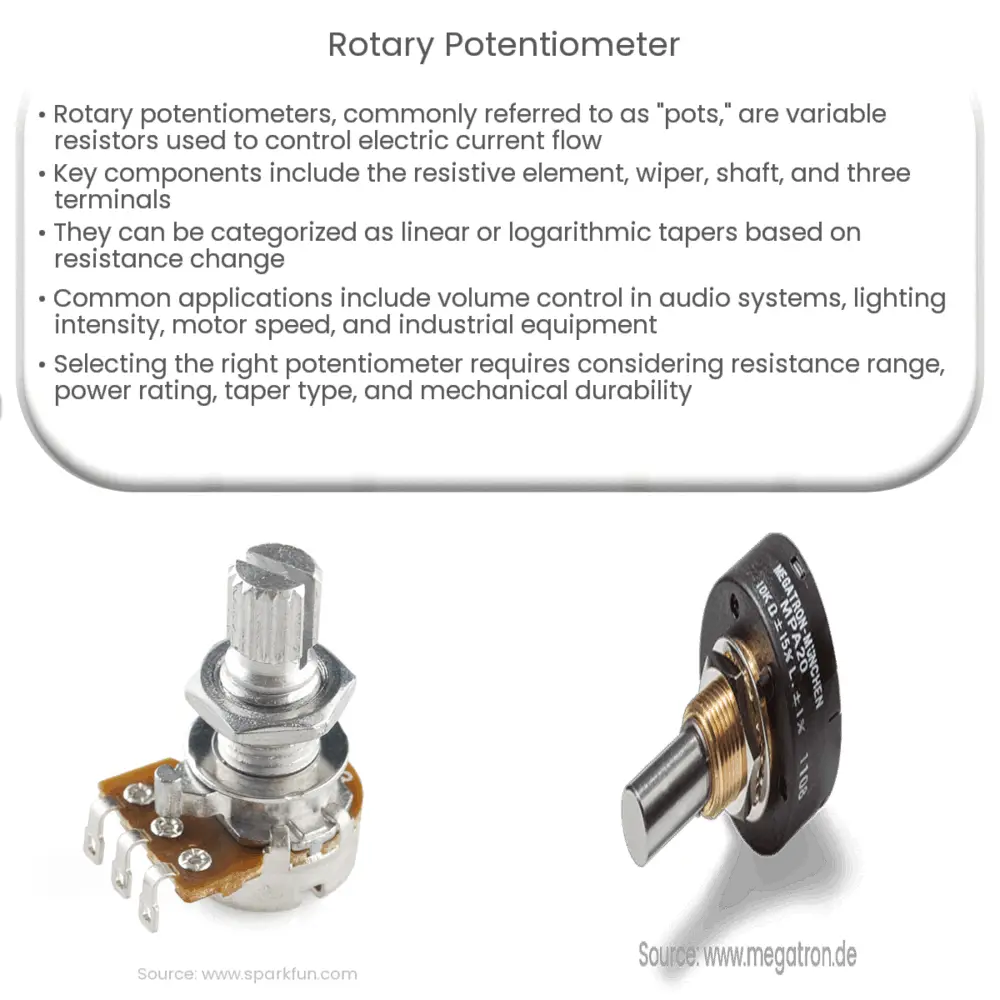
Rotary potentiometers are a common component in electronics that allows for variable resistance based on the position of a knob or dial. They are often used as input devices in various applications such as volume controls, joysticks, and other user interface elements. If you are looking to use a rotary potentiometer for input in your project, there are a few best practices to keep in mind to ensure optimal performance and usability.
Choose the right type of rotary potentiometer
Before you start using a rotary potentiometer for input, it’s important to choose the right type for your specific application. There are various types of rotary potentiometers available, including single-turn, multi-turn, linear taper, log taper, and more. The type you choose should depend on factors such as the required resolution, sensitivity, and physical size constraints of your project.
For example, if you need fine-grained control over a wide range of values, a multi-turn potentiometer with a log taper might be the best choice. On the other hand, if you need quick, precise adjustments within a limited range, a single-turn potentiometer with a linear taper may be more suitable.
Connect the rotary potentiometer correctly
Once you have chosen the right type of rotary potentiometer for your project, it’s important to connect it correctly to your circuit. Rotary potentiometers typically have three terminals – the input terminal, the output terminal, and the wiper terminal. The input terminal is connected to the voltage source, the output terminal is connected to ground, and the wiper terminal outputs a variable voltage based on the position of the knob.
Make sure to follow the datasheet of your rotary potentiometer to determine the correct pinout and wiring configuration. Incorrect wiring can lead to erratic behavior and inaccurate readings, so double-check your connections before powering up your circuit.
Calibrate the rotary potentiometer
Before using the rotary potentiometer for input in your project, it’s a good idea to calibrate it to ensure accurate and consistent readings. Calibration involves mapping the physical position of the knob to specific values or ranges in your software or firmware.
You can do this by manually turning the knob to its minimum and maximum positions and recording the corresponding output voltages. Then, you can create a mapping function in your code that translates these voltages to the desired input values for your application.
Implement smoothing algorithms if needed
Rotary potentiometers can sometimes produce noisy or jittery output readings, especially when the knob is turned quickly or if there are fluctuations in the power supply. If you notice this behavior in your project, you can implement smoothing algorithms in your software to filter out unwanted noise and ensure smooth and stable input.
There are various smoothing techniques you can use, such as simple averaging, exponential smoothing, or digital filters. Experiment with different algorithms to find the one that works best for your specific application and provides the desired level of smoothing without introducing too much latency.
Consider adding physical detents or stops
If you want to provide tactile feedback or limit the range of motion for the rotary potentiometer in your project, you can consider adding physical detents or stops to the knob. Detents are small notches or bumps that provide resistance when the knob is turned, giving the user a sense of “clicks” or “steps” as they adjust the input.
Stops, on the other hand, are physical barriers that prevent the knob from turning beyond a certain point. Stops can be useful for limiting the range of input values or for implementing discrete modes of operation in your project.
Test and iterate on your design
After implementing the rotary potentiometer in your project, it’s important to thoroughly test its performance and usability in real-world conditions. Pay attention to factors such as responsiveness, accuracy, reliability, and user experience. Solicit feedback from beta testers or end users to identify any potential issues or areas for improvement.
Based on the feedback you receive, iterate on your design by making necessary adjustments or refinements to optimize the user experience and overall performance of the rotary potentiometer input. Remember that user input devices play a crucial role in the success of any interactive product, so invest time and effort in fine-tuning your design for maximum effectiveness.
By following these best practices and tips for using a rotary potentiometer for input in your project, you can ensure smooth operation, accurate readings, and an intuitive user experience. Remember to choose the right type of potentiometer, connect it correctly, calibrate it accurately, implement smoothing algorithms if needed, consider adding physical detents or stops, and test and iterate on your design to create a seamless and effective user interface.
Best way to use a rotary potentiometer for input?
Rotary potentiometers are a common component in electronics that allows for variable resistance based on the position of a knob or dial. They are often used as input devices in various applications such as volume controls, joysticks, and other user interface elements. If you are looking to use a rotary potentiometer for input in your project, there are a few best practices to keep in mind to ensure optimal performance and usability.
Choose the right type of rotary potentiometer
Before you start using a rotary potentiometer for input, it’s important to choose the right type for your specific application. There are various types of rotary potentiometers available, including single-turn, multi-turn, linear taper, log taper, and more. The type you choose should depend on factors such as the required resolution, sensitivity, and physical size constraints of your project.
For example, if you need fine-grained control over a wide range of values, a multi-turn potentiometer with a log taper might be the best choice. On the other hand, if you need quick, precise adjustments within a limited range, a single-turn potentiometer with a linear taper may be more suitable.
Connect the rotary potentiometer correctly
Once you have chosen the right type of rotary potentiometer for your project, it’s important to connect it correctly to your circuit. Rotary potentiometers typically have three terminals – the input terminal, the output terminal, and the wiper terminal. The input terminal is connected to the voltage source, the output terminal is connected to ground, and the wiper terminal outputs a variable voltage based on the position of the knob.
Make sure to follow the datasheet of your rotary potentiometer to determine the correct pinout and wiring configuration. Incorrect wiring can lead to erratic behavior and inaccurate readings, so double-check your connections before powering up your circuit.
Calibrate the rotary potentiometer
Before using the rotary potentiometer for input in your project, it’s a good idea to calibrate it to ensure accurate and consistent readings. Calibration involves mapping the physical position of the knob to specific values or ranges in your software or firmware.
You can do this by manually turning the knob to its minimum and maximum positions and recording the corresponding output voltages. Then, you can create a mapping function in your code that translates these voltages to the desired input values for your application.
Implement smoothing algorithms if needed
Rotary potentiometers can sometimes produce noisy or jittery output readings, especially when the knob is turned quickly or if there are fluctuations in the power supply. If you notice this behavior in your project, you can implement smoothing algorithms in your software to filter out unwanted noise and ensure smooth and stable input.
There are various smoothing techniques you can use, such as simple averaging, exponential smoothing, or digital filters. Experiment with different algorithms to find the one that works best for your specific application and provides the desired level of smoothing without introducing too much latency.
Consider adding physical detents or stops
If you want to provide tactile feedback or limit the range of motion for the rotary potentiometer in your project, you can consider adding physical detents or stops to the knob. Detents are small notches or bumps that provide resistance when the knob is turned, giving the user a sense of “clicks” or “steps” as they adjust the input.
Stops, on the other hand, are physical barriers that prevent the knob from turning beyond a certain point. Stops can be useful for limiting the range of input values or for implementing discrete modes of operation in your project.
Test and iterate on your design
After implementing the rotary potentiometer in your project, it’s important to thoroughly test its performance and usability in real-world conditions. Pay attention to factors such as responsiveness, accuracy, reliability, and user experience. Solicit feedback from beta testers or end users to identify any potential issues or areas for improvement.
Based on the feedback you receive, iterate on your design by making necessary adjustments or refinements to optimize the user experience and overall performance of the rotary potentiometer input. Remember that user input devices play a crucial role in the success of any interactive product, so invest time and effort in fine-tuning your design for maximum effectiveness.
By following these best practices and tips for using a rotary potentiometer for input in your project, you can ensure smooth operation, accurate readings, and an intuitive user experience. Remember to choose the right type of potentiometer, connect it correctly, calibrate it accurately, implement smoothing algorithms if needed, consider adding physical detents or stops, and test and iterate on your design to create a seamless and effective user interface.