Best Way to Generate PWM Signals on an ATmega32
Are you looking for the best way to generate PWM signals on an ATmega32 microcontroller? Look no further! In this article, we will explore the various methods and techniques to efficiently generate PWM signals on an ATmega32, a popular microcontroller in the AVR family.
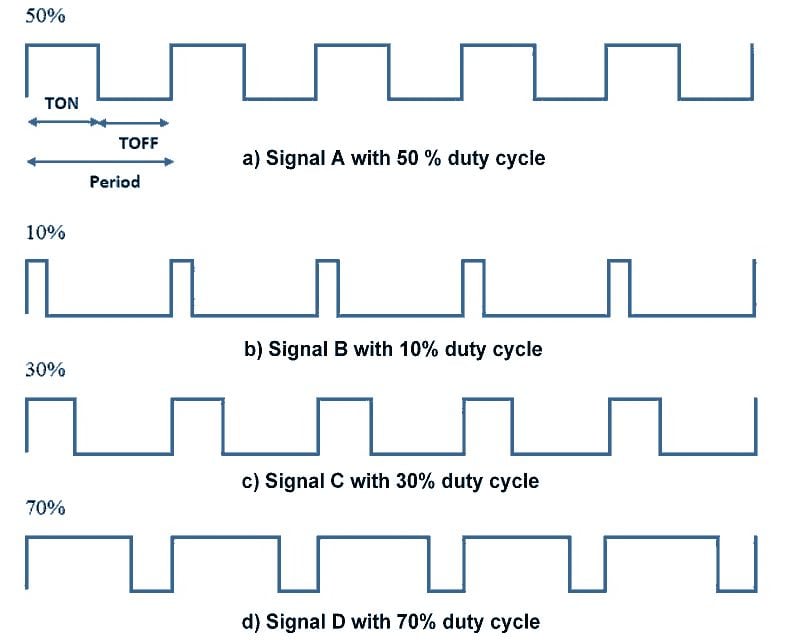
Pulse Width Modulation (PWM) is a crucial aspect of many embedded systems, used for controlling motors, LEDs, and other electronic devices requiring variable power levels. Generating PWM signals on an ATmega32 is relatively easy, thanks to its built-in hardware PWM capabilities.
Hardware PWM vs. Software PWM
There are two main ways to generate PWM signals on an ATmega32: hardware PWM and software PWM. Hardware PWM utilizes the built-in Pulse Width Modulation peripherals of the microcontroller, while software PWM uses software to implement PWM functionality.
Hardware PWM offers several advantages over software PWM, including higher accuracy, lower CPU usage, and precise timing control. However, software PWM provides greater flexibility and can be used on any pin of the microcontroller.
For most applications, hardware PWM is recommended due to its superior performance and efficiency. In this article, we will focus on generating hardware PWM signals on an ATmega32.
Generating PWM Signals Using Timer/Counter Registers
The ATmega32 microcontroller features several Timer/Counter registers that can be configured to generate PWM signals. By setting the appropriate registers and control bits, you can easily generate PWM signals with varying duty cycles.
One of the most commonly used Timer/Counter registers for PWM generation is Timer/Counter 1 (TCNT1). By configuring TCNT1 along with the Output Compare Registers (OCR1A and OCR1B), you can achieve precise PWM generation with minimal effort.
Here’s a simple example of generating PWM signals on an ATmega32 using Timer/Counter 1:
// Set Fast PWM mode with non-inverting output on OC1A pin
TCCR1A |= (1 << WGM11) | (1 << COM1A1);
// Set prescaler to 64 for a frequency of 976.5625 Hz
TCCR1B |= (1 << WGM12) | (1 << WGM13) | (1 << CS11) | (1 << CS10);
// Set the duty cycle to 50% by writing to OCR1A
OCR1A = 32768;
By following these simple steps, you can generate PWM signals with a 50% duty cycle on the ATmega32 microcontroller. Experiment with different settings and configurations to achieve the desired PWM output for your specific application.
Conclusion
Generating PWM signals on an ATmega32 is a straightforward process that can be accomplished using the microcontroller's built-in Timer/Counter registers. By leveraging hardware PWM capabilities, you can efficiently control various devices and components in your embedded system.
Experiment with different PWM settings and configurations to optimize the performance and functionality of your ATmega32-based projects. With the right approach, you can harness the power of PWM to create innovative and dynamic electronic applications.
Stay tuned for more articles and tutorials on embedded systems and microcontroller programming!
Best Way to Generate PWM Signals on an ATmega32
Are you looking for the best way to generate PWM signals on an ATmega32 microcontroller? Look no further! In this article, we will explore the various methods and techniques to efficiently generate PWM signals on an ATmega32, a popular microcontroller in the AVR family.
Pulse Width Modulation (PWM) is a crucial aspect of many embedded systems, used for controlling motors, LEDs, and other electronic devices requiring variable power levels. Generating PWM signals on an ATmega32 is relatively easy, thanks to its built-in hardware PWM capabilities.
Hardware PWM vs. Software PWM
There are two main ways to generate PWM signals on an ATmega32: hardware PWM and software PWM. Hardware PWM utilizes the built-in Pulse Width Modulation peripherals of the microcontroller, while software PWM uses software to implement PWM functionality.
Hardware PWM offers several advantages over software PWM, including higher accuracy, lower CPU usage, and precise timing control. However, software PWM provides greater flexibility and can be used on any pin of the microcontroller.
For most applications, hardware PWM is recommended due to its superior performance and efficiency. In this article, we will focus on generating hardware PWM signals on an ATmega32.
Generating PWM Signals Using Timer/Counter Registers
The ATmega32 microcontroller features several Timer/Counter registers that can be configured to generate PWM signals. By setting the appropriate registers and control bits, you can easily generate PWM signals with varying duty cycles.
One of the most commonly used Timer/Counter registers for PWM generation is Timer/Counter 1 (TCNT1). By configuring TCNT1 along with the Output Compare Registers (OCR1A and OCR1B), you can achieve precise PWM generation with minimal effort.
Here’s a simple example of generating PWM signals on an ATmega32 using Timer/Counter 1:
// Set Fast PWM mode with non-inverting output on OC1A pin
TCCR1A |= (1 << WGM11) | (1 << COM1A1);
// Set prescaler to 64 for a frequency of 976.5625 Hz
TCCR1B |= (1 << WGM12) | (1 << WGM13) | (1 << CS11) | (1 << CS10);
// Set the duty cycle to 50% by writing to OCR1A
OCR1A = 32768;
By following these simple steps, you can generate PWM signals with a 50% duty cycle on the ATmega32 microcontroller. Experiment with different settings and configurations to achieve the desired PWM output for your specific application.
Conclusion
Generating PWM signals on an ATmega32 is a straightforward process that can be accomplished using the microcontroller's built-in Timer/Counter registers. By leveraging hardware PWM capabilities, you can efficiently control various devices and components in your embedded system.
Experiment with different PWM settings and configurations to optimize the performance and functionality of your ATmega32-based projects. With the right approach, you can harness the power of PWM to create innovative and dynamic electronic applications.
Stay tuned for more articles and tutorials on embedded systems and microcontroller programming!