How to Connect an HC-SR501 Motion Sensor
Are you looking to add a motion sensor to your project? The HC-SR501 motion sensor is a popular choice due to its affordability and reliability. In this guide, we will walk you through the steps to connect an HC-SR501 motion sensor to your Arduino or Raspberry Pi.
What You Will Need
- HC-SR501 motion sensor
- Jumper wires
- Arduino or Raspberry Pi
- Breadboard (optional)
Step 1: Wiring the Sensor
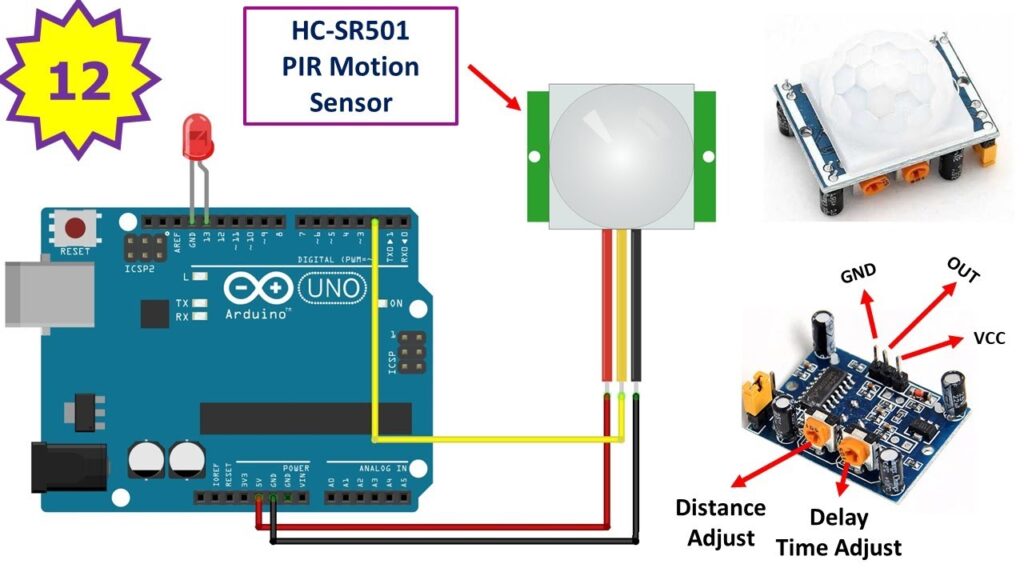
Begin by identifying the pins on the HC-SR501 motion sensor. It has three pins: VCC (power), OUT (signal output), and GND (ground). Connect the VCC pin to the 5V pin on your Arduino or Raspberry Pi, the OUT pin to a digital input pin (e.g., Pin 7), and the GND pin to the ground pin.
Step 2: Coding the Sensor
Next, you will need to write the code to read the sensor data. Here is a sample Arduino sketch to get you started:
int motionSensor = 7; // Define the pin for the sensor output
int motionState = 0; // Variable to store the sensor state

void setup() {
  // Initialize the sensor pin as an input
  pinMode(motionSensor, INPUT);
  // Initialize serial communication
  Serial.begin(9600);
}

void loop() {
  // Read the sensor state
  motionState = digitalRead(motionSensor);
  // Print the sensor state
  Serial.println(motionState);
  // Delay for a short period
  delay(500);
}
Step 3: Testing the Sensor
Upload the code to your Arduino or Raspberry Pi and open the serial monitor. You should see the sensor state (0 or 1) changing when motion is detected. You can now use this data to trigger actions in your project, such as turning on a light or sending a notification.
Conclusion
Connecting an HC-SR501 motion sensor is a simple process that can add a new level of interactivity to your projects. With just a few basic components and some coding, you can create a smart system that responds to movement. Have fun experimenting with different applications for your motion sensor!
How to Connect an HC-SR501 Motion Sensor
Are you looking to add a motion sensor to your project? The HC-SR501 motion sensor is a popular choice due to its affordability and reliability. In this guide, we will walk you through the steps to connect an HC-SR501 motion sensor to your Arduino or Raspberry Pi.
What You Will Need
- HC-SR501 motion sensor
- Jumper wires
- Arduino or Raspberry Pi
- Breadboard (optional)
Step 1: Wiring the Sensor
Begin by identifying the pins on the HC-SR501 motion sensor. It has three pins: VCC (power), OUT (signal output), and GND (ground). Connect the VCC pin to the 5V pin on your Arduino or Raspberry Pi, the OUT pin to a digital input pin (e.g., Pin 7), and the GND pin to the ground pin.
Step 2: Coding the Sensor
Next, you will need to write the code to read the sensor data. Here is a sample Arduino sketch to get you started:
int motionSensor = 7; // Define the pin for the sensor output
int motionState = 0; // Variable to store the sensor state

void setup() {
  // Initialize the sensor pin as an input
  pinMode(motionSensor, INPUT);
  // Initialize serial communication
  Serial.begin(9600);
}

void loop() {
  // Read the sensor state
  motionState = digitalRead(motionSensor);
  // Print the sensor state
  Serial.println(motionState);
  // Delay for a short period
  delay(500);
}
Step 3: Testing the Sensor
Upload the code to your Arduino or Raspberry Pi and open the serial monitor. You should see the sensor state (0 or 1) changing when motion is detected. You can now use this data to trigger actions in your project, such as turning on a light or sending a notification.
Conclusion
Connecting an HC-SR501 motion sensor is a simple process that can add a new level of interactivity to your projects. With just a few basic components and some coding, you can create a smart system that responds to movement. Have fun experimenting with different applications for your motion sensor!