Best Way to Measure Soil Moisture with Arduino
Arduino is a popular open-source platform used for building electronics projects. One common application of Arduino is in measuring soil moisture levels for agriculture and gardening purposes. In this article, we will explore the best way to measure soil moisture with Arduino.
Measuring soil moisture with Arduino involves using a soil moisture sensor that can detect the water content in the soil. There are several types of soil moisture sensors available, but the most commonly used one is the capacitive soil moisture sensor. These sensors work by measuring the electrical conductivity of the soil, which changes with the water content.
Before you start measuring soil moisture with Arduino, you will need the following materials:
- Arduino board (e.g., Arduino Uno)
- Capacitive soil moisture sensor
- Jumper wires
- Small water container
- LED or buzzer (optional for visual or audible feedback)
Once you have gathered all the materials, follow these steps to measure soil moisture with Arduino:
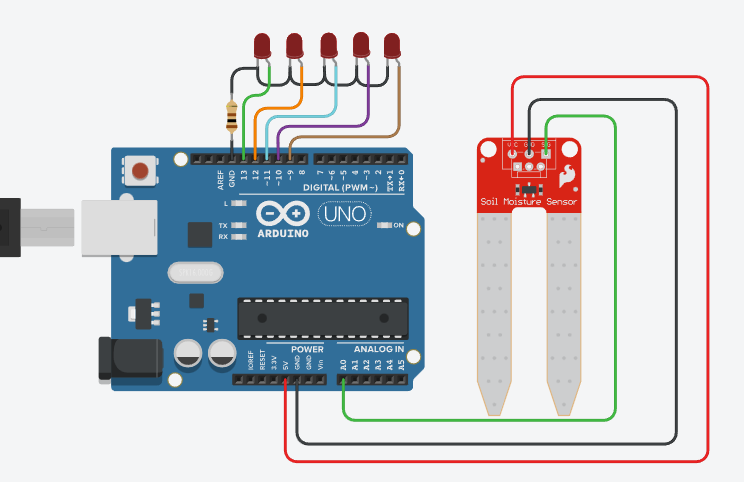
- Connect the soil moisture sensor to the Arduino board using jumper wires. The sensor will have three pins: VCC, GND, and A0 (analog output).
- Connect the VCC pin to the 5V pin on the Arduino, the GND pin to the GND pin, and the A0 pin to the A0 pin.
- Fill the small water container with water and place the soil moisture sensor in the soil.
- Upload the following Arduino code to the board:
void setup() {
  Serial.begin(9600);
}

void loop() {
  int sensorValue = analogRead(A0);
  Serial.print("Soil Moisture: ");
  Serial.println(sensorValue);
  delay(1000);
}
After uploading the code, open the Serial Monitor in the Arduino IDE to see the soil moisture readings. The sensor value will change based on the soil’s moisture content, with higher values indicating drier soil and lower values indicating wetter soil.
You can further enhance your soil moisture measurement system by adding an LED or buzzer that turns on or buzzes when the soil moisture reaches a certain threshold. This way, you can receive visual or audible alerts when your plants need watering.
Overall, measuring soil moisture with Arduino is a simple and effective way to monitor the water levels in your soil. By following the steps outlined in this article, you can build your own soil moisture measurement system and keep your plants healthy and thriving.
So, grab your Arduino board and soil moisture sensor, and start measuring your soil moisture today!
Best Way to Measure Soil Moisture with Arduino
Arduino is a popular open-source platform used for building electronics projects. One common application of Arduino is in measuring soil moisture levels for agriculture and gardening purposes. In this article, we will explore the best way to measure soil moisture with Arduino.
Measuring soil moisture with Arduino involves using a soil moisture sensor that can detect the water content in the soil. There are several types of soil moisture sensors available, but the most commonly used one is the capacitive soil moisture sensor. These sensors work by measuring the electrical conductivity of the soil, which changes with the water content.
Before you start measuring soil moisture with Arduino, you will need the following materials:
- Arduino board (e.g., Arduino Uno)
- Capacitive soil moisture sensor
- Jumper wires
- Small water container
- LED or buzzer (optional for visual or audible feedback)
Once you have gathered all the materials, follow these steps to measure soil moisture with Arduino:
- Connect the soil moisture sensor to the Arduino board using jumper wires. The sensor will have three pins: VCC, GND, and A0 (analog output).
- Connect the VCC pin to the 5V pin on the Arduino, the GND pin to the GND pin, and the A0 pin to the A0 pin.
- Fill the small water container with water and place the soil moisture sensor in the soil.
- Upload the following Arduino code to the board:
void setup() {
  Serial.begin(9600);
}

void loop() {
  int sensorValue = analogRead(A0);
  Serial.print("Soil Moisture: ");
  Serial.println(sensorValue);
  delay(1000);
}
After uploading the code, open the Serial Monitor in the Arduino IDE to see the soil moisture readings. The sensor value will change based on the soil’s moisture content, with higher values indicating drier soil and lower values indicating wetter soil.
You can further enhance your soil moisture measurement system by adding an LED or buzzer that turns on or buzzes when the soil moisture reaches a certain threshold. This way, you can receive visual or audible alerts when your plants need watering.
Overall, measuring soil moisture with Arduino is a simple and effective way to monitor the water levels in your soil. By following the steps outlined in this article, you can build your own soil moisture measurement system and keep your plants healthy and thriving.
So, grab your Arduino board and soil moisture sensor, and start measuring your soil moisture today!