How to use a DS18B20 temperature sensor with Arduino?
Are you looking to incorporate temperature sensing into your Arduino projects? The DS18B20 temperature sensor is a versatile and accurate sensor that can be easily integrated with Arduino. In this article, we will guide you on how to use the DS18B20 temperature sensor with Arduino to measure temperature and make your projects more interactive.
What is the DS18B20 temperature sensor?
The DS18B20 is a digital temperature sensor that uses the one-wire communication protocol to communicate with microcontrollers like Arduino. It has an accuracy of ±0.5°C over the temperature range of -10°C to +85°C, making it suitable for a wide range of applications. The sensor comes in a waterproof package, allowing it to be used in harsh environments.
Hardware required
- Arduino board (e.g., Arduino Uno)
- DS18B20 temperature sensor
- 4.7kΩ resistor
- Jumper wires
- Breadboard
Connections
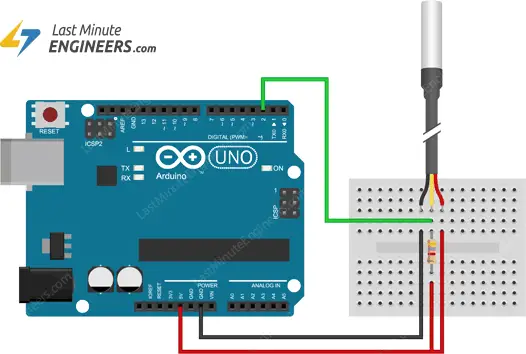
To connect the DS18B20 temperature sensor to Arduino, follow these steps:
- VCC pin of DS18B20 to 5V pin of Arduino
- GND pin of DS18B20 to GND pin of Arduino
- DQ pin of DS18B20 to Digital pin 2 of Arduino with a 4.7kΩ pull-up resistor connected to 5V
Installing libraries
Before you can start reading temperature data from the DS18B20 sensor, you need to install the OneWire and DallasTemperature libraries in the Arduino IDE. To install these libraries, go to Sketch > Include Library > Manage Libraries and search for OneWire and DallasTemperature. Click on Install to add the libraries to your Arduino IDE.
Reading temperature data
Once you have installed the necessary libraries, you can start reading temperature data from the DS18B20 sensor. Upload the following code to your Arduino board:
#include
#include
// Data wire is connected to digital pin 2
#define ONE_WIRE_BUS 2
OneWire oneWire(ONE_WIRE_BUS);
DallasTemperature sensors(&oneWire);
void setup() {
Serial.begin(9600);
sensors.begin();
}
void loop() {
sensors.requestTemperatures();
float temperature = sensors.getTempCByIndex(0);
Serial.print("Temperature: ");
Serial.print(temperature);
Serial.println(" °C");
delay(1000);
}
After uploading the code, open the Serial Monitor in the Arduino IDE to view the temperature readings from the DS18B20 sensor. You should see the temperature displayed in degrees Celsius with new readings every second.
Conclusion
By following these simple steps, you can easily use the DS18B20 temperature sensor with Arduino to monitor temperature in your projects. Whether you are building a weather station, a thermostat, or a temperature-controlled system, the DS18B20 sensor is a great choice for accurate and reliable temperature sensing.
Experiment with the DS18B20 sensor in your Arduino projects and explore the endless possibilities of temperature monitoring and control. Have fun learning and creating with Arduino and the DS18B20 temperature sensor!
How to use a DS18B20 temperature sensor with Arduino?
Are you looking to incorporate temperature sensing into your Arduino projects? The DS18B20 temperature sensor is a versatile and accurate sensor that can be easily integrated with Arduino. In this article, we will guide you on how to use the DS18B20 temperature sensor with Arduino to measure temperature and make your projects more interactive.
What is the DS18B20 temperature sensor?
The DS18B20 is a digital temperature sensor that uses the one-wire communication protocol to communicate with microcontrollers like Arduino. It has an accuracy of ±0.5°C over the temperature range of -10°C to +85°C, making it suitable for a wide range of applications. The sensor comes in a waterproof package, allowing it to be used in harsh environments.
Hardware required
- Arduino board (e.g., Arduino Uno)
- DS18B20 temperature sensor
- 4.7kΩ resistor
- Jumper wires
- Breadboard
Connections
To connect the DS18B20 temperature sensor to Arduino, follow these steps:
- VCC pin of DS18B20 to 5V pin of Arduino
- GND pin of DS18B20 to GND pin of Arduino
- DQ pin of DS18B20 to Digital pin 2 of Arduino with a 4.7kΩ pull-up resistor connected to 5V
Installing libraries
Before you can start reading temperature data from the DS18B20 sensor, you need to install the OneWire and DallasTemperature libraries in the Arduino IDE. To install these libraries, go to Sketch > Include Library > Manage Libraries and search for OneWire and DallasTemperature. Click on Install to add the libraries to your Arduino IDE.
Reading temperature data
Once you have installed the necessary libraries, you can start reading temperature data from the DS18B20 sensor. Upload the following code to your Arduino board:
#include
#include
// Data wire is connected to digital pin 2
#define ONE_WIRE_BUS 2
OneWire oneWire(ONE_WIRE_BUS);
DallasTemperature sensors(&oneWire);
void setup() {
Serial.begin(9600);
sensors.begin();
}
void loop() {
sensors.requestTemperatures();
float temperature = sensors.getTempCByIndex(0);
Serial.print("Temperature: ");
Serial.print(temperature);
Serial.println(" °C");
delay(1000);
}
After uploading the code, open the Serial Monitor in the Arduino IDE to view the temperature readings from the DS18B20 sensor. You should see the temperature displayed in degrees Celsius with new readings every second.
Conclusion
By following these simple steps, you can easily use the DS18B20 temperature sensor with Arduino to monitor temperature in your projects. Whether you are building a weather station, a thermostat, or a temperature-controlled system, the DS18B20 sensor is a great choice for accurate and reliable temperature sensing.
Experiment with the DS18B20 sensor in your Arduino projects and explore the endless possibilities of temperature monitoring and control. Have fun learning and creating with Arduino and the DS18B20 temperature sensor!