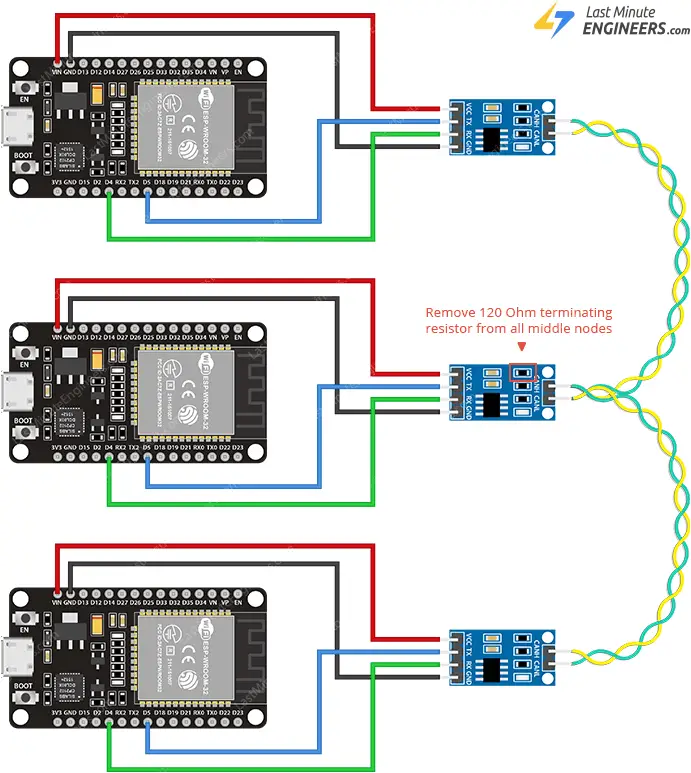
How to Interface a CAN Bus Module with an ESP32
Interfacing a Controller Area Network (CAN) bus module with an ESP32 microcontroller opens up a realm of possibilities for communication between various devices in a network. CAN bus is commonly used in automotive and industrial applications for real-time communication between microcontrollers and sensors. In this article, we will explore how to connect a CAN bus module to an ESP32 and utilize its capabilities effectively.
Understanding CAN Bus Communication
CAN bus is a robust, reliable, and high-speed serial communication protocol used to connect multiple microcontrollers in a network. It allows for real-time data transmission between devices, making it ideal for applications where timing and accuracy are crucial. The CAN bus consists of two wires – CAN_H and CAN_L, which carry differential signals to communicate between devices.
Materials Needed
- ESP32 Development Board
- CAN Bus Module (MCP2515)
- Transceiver Module (TJA1050)
- Jumper Wires
- Breadboard
Connecting the CAN Bus Module to ESP32
To interface the CAN bus module with the ESP32, follow these steps:
1. Connect the CAN_H pin of the CAN bus module to the RX pin of the transceiver module.
2. Connect the CAN_L pin of the CAN bus module to the TX pin of the transceiver module.
3. Connect the VCC and GND pins of both the CAN bus module and the transceiver module to the 3.3V and GND pins of the ESP32, respectively.
4. Connect the CS pin of the CAN bus module to GPIO 5 of the ESP32.
5. Connect the INT pin of the CAN bus module to GPIO 2 of the ESP32.
Programming the ESP32 for CAN Bus Communication
Now that the hardware connections are in place, you need to program the ESP32 to communicate with the CAN bus module. You can use libraries like the Arduino CAN library to facilitate CAN bus communication. Here’s a simple example code snippet to get you started:
#include <SPI.h>
#include <Adafruit_MCP2515.h>
Adafruit_MCP2515 can(&SPI, 5);
void setup() {
Serial.begin(115200);
if (!can.begin(1000000)) {
Serial.println(“Failed to start CAN bus!”);
while (1);
}
}
Conclusion
By following the steps outlined in this article, you can successfully interface a CAN bus module with an ESP32 and leverage the power of real-time communication in your projects. Experiment with different sensors, actuators, and devices to create a networked system that communicates seamlessly through the CAN bus protocol.
Remember to double-check your hardware connections and code to ensure everything is working correctly. With practice and experimentation, you can master CAN bus communication with the ESP32 and unlock a world of possibilities for your projects.