How to Interface a GSM Module with a PIC Microcontroller
Are you looking to connect a GSM module to a PIC microcontroller for a specific project or application? In this article, we will walk you through the steps to achieve this successfully. By interfacing a GSM module with a PIC microcontroller, you can enable your project to communicate over the GSM network, send text messages, make calls, and even connect to the internet.
Before we begin, let’s understand what GSM and PIC microcontrollers are. GSM (Global System for Mobile Communications) is a standard for digitally transmitting voice and data services used by mobile phones. A GSM module is a specialized type of modem that uses a SIM card to connect to the GSM network. On the other hand, a PIC microcontroller is a versatile and powerful microcontroller from Microchip Technology that is widely used in embedded systems.
Components Required
- GSM Module (e.g., SIM800L)
- PIC Microcontroller (e.g., PIC16F877A)
- Max232 IC
- Connecting Wires
- Breadboard
- Programmer (e.g., PICKIT3)
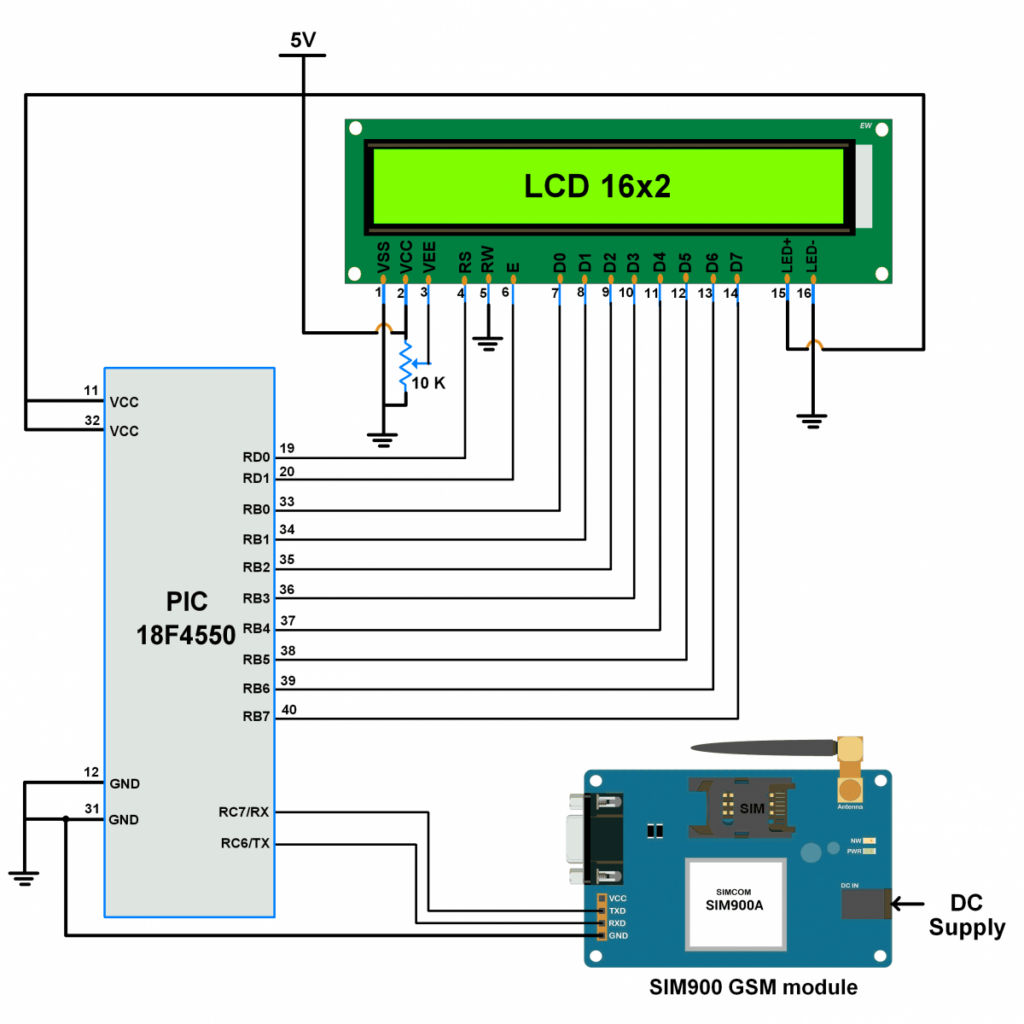
Connections
1. Connect the Tx pin of the PIC microcontroller to the Rx pin of the GSM module.
2. Connect the Rx pin of the PIC microcontroller to the Tx pin of the GSM module.
3. Connect the ground of both the PIC microcontroller and the GSM module.
4. Connect the Vcc pin of the GSM module to a 5V power supply.
Communication Protocol
To establish communication between the GSM module and the PIC microcontroller, we need to use the AT commands. AT commands are a standard set of commands used to control modems and other communication devices. By sending AT commands from the PIC microcontroller to the GSM module, we can perform various tasks such as sending SMS messages, making calls, and connecting to the internet.
Here is a simple example of sending an SMS message using AT commands:
AT+CMGF=1 // Set the SMS mode to text
AT+CMGS="+1234567890" // Enter the recipient's phone number
Hello, this is a test message. // Type the message
Ctrl+Z // Send the message
Programming the PIC Microcontroller
Once the hardware connections are in place, you can start writing the code for the PIC microcontroller. You can use a software like MPLAB X IDE to write and compile the code. Make sure to include the necessary libraries and configurations to communicate with the GSM module using UART.
Here is a simple example code snippet to send an AT command to the GSM module:
void sendATCommand(char* command) {
  while(*command)
    TXREG = *command++;
}
Testing the Setup
After writing and uploading the code to the PIC microcontroller, you can now test the setup. Power up the circuit and monitor the serial communication between the PIC microcontroller and the GSM module using a serial monitor tool. Send AT commands and check the responses from the GSM module to verify that the communication is successful.
Conclusion
Interfacing a GSM module with a PIC microcontroller opens up a wide range of possibilities for your projects. You can now send SMS messages, make calls, and even connect to the internet using your PIC-based system. With the right hardware connections and software programming, you can harness the power of GSM technology in your embedded applications. Have fun experimenting with this setup and explore the endless capabilities of GSM communication!
How to Interface a GSM Module with a PIC Microcontroller
Are you looking to connect a GSM module to a PIC microcontroller for a specific project or application? In this article, we will walk you through the steps to achieve this successfully. By interfacing a GSM module with a PIC microcontroller, you can enable your project to communicate over the GSM network, send text messages, make calls, and even connect to the internet.
Before we begin, let’s understand what GSM and PIC microcontrollers are. GSM (Global System for Mobile Communications) is a standard for digitally transmitting voice and data services used by mobile phones. A GSM module is a specialized type of modem that uses a SIM card to connect to the GSM network. On the other hand, a PIC microcontroller is a versatile and powerful microcontroller from Microchip Technology that is widely used in embedded systems.
Components Required
- GSM Module (e.g., SIM800L)
- PIC Microcontroller (e.g., PIC16F877A)
- Max232 IC
- Connecting Wires
- Breadboard
- Programmer (e.g., PICKIT3)
Connections
1. Connect the Tx pin of the PIC microcontroller to the Rx pin of the GSM module.
2. Connect the Rx pin of the PIC microcontroller to the Tx pin of the GSM module.
3. Connect the ground of both the PIC microcontroller and the GSM module.
4. Connect the Vcc pin of the GSM module to a 5V power supply.
Communication Protocol
To establish communication between the GSM module and the PIC microcontroller, we need to use the AT commands. AT commands are a standard set of commands used to control modems and other communication devices. By sending AT commands from the PIC microcontroller to the GSM module, we can perform various tasks such as sending SMS messages, making calls, and connecting to the internet.
Here is a simple example of sending an SMS message using AT commands:
AT+CMGF=1 // Set the SMS mode to text
AT+CMGS="+1234567890" // Enter the recipient's phone number
Hello, this is a test message. // Type the message
Ctrl+Z // Send the message
Programming the PIC Microcontroller
Once the hardware connections are in place, you can start writing the code for the PIC microcontroller. You can use a software like MPLAB X IDE to write and compile the code. Make sure to include the necessary libraries and configurations to communicate with the GSM module using UART.
Here is a simple example code snippet to send an AT command to the GSM module:
void sendATCommand(char* command) {
  while(*command)
    TXREG = *command++;
}
Testing the Setup
After writing and uploading the code to the PIC microcontroller, you can now test the setup. Power up the circuit and monitor the serial communication between the PIC microcontroller and the GSM module using a serial monitor tool. Send AT commands and check the responses from the GSM module to verify that the communication is successful.
Conclusion
Interfacing a GSM module with a PIC microcontroller opens up a wide range of possibilities for your projects. You can now send SMS messages, make calls, and even connect to the internet using your PIC-based system. With the right hardware connections and software programming, you can harness the power of GSM technology in your embedded applications. Have fun experimenting with this setup and explore the endless capabilities of GSM communication!