Best way to use GPIO interrupts on an ESP32
When it comes to programming the ESP32 microcontroller, utilizing GPIO interrupts is a powerful tool that can help optimize your code and increase the efficiency of your project. In this article, we will delve into the best practices for using GPIO interrupts on an ESP32, so that you can make the most out of this feature.
What are GPIO interrupts?
GPIO interrupts allow you to configure the ESP32 to trigger an interrupt whenever a specific GPIO pin changes its state. This means that you can make your ESP32 respond to external events without the need for constant polling, thus saving valuable processing power and reducing the complexity of your code.
Choosing the right GPIO pin
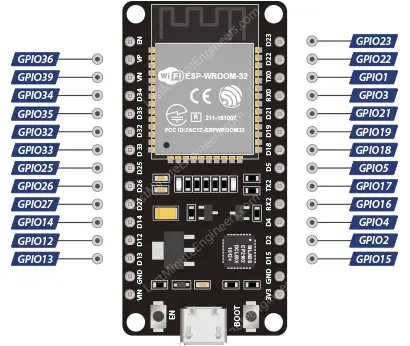
Before you start using GPIO interrupts on your ESP32, it’s important to carefully choose the GPIO pin that will be triggering the interrupts. Make sure to pick a pin that is not being used for any other critical functions, as this could lead to conflicts and unexpected behavior in your project.
Configuring GPIO interrupts
To configure a GPIO pin to trigger an interrupt on the ESP32, you will need to set up the pin as an input and define the type of interrupt you want to use (rising edge, falling edge, etc.). You can do this using the Arduino IDE or any other development environment that supports ESP32 programming.
For example, if you want to trigger an interrupt when the GPIO pin goes from low to high, you would use the attachInterrupt() function in your code and specify the pin, the interrupt handler function, and the type of edge you want to trigger the interrupt.
Interrupt handlers
An interrupt handler is a function that gets called whenever an interrupt is triggered on the configured GPIO pin. This is where you can define the actions that should be taken in response to the interrupt, such as updating a variable, toggling an LED, or sending a signal to another device.
Avoiding conflicts
One common mistake when using GPIO interrupts on the ESP32 is forgetting to disable interrupts before making critical changes to shared resources. This can lead to conflicts and unexpected behavior in your code, so be sure to disable interrupts when necessary and re-enable them once the critical section is over.
Testing and debugging
Before deploying your project with GPIO interrupts on the ESP32, it’s crucial to thoroughly test and debug your code to ensure that everything is working as expected. Use serial prints, LED indicators, or any other debugging tool at your disposal to monitor the behavior of your interrupt handlers and make any necessary adjustments.
Conclusion
Using GPIO interrupts on an ESP32 can greatly enhance the performance and efficiency of your project, but it requires careful planning and implementation to avoid conflicts and unexpected behavior. By following the best practices outlined in this article, you can harness the power of GPIO interrupts and take your ESP32 projects to the next level.


