How to create an SPI communication link between two microcontrollers?
SPI (Serial Peripheral Interface) is a common communication protocol used in the world of microcontrollers to connect multiple devices and exchange data. In this article, we will explore how to establish an SPI communication link between two microcontrollers. This guide can be especially helpful for beginners looking to learn about communication protocols in embedded systems. Let’s dive in!
Understanding SPI Communication
SPI is a synchronous serial communication interface that allows devices to communicate with each other using a master-slave architecture. It consists of four main lines:
- MOSI (Master Out Slave In): This line is used by the master to send data to a slave device.
- MISO (Master In Slave Out): This line is used by the slave to send data back to the master.
- SCK (Serial Clock): This line is used to synchronize communication between the master and slave.
- SS (Slave Select): This line is used by the master to select which slave device to communicate with.
Setting Up the SPI Communication
Now that we understand the basics of SPI communication, let’s move on to setting up the SPI link between two microcontrollers. Here are the steps to follow:
Step 1: Identify the Master and Slave
Firstly, you need to designate one microcontroller as the master and the other as the slave. The master will initiate communication and control the data transfer, while the slave will respond to commands from the master.
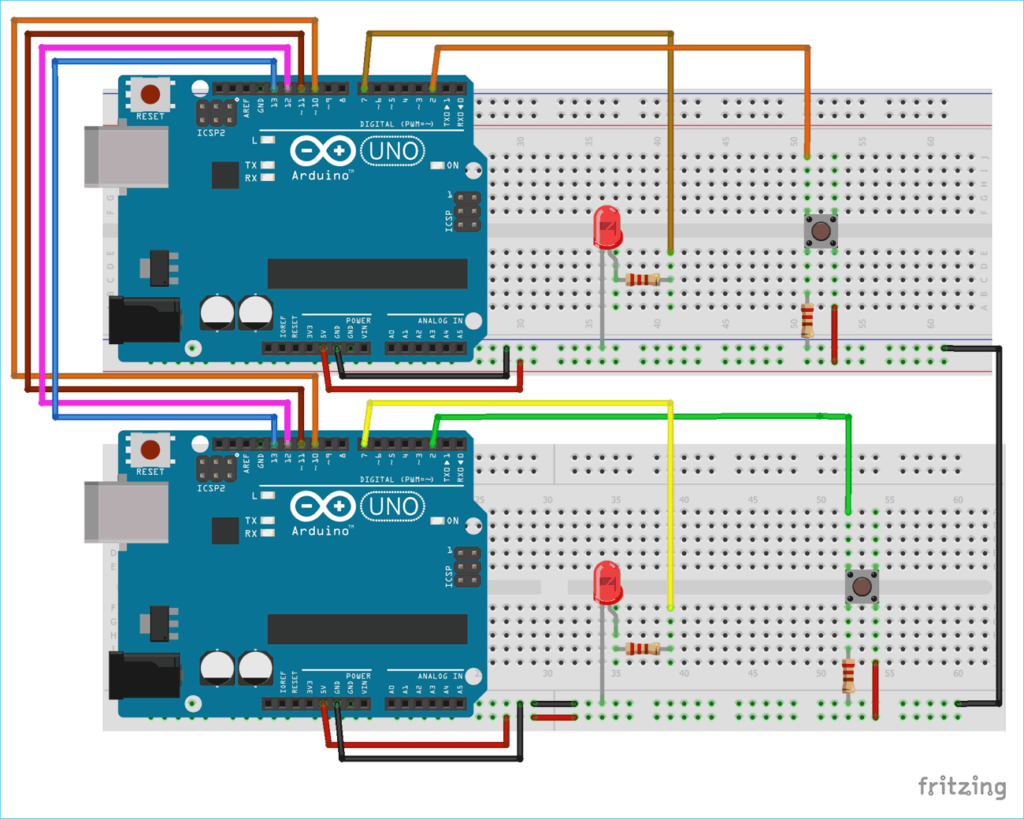
Step 2: Connect the SPI Pins
Next, you’ll need to connect the SPI pins on both microcontrollers. Ensure that the MOSI, MISO, SCK, and SS lines are correctly connected between the master and slave devices. You may need to refer to the datasheets of your microcontrollers to identify the correct pins.
Step 3: Configure the SPI Parameters
Once the physical connections are in place, you’ll need to configure the SPI parameters on both microcontrollers. This includes setting the clock speed, data format, and other relevant settings to ensure smooth communication between the devices.
Testing the SPI Communication
After setting up the SPI link, it’s essential to test the communication between the two microcontrollers. You can send test data packets from the master to the slave and verify that the slave responds correctly. This debugging phase is crucial to ensure that the SPI link is functioning correctly.
Conclusion
Establishing an SPI communication link between two microcontrollers is a fundamental skill for embedded systems developers. By following the steps outlined in this article and experimenting with different configurations, you can gain valuable experience in working with communication protocols. Remember to consult the datasheets of your microcontrollers for detailed information on SPI communication.
How to create an SPI communication link between two microcontrollers?
SPI (Serial Peripheral Interface) is a common communication protocol used in the world of microcontrollers to connect multiple devices and exchange data. In this article, we will explore how to establish an SPI communication link between two microcontrollers. This guide can be especially helpful for beginners looking to learn about communication protocols in embedded systems. Let’s dive in!
Understanding SPI Communication
SPI is a synchronous serial communication interface that allows devices to communicate with each other using a master-slave architecture. It consists of four main lines:
- MOSI (Master Out Slave In): This line is used by the master to send data to a slave device.
- MISO (Master In Slave Out): This line is used by the slave to send data back to the master.
- SCK (Serial Clock): This line is used to synchronize communication between the master and slave.
- SS (Slave Select): This line is used by the master to select which slave device to communicate with.
Setting Up the SPI Communication
Now that we understand the basics of SPI communication, let’s move on to setting up the SPI link between two microcontrollers. Here are the steps to follow:
Step 1: Identify the Master and Slave
Firstly, you need to designate one microcontroller as the master and the other as the slave. The master will initiate communication and control the data transfer, while the slave will respond to commands from the master.
Step 2: Connect the SPI Pins
Next, you’ll need to connect the SPI pins on both microcontrollers. Ensure that the MOSI, MISO, SCK, and SS lines are correctly connected between the master and slave devices. You may need to refer to the datasheets of your microcontrollers to identify the correct pins.
Step 3: Configure the SPI Parameters
Once the physical connections are in place, you’ll need to configure the SPI parameters on both microcontrollers. This includes setting the clock speed, data format, and other relevant settings to ensure smooth communication between the devices.
Testing the SPI Communication
After setting up the SPI link, it’s essential to test the communication between the two microcontrollers. You can send test data packets from the master to the slave and verify that the slave responds correctly. This debugging phase is crucial to ensure that the SPI link is functioning correctly.
Conclusion
Establishing an SPI communication link between two microcontrollers is a fundamental skill for embedded systems developers. By following the steps outlined in this article and experimenting with different configurations, you can gain valuable experience in working with communication protocols. Remember to consult the datasheets of your microcontrollers for detailed information on SPI communication.