How to Use an External Crystal with an STM32 Microcontroller
For many projects that require precise timing or communication with other devices, using an external crystal oscillator with your STM32 microcontroller is essential. In this guide, we will walk you through the steps to properly connect and configure an external crystal with your STM32 microcontroller.
Step 1: Selecting the Right Crystal
The first step in using an external crystal with your STM32 microcontroller is selecting the right crystal oscillator. The crystal oscillator you choose should have the correct frequency range for your project requirements. Common frequencies used with STM32 microcontrollers are 8 MHz, 12 MHz, and 16 MHz. Make sure to check the datasheet of your STM32 microcontroller to determine the recommended crystal frequency.
Step 2: Connecting the Crystal
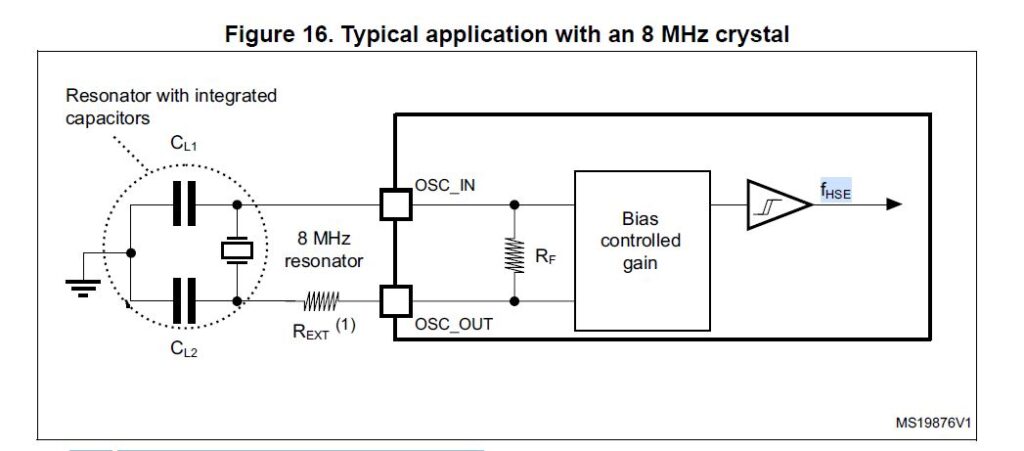
Once you have selected the right crystal oscillator, you will need to connect it to your STM32 microcontroller correctly. The crystal oscillator should be connected to the X1 and X2 pins of your STM32 microcontroller. Additionally, two capacitors (usually 22pF) should be connected in parallel with the crystal to stabilize the oscillation.
Step 3: Configuring the STM32 Microcontroller
After connecting the crystal oscillator to your STM32 microcontroller, you will need to configure the microcontroller to use the external crystal as its clock source. This can be done in the STM32CubeMX software by setting the HSE (High-Speed External) as the clock source and choosing the correct crystal frequency. Additionally, you will need to enable the HSE bypass mode if your crystal oscillator requires it.
Step 4: Programming the STM32 Microcontroller
Once you have connected and configured the external crystal with your STM32 microcontroller, you can now start programming your microcontroller. When writing your code, make sure to initialize the RCC (Reset and Clock Control) to use the external crystal as the system clock source. This will ensure that your microcontroller runs at the desired frequency provided by the external crystal oscillator.
Step 5: Testing the Crystal Oscillator
Finally, it is essential to test the crystal oscillator to ensure that it is functioning correctly. You can do this by monitoring the clock signal on the X1 pin using an oscilloscope. The waveform should be a stable square wave at the frequency of the crystal oscillator. If the waveform is unstable or incorrect, double-check your connections and configurations.
By following these steps, you can successfully use an external crystal oscillator with your STM32 microcontroller. This will provide precise timing and stable communication for your projects that require it.
How to Use an External Crystal with an STM32 Microcontroller
For many projects that require precise timing or communication with other devices, using an external crystal oscillator with your STM32 microcontroller is essential. In this guide, we will walk you through the steps to properly connect and configure an external crystal with your STM32 microcontroller.
Step 1: Selecting the Right Crystal
The first step in using an external crystal with your STM32 microcontroller is selecting the right crystal oscillator. The crystal oscillator you choose should have the correct frequency range for your project requirements. Common frequencies used with STM32 microcontrollers are 8 MHz, 12 MHz, and 16 MHz. Make sure to check the datasheet of your STM32 microcontroller to determine the recommended crystal frequency.
Step 2: Connecting the Crystal
Once you have selected the right crystal oscillator, you will need to connect it to your STM32 microcontroller correctly. The crystal oscillator should be connected to the X1 and X2 pins of your STM32 microcontroller. Additionally, two capacitors (usually 22pF) should be connected in parallel with the crystal to stabilize the oscillation.
Step 3: Configuring the STM32 Microcontroller
After connecting the crystal oscillator to your STM32 microcontroller, you will need to configure the microcontroller to use the external crystal as its clock source. This can be done in the STM32CubeMX software by setting the HSE (High-Speed External) as the clock source and choosing the correct crystal frequency. Additionally, you will need to enable the HSE bypass mode if your crystal oscillator requires it.
Step 4: Programming the STM32 Microcontroller
Once you have connected and configured the external crystal with your STM32 microcontroller, you can now start programming your microcontroller. When writing your code, make sure to initialize the RCC (Reset and Clock Control) to use the external crystal as the system clock source. This will ensure that your microcontroller runs at the desired frequency provided by the external crystal oscillator.
Step 5: Testing the Crystal Oscillator
Finally, it is essential to test the crystal oscillator to ensure that it is functioning correctly. You can do this by monitoring the clock signal on the X1 pin using an oscilloscope. The waveform should be a stable square wave at the frequency of the crystal oscillator. If the waveform is unstable or incorrect, double-check your connections and configurations.
By following these steps, you can successfully use an external crystal oscillator with your STM32 microcontroller. This will provide precise timing and stable communication for your projects that require it.