How to Interface a Temperature Sensor with a PIC Microcontroller
Temperature sensors are essential components in various electronic projects, providing vital data needed for controlling and monitoring processes. In this guide, we will explore how to interface a temperature sensor with a PIC microcontroller, enabling you to read temperature values and incorporate them into your projects.
Choosing a Temperature Sensor
Before we get into the details of interfacing a temperature sensor with a PIC microcontroller, it’s crucial to select the right sensor for the job. There are various types of temperature sensors available, such as thermocouples, resistance temperature detectors (RTDs), and thermistors. Each sensor type has its advantages and disadvantages, so make sure to choose the one that best suits your project requirements.
For this guide, we will be using a popular and easy-to-use sensor, the LM35 temperature sensor. The LM35 is a precision integrated-circuit temperature sensor that provides an output voltage proportional to the temperature.
Interfacing the LM35 Temperature Sensor with a PIC Microcontroller
Now that we have chosen our temperature sensor, let’s dive into the process of connecting it to a PIC microcontroller. Here’s a step-by-step guide to interface the LM35 temperature sensor with a PIC microcontroller:
Step 1: Gather the Required Components
- PIC Microcontroller (e.g., PIC16F877A)
- LM35 Temperature Sensor
- Connecting Wires
- Breadboard
- Power Supply
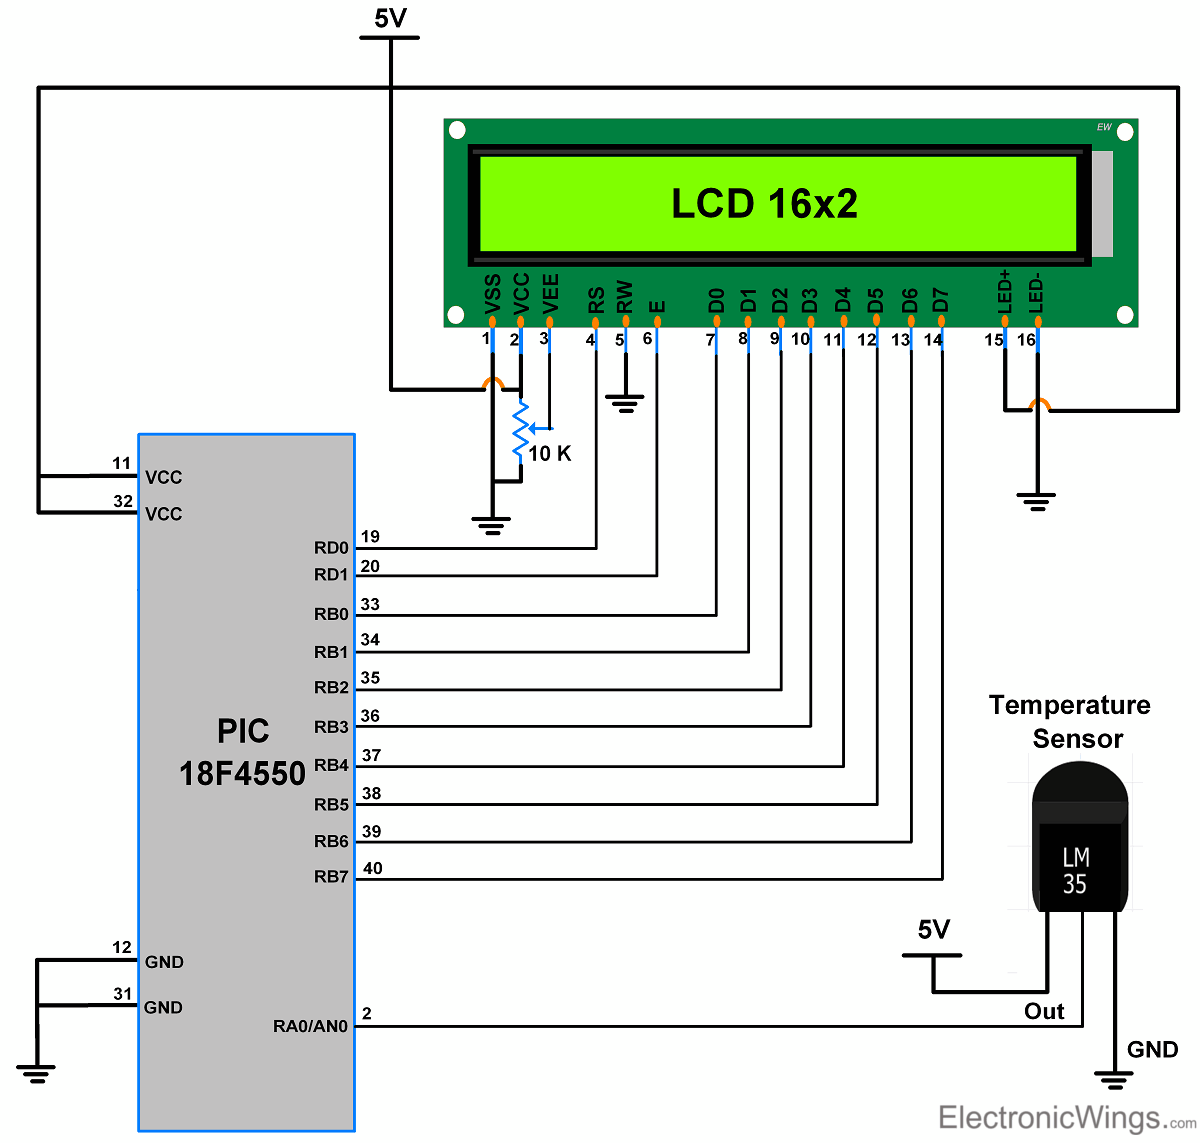
Step 2: Build the Circuit
Connect the LM35 temperature sensor to the PIC microcontroller as follows:
- VOUT of LM35 → Analog input pin of PIC microcontroller
- VSS of LM35 → Ground
- VCC of LM35 → Power Supply
Step 3: Write the Code
Next, write a simple code in MPLAB IDE to read the analog voltage from the LM35 sensor and convert it into temperature values. Here’s a sample code snippet in C:
#include

#define _XTAL_FREQ 8000000

void main() {
    ADCON1 = 0x80;
    TRISA0 = 1;

    while(1){
        GO_DONE = 1;
        while(GO_DONE);
        unsigned int temp = ADRES;
        temp = (temp * 500.0) / 1024.0;
    }
}
Step 4: Upload the Code to the PIC Microcontroller
After writing the code, compile it and upload it to your PIC microcontroller using a suitable programmer. Once uploaded, power up the circuit and start receiving temperature values from the LM35 sensor.
Conclusion
Interfacing a temperature sensor with a PIC microcontroller is a simple yet crucial process in many electronic projects. By following the steps outlined in this guide, you can easily integrate temperature sensing capabilities into your PIC-based projects. Experiment with different sensors and codes to enhance your understanding of temperature measurement and control.
Remember, the key to successful interfacing lies in choosing the right sensor, building the circuit correctly, writing efficient code, and testing the system thoroughly. With practice and experimentation, you can master the art of temperature sensor interfacing and create innovative projects that rely on accurate temperature data.
Happy tinkering!
Was this helpful?
0 / 0