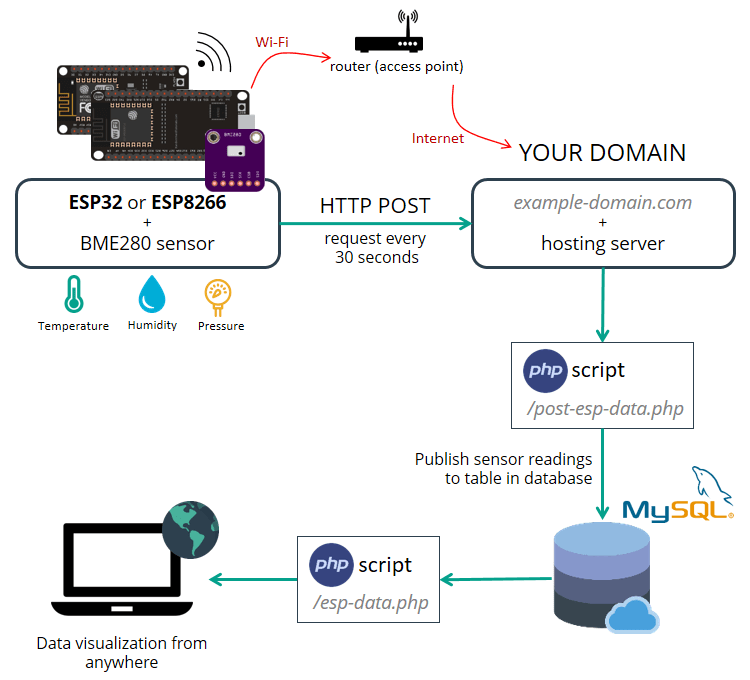
How to Set Up Wi-Fi on an ESP8266
Setting up Wi-Fi on an ESP8266 can seem like a daunting task, but with the right guidance, it can be a straightforward process. In this guide, we will walk you through the steps to connect your ESP8266 to your Wi-Fi network so that you can start building amazing IoT projects.
Step 1: Gather Your Materials
Before you begin, make sure you have all the necessary materials on hand:
- ESP8266 development board
- USB cable
- Computer with Arduino IDE installed
- Wi-Fi network and password
Step 2: Set Up Your Arduino IDE
If you haven’t already, download and install the Arduino IDE on your computer. Open the Arduino IDE and go to File > Preferences. In the “Additional Board Manager URLs” field, add the following URL: http://arduino.esp8266.com/stable/package_esp8266com_index.json. This will allow you to install the ESP8266 board package.
Step 3: Install the ESP8266 Board Package
Go to Tools > Board > Boards Manager in the Arduino IDE. Search for “esp8266” and install the board package. Select your ESP8266 board from the Tools > Board menu.
Step 4: Write the Code
Now it’s time to write the code that will connect your ESP8266 to your Wi-Fi network. Here’s a simple example:
#include <ESP8266WiFi.h>

const char* ssid = "YourNetworkName";
const char* password = "YourNetworkPassword";

void setup() {
  Serial.begin(115200);

  WiFi.begin(ssid, password);

  while (WiFi.status() != WL_CONNECTED) {
    delay(500);
    Serial.print(".");
  }

  Serial.println("");
  Serial.println("Wi-Fi connected");
  Serial.println("IP address: ");
  Serial.println(WiFi.localIP());
}

void loop() {

}
Step 5: Upload the Code
Connect your ESP8266 to your computer with the USB cable. In the Arduino IDE, select the correct port under Tools > Port and click the upload button. Once the code has been uploaded, open the serial monitor to view the IP address of your ESP8266.
Step 6: Test the Connection
Disconnect the ESP8266 from your computer and power it using an external power source. Your ESP8266 should now be connected to your Wi-Fi network. You can test the connection by pinging the IP address displayed on the serial monitor.
Congratulations! You have successfully set up Wi-Fi on your ESP8266. You are now ready to start building your own IoT projects. Happy coding!