How to Use a GPIO Expander with ESP32
GPIO expanders are a great way to increase the number of IO pins available on a microcontroller, such as the popular ESP32. These devices allow you to connect multiple sensors, switches, and other peripherals to your microcontroller without running out of pins. In this guide, we will show you how to use a GPIO expander with an ESP32.
What is a GPIO Expander?
A GPIO expander is a device that allows you to expand the number of general-purpose input/output (GPIO) pins available on a microcontroller. It communicates with the microcontroller through a standard communication protocol, such as I2C or SPI, and provides additional pins that can be used to connect external devices.
Materials Needed
- ESP32 development board
- GPIO expander module (e.g., MCP23017, PCF8574)
- Jumper wires
- Breadboard
- Sensors or other peripherals
Connecting the GPIO Expander
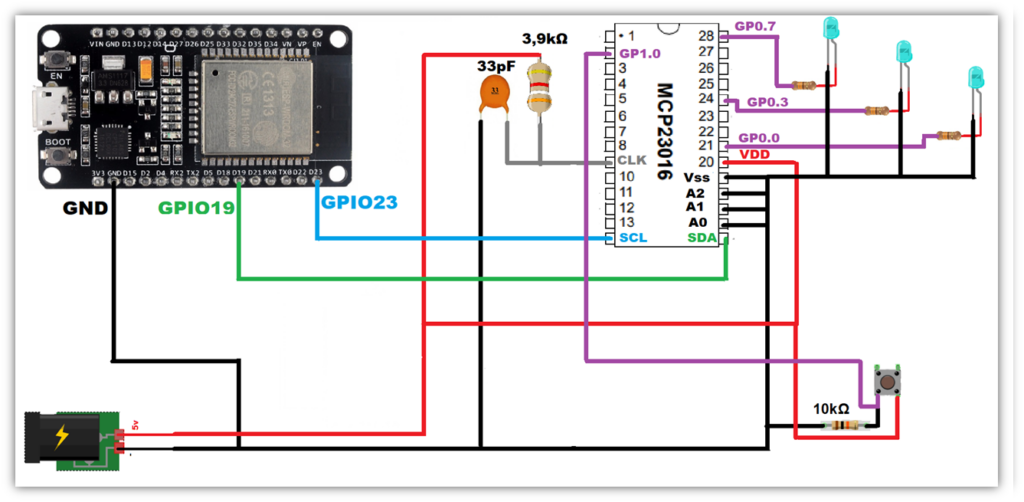
First, connect the GPIO expander module to your ESP32 using jumper wires. Make sure to check the pinout of both devices and connect the SDA and SCL pins of the expander to the corresponding pins on the ESP32. Additionally, connect the VCC and GND pins to the appropriate power and ground pins on the ESP32.
Next, connect any sensors or peripherals you want to use to the remaining GPIO pins of the expander. You can now control these devices using the GPIO expander through the ESP32.
Programming the GPIO Expander
To use the GPIO expander with the ESP32, you will need to write code that communicates with the expander module through the I2C or SPI interface. You can use libraries such as Adafruit MCP23017 or Arduino Wire.h to simplify the communication process.
In your code, you can set the direction (input or output) of each GPIO pin on the expander and read or write data to those pins. This allows you to easily interface with external devices using the expanded GPIO pins.
Example Code
```cpp
#include

Adafruit_MCP23017 mcp;

void setup() {
  mcp.begin();
  mcp.pinMode(0, OUTPUT);
}

void loop() {
  mcp.digitalWrite(0, HIGH);
  delay(1000);
  mcp.digitalWrite(0, LOW);
  delay(1000);
}
```
In this example code, we initialize the MCP23017 GPIO expander and set pin 0 as an output. We then toggle the state of pin 0 every second, demonstrating how to control an external device connected to the GPIO expander.
Conclusion
Using a GPIO expander with an ESP32 allows you to expand the number of GPIO pins available for connecting external devices to your microcontroller. By following the steps outlined in this guide, you can easily interface with sensors, switches, and other peripherals using the expanded GPIO pins provided by the expander module.
Experiment with different sensors and devices to create exciting projects with your ESP32 and GPIO expander. Have fun exploring the possibilities of expanding your microcontroller’s IO capabilities!
How to Use a GPIO Expander with ESP32
GPIO expanders are a great way to increase the number of IO pins available on a microcontroller, such as the popular ESP32. These devices allow you to connect multiple sensors, switches, and other peripherals to your microcontroller without running out of pins. In this guide, we will show you how to use a GPIO expander with an ESP32.
What is a GPIO Expander?
A GPIO expander is a device that allows you to expand the number of general-purpose input/output (GPIO) pins available on a microcontroller. It communicates with the microcontroller through a standard communication protocol, such as I2C or SPI, and provides additional pins that can be used to connect external devices.
Materials Needed
- ESP32 development board
- GPIO expander module (e.g., MCP23017, PCF8574)
- Jumper wires
- Breadboard
- Sensors or other peripherals
Connecting the GPIO Expander
First, connect the GPIO expander module to your ESP32 using jumper wires. Make sure to check the pinout of both devices and connect the SDA and SCL pins of the expander to the corresponding pins on the ESP32. Additionally, connect the VCC and GND pins to the appropriate power and ground pins on the ESP32.
Next, connect any sensors or peripherals you want to use to the remaining GPIO pins of the expander. You can now control these devices using the GPIO expander through the ESP32.
Programming the GPIO Expander
To use the GPIO expander with the ESP32, you will need to write code that communicates with the expander module through the I2C or SPI interface. You can use libraries such as Adafruit MCP23017 or Arduino Wire.h to simplify the communication process.
In your code, you can set the direction (input or output) of each GPIO pin on the expander and read or write data to those pins. This allows you to easily interface with external devices using the expanded GPIO pins.
Example Code
```cpp
#include

Adafruit_MCP23017 mcp;

void setup() {
  mcp.begin();
  mcp.pinMode(0, OUTPUT);
}

void loop() {
  mcp.digitalWrite(0, HIGH);
  delay(1000);
  mcp.digitalWrite(0, LOW);
  delay(1000);
}
```
In this example code, we initialize the MCP23017 GPIO expander and set pin 0 as an output. We then toggle the state of pin 0 every second, demonstrating how to control an external device connected to the GPIO expander.
Conclusion
Using a GPIO expander with an ESP32 allows you to expand the number of GPIO pins available for connecting external devices to your microcontroller. By following the steps outlined in this guide, you can easily interface with sensors, switches, and other peripherals using the expanded GPIO pins provided by the expander module.
Experiment with different sensors and devices to create exciting projects with your ESP32 and GPIO expander. Have fun exploring the possibilities of expanding your microcontroller’s IO capabilities!