How to Use an I2C Display with Arduino
Are you looking to add a display to your Arduino project? Using an I2C display with Arduino is a cost-effective and efficient way to display information. In this article, we will guide you through the process of connecting and using an I2C display with your Arduino board.
What is I2C?
I2C, or Inter-Integrated Circuit, is a communication protocol that allows multiple devices to communicate with each other using only two wires. This makes it ideal for connecting multiple devices to a microcontroller like Arduino.
Why Use an I2C Display?
Using an I2C display with Arduino has several advantages. It allows you to save on pins, as I2C displays only require two pins for communication. This leaves more pins available for other sensors or components in your project. Additionally, I2C displays are easy to use and can display text, numbers, and even graphics.
Connecting the I2C Display to Arduino
To connect an I2C display to your Arduino, you will need to make sure you have the following components:
- Arduino board
- I2C display
- Jumper wires
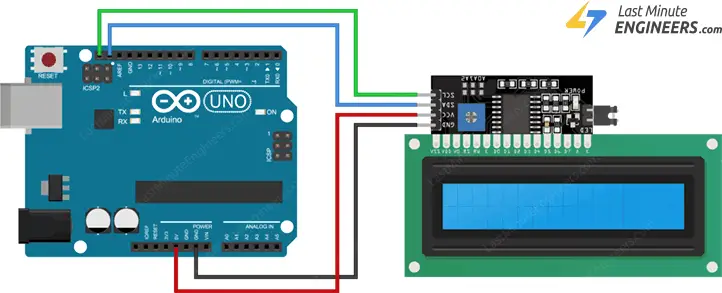
Connect the SDA pin on the I2C display to the A4 pin on your Arduino board, and connect the SCL pin to the A5 pin. Additionally, connect the VCC pin to 5V and the GND pin to GND on your Arduino board.
Installing Libraries
Before you can start using the I2C display with Arduino, you will need to install the necessary libraries. Open the Arduino IDE, go to Sketch > Include Library > Manage Libraries, and search for “LiquidCrystal_I2C.” Click on Install to add the library to your IDE.
Displaying Text on the I2C Display
Now that you have connected the I2C display and installed the library, you can start displaying text on the screen. Open a new sketch in the Arduino IDE and paste the following code:
Code Example:
#include <Wire.h>
#include <LiquidCrystal_I2C.h>

LiquidCrystal_I2C lcd(0x27, 16, 2);

void setup() {
   lcd.begin();
   lcd.backlight();
   lcd.setCursor(0, 0);
   lcd.print("Hello, World!");
}

void loop() {
   // Your code here
}
Replace “Hello, World!” with the text you want to display on the screen. Upload the sketch to your Arduino board, and you should see the text appear on the I2C display.
Conclusion
Using an I2C display with Arduino is a simple and effective way to add a display to your projects. By following the steps outlined in this article, you can easily connect and start using an I2C display with your Arduino board. Experiment with different text and graphics to create engaging and interactive displays for your projects.
How to Use an I2C Display with Arduino
Are you looking to add a display to your Arduino project? Using an I2C display with Arduino is a cost-effective and efficient way to display information. In this article, we will guide you through the process of connecting and using an I2C display with your Arduino board.
What is I2C?
I2C, or Inter-Integrated Circuit, is a communication protocol that allows multiple devices to communicate with each other using only two wires. This makes it ideal for connecting multiple devices to a microcontroller like Arduino.
Why Use an I2C Display?
Using an I2C display with Arduino has several advantages. It allows you to save on pins, as I2C displays only require two pins for communication. This leaves more pins available for other sensors or components in your project. Additionally, I2C displays are easy to use and can display text, numbers, and even graphics.
Connecting the I2C Display to Arduino
To connect an I2C display to your Arduino, you will need to make sure you have the following components:
- Arduino board
- I2C display
- Jumper wires
Connect the SDA pin on the I2C display to the A4 pin on your Arduino board, and connect the SCL pin to the A5 pin. Additionally, connect the VCC pin to 5V and the GND pin to GND on your Arduino board.
Installing Libraries
Before you can start using the I2C display with Arduino, you will need to install the necessary libraries. Open the Arduino IDE, go to Sketch > Include Library > Manage Libraries, and search for “LiquidCrystal_I2C.” Click on Install to add the library to your IDE.
Displaying Text on the I2C Display
Now that you have connected the I2C display and installed the library, you can start displaying text on the screen. Open a new sketch in the Arduino IDE and paste the following code:
Code Example:
#include <Wire.h>
#include <LiquidCrystal_I2C.h>

LiquidCrystal_I2C lcd(0x27, 16, 2);

void setup() {
   lcd.begin();
   lcd.backlight();
   lcd.setCursor(0, 0);
   lcd.print("Hello, World!");
}

void loop() {
   // Your code here
}
Replace “Hello, World!” with the text you want to display on the screen. Upload the sketch to your Arduino board, and you should see the text appear on the I2C display.
Conclusion
Using an I2C display with Arduino is a simple and effective way to add a display to your projects. By following the steps outlined in this article, you can easily connect and start using an I2C display with your Arduino board. Experiment with different text and graphics to create engaging and interactive displays for your projects.