How to Use an ATtiny85 with Arduino
Are you looking to expand your Arduino projects and capabilities? Then integrating an ATtiny85 microcontroller into your projects might be the next step for you. In this article, we will guide you on how to use the ATtiny85 with Arduino, opening up a world of possibilities for your DIY projects and prototyping.
What is an ATtiny85?
The ATtiny85 is a low-power, high-performance 8-bit AVR microcontroller from Atmel, which is commonly used in embedded systems and Arduino projects. It comes in a compact 8-pin configuration, making it ideal for small projects that require microcontroller integration.
Hardware Required
- Arduino UNO or any other Arduino board
- ATtiny85 microcontroller
- Breadboard
- Jumper wires
- 10uF capacitor
- 330-ohm resistor
Step-by-Step Guide
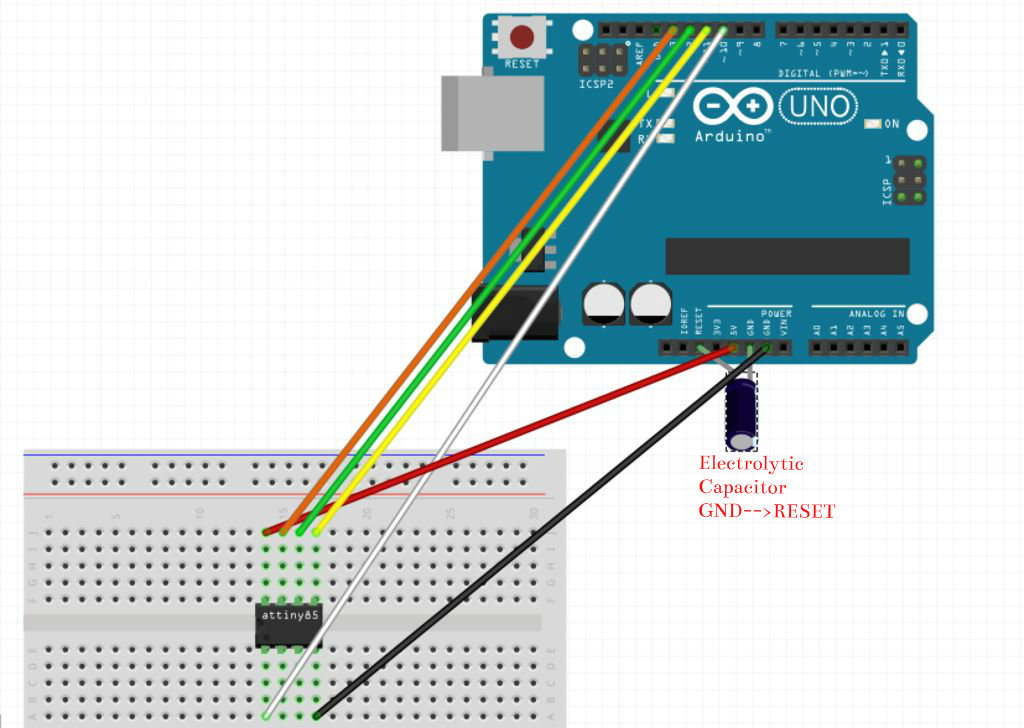
1. Connect ATtiny85 to Arduino
Start by connecting the ATtiny85 to your Arduino board. You can do this by following the schematic provided by Arduino in their documentation. Make sure to correctly connect the power, ground, and programming pins between the Arduino and ATtiny85.
2. Prepare Arduino IDE
Open the Arduino IDE and go to File > Preferences. In the Additional Boards Manager URLs field, add the following URL: https://raw.githubusercontent.com/damellis/attiny/ide-1.6.x-boards-manager/package_damellis_attiny_index.json
Next, go to Tools > Board > Boards Manager and install the ATtiny boards package. This will allow you to program the ATtiny85 from the Arduino IDE.
3. Upload Blink Sketch
Write a simple blink sketch in the Arduino IDE, similar to the one for an Arduino board. Make sure to select the ATtiny85 board and the correct programmer before uploading the sketch to your ATtiny85 microcontroller.
4. Test Your ATtiny85
Once you have successfully uploaded the blink sketch to your ATtiny85, test it by observing the LED connected to pin 0 of the microcontroller. If the LED blinks at the desired rate, you have successfully programmed your ATtiny85 using Arduino.
Conclusion
Integrating an ATtiny85 with Arduino opens up a wide range of possibilities for your projects. Whether you want to create compact and low-power devices or simply expand your Arduino knowledge, the ATtiny85 is a versatile microcontroller that can take your projects to the next level.
By following the steps outlined in this guide, you can start experimenting with the ATtiny85 in your Arduino projects and unlock new opportunities for creativity and innovation. Have fun exploring the capabilities of the ATtiny85 and see where your imagination takes you!
Was this helpful?
0 / 0