How to Program an ATmega328P Microcontroller
Are you interested in programming microcontrollers but don’t know where to start? Programming an ATmega328P microcontroller is a great way to dip your toes into the world of embedded systems and electronics. In this article, we will walk you through the process of programming an ATmega328P microcontroller from start to finish.
What is an ATmega328P Microcontroller?
The ATmega328P is a popular microcontroller that is commonly used in Arduino boards. It is based on the AVR RISC architecture and has 32KB of flash memory, 2KB of SRAM, and 1KB of EEPROM. The ATmega328P has 23 general-purpose I/O pins, 6 PWM channels, 6 ADC channels, and supports SPI, I2C, and UART communication protocols.
Setting up Your Development Environment
Before you can start programming your ATmega328P microcontroller, you will need to set up your development environment. The most popular way to program an ATmega328P is to use the Arduino IDE. You can download the Arduino IDE for free from the Arduino website and install it on your computer.
Once you have installed the Arduino IDE, you will need to install the necessary drivers for your ATmega328P microcontroller. You can find the drivers on the Arduino website or through the device manager on your computer.
Programming the ATmega328P Microcontroller
Now that you have set up your development environment, you are ready to start programming your ATmega328P microcontroller. The easiest way to program the ATmega328P is to use the Arduino IDE and write your code in the Arduino programming language. The Arduino language is based on C/C++ and is easy to learn for beginners.
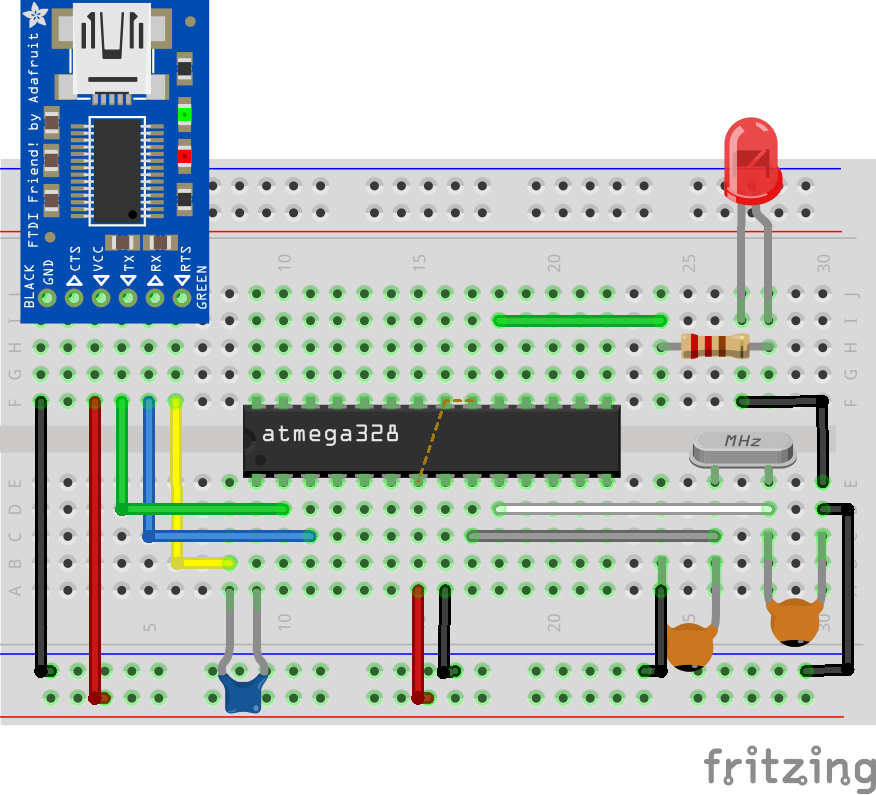
To program the ATmega328P using the Arduino IDE, you will need to connect your ATmega328P to your computer using a USB to serial adapter. You can find many tutorials online on how to do this. Once your ATmega328P is connected, you can select the correct board and COM port in the Arduino IDE and upload your code to the microcontroller.
Testing Your Program
After you have uploaded your code to the ATmega328P microcontroller, it’s time to test your program. You can use a variety of tools to test your program, such as LEDs, switches, sensors, and displays. Make sure to carefully test each function of your program to ensure that it works correctly.
Next Steps
Congratulations! You have successfully programmed an ATmega328P microcontroller. Now that you have mastered the basics, you can explore more advanced topics such as interrupt handling, analog-to-digital conversion, and serial communication. The possibilities are endless when it comes to programming microcontrollers, so keep experimenting and learning!
Conclusion
Programming an ATmega328P microcontroller is a fun and rewarding experience. By following the steps outlined in this article, you can start creating your own embedded systems projects and bring your ideas to life. Remember to be patient and persistent, as programming microcontrollers can be challenging but also incredibly satisfying. Happy programming!
Was this helpful?
0 / 0